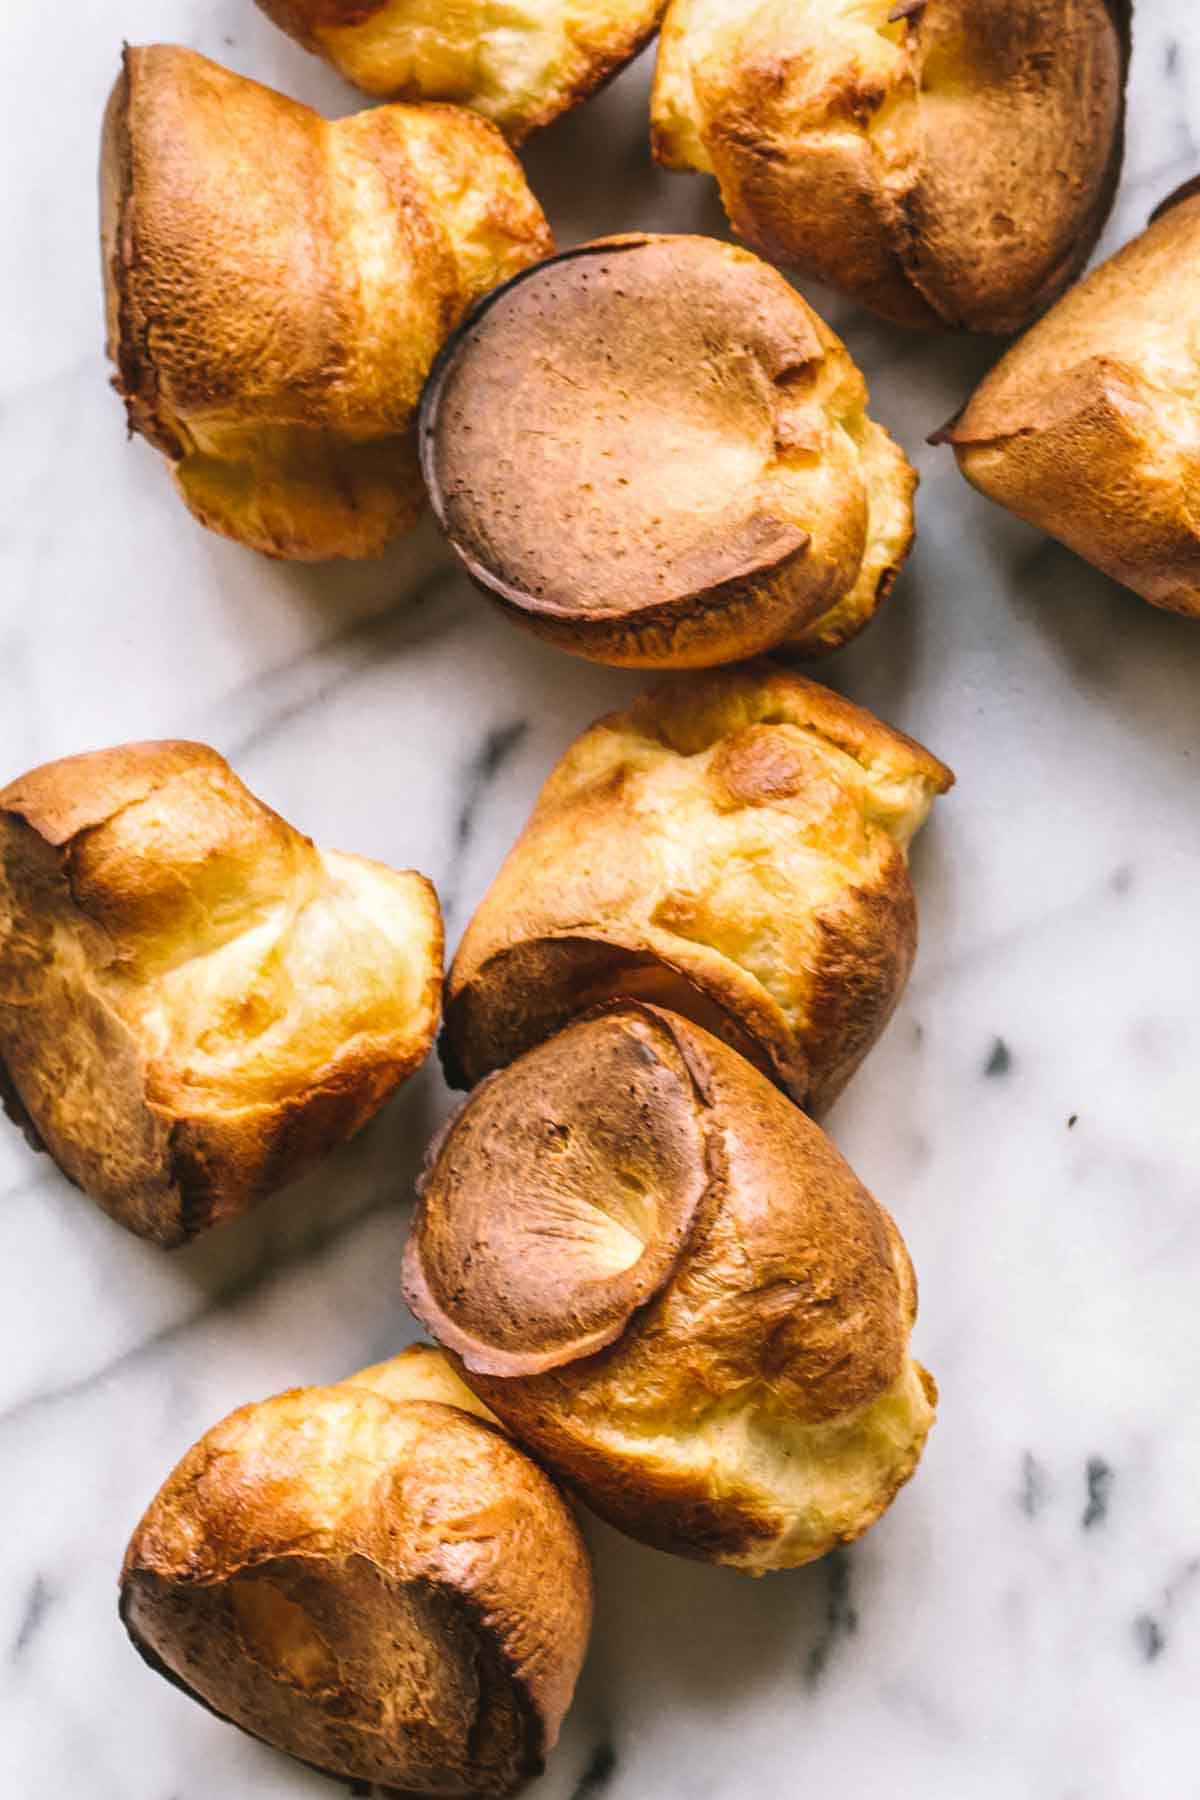
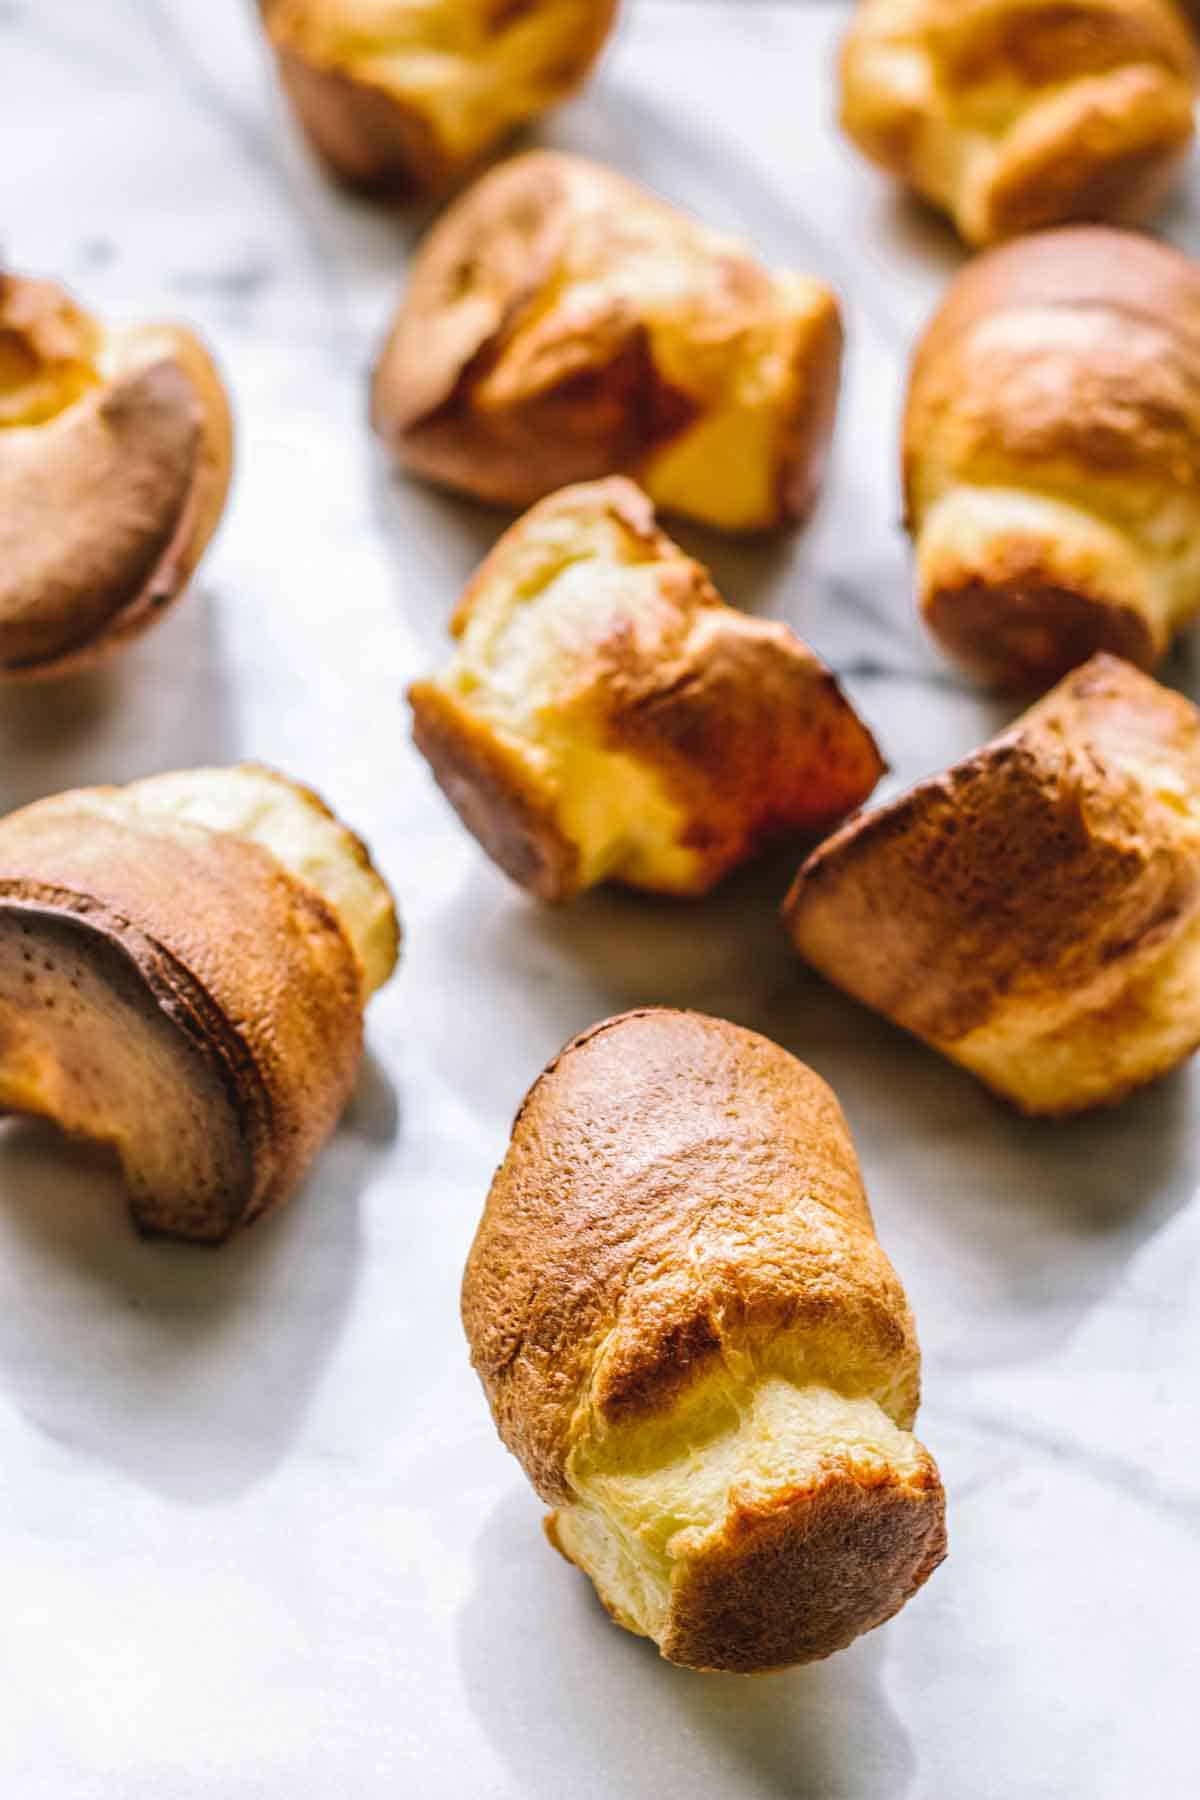
Easy Muffin Tin Popovers
Made using 7 baking staples and a standard muffin tin, these fail-proof popovers are guaranteed to come out light and airy with caramelized and golden edges. This easy recipe will show you how to make these perfect mini breakfast or brunch treats without using any special equipment, plus some very helpful tips.
No need to invest in a unitasking piece of equipment such as a popover pan to get perfectly baked popovers every morning!
All you need is a regular muffin tin, the right ingredients, and a few simple techniques to achieve sky-high, light, and crispy popovers of your dreams.
These popovers are smaller and quicker to make, perfect for on-the-go snacking or an easy pick-me-up. Light and versatile, they're delicious on their own or paired with sweet spreads and savory toppings for breakfast, brunch, or even dessert.
They would make the ideal Christmas breakfast goodies together with some cinnamon toast cookies and strawberry and goat cheese pop tarts.
For more breads and pizzas, try my white pizza recipe, easy homemade croutons, or easy focaccia.
Why This Recipe Works
- No special equipment needed!
- This recipe requires ingredients that you most probably have in your pantry and fridge.
- Much like most delicious carby treats these popovers hold up exceptionally well in the freezer.
Milk - The key to making tall, fluffy, and airy popovers is to use 1% low-fat milk. High-fat milk will weigh down the popovers and will keep them from rising to their full potential. 2% is okay if you have that already.
Bread flour- The higher protein count in bread flour provides more structure to the popovers, so they rise higher, get crispier, and hold their shape better.
Vegetable shortening- I use non-hydrogenated vegetable shortening such as Spectrum Organic. Butter is not recommended for greasing the pans due to its water content. A cooking spray can be used as a substitute.
*Find the full ingredient list in the recipe card below!
Helpful Equipment
- Muffin tin
- Small saucepan
- Whisk
How to make muffin tin popovers
- Melt the butter in a small saucepan over medium heat, then add in the milk, sugar and salt. Stir until the sugar and salt dissolve and the milk is warm to the touch. Remove from the heat. In a medium bowl, whisk together the eggs until they're light and frothy, about 3 minutes.
Pro Tip: Always use room-temperature eggs and milk. This will make it easier to mix the ingredients together and result in a smooth batter.
- Sift in the flour, one cup at a time, and whisk until no lumps remain. Cover the batter and let rest for an hour.
- Preheat the oven to 450°F, then grease the outer 10 muffin cups on a pan, leaving the inner two cups ungreased. Place the muffin tin in the oven to heat up for about 5-10 minutes.
- Remove the muffin tin from the oven, then whisk the batter to recombine. Pour the batter into the cups about ¼ inch away from the top, leaving the middle two cups empty.
Pro Tip: Do not overfill the muffin cups. Only fill them ¾ of the way to give them space to rise as they bake without over-spilling.
- Bake, without opening the oven door until browned, about 15-20 minutes. Lower the oven temperature to 300°F, and continue to bake for an additional 10 minutes.
Pro Tip: Once the popovers are in the oven, avoid opening the oven door, especially during the initial baking period. Sudden temperature changes can cause them to deflate.
- Use a skewer to poke a small hole in the top of each popover, return to the oven and bake for an additional 5-10 minutes, or until deep golden brown.
- Remove popovers from the pan and serve immediately.
Tips for Success
- Do not over-mix the batter. Overmixing can result in dense popovers, so stop as soon as the batter is smooth and everything is incorporated.
- Let the batter rest. This will help the bread flour fully absorb the liquid for better texture.
- Leaving the middle two muffin cups empty will promote even cooking.
- To help the steam escape and prevent the popovers from becoming too doughy inside, pierce each popover with a skewer or toothpick a few minutes before the end of the baking time.
Serving Suggestions
Serve the poppers warm! Enjoy them plain, slathered with butter and jam, doused with maple brown butter, dipped in a creamy soup, and stuffed with ricotta scrambled eggs and homemade bacon.
They are so good, that we even have them loaded with melted chocolate chips for dessert!
FAQs
Muffin tin popovers are smaller versions of the classic baked using a standard muffin tin.
The batter can be made ahead of time and refrigerated for up to one day. Bring to room temperature before baking.
Freeze leftover popovers in an airtight zip-top bag for up to 6 months. To reheat, just pop them in the toaster oven to reheat and they'll taste as awesome as when they first came out the oven.
It's all about getting those popovers to cook and set right from the get-go. The hot surface helps create steam quickly, which is vital for the quick expansion and popping over of the popovers.


Did you LOVE this recipe? Please leave a star ⭐️ rating and comment and tag your creations @ColeyCooks on Instagram!
Want to Save This Recipe?
Enter your email & I'll send it to your inbox.
By submitting this form, you consent to receive emails from Coley Cooks.

Perfect Muffin Tin Popovers
Ingredients
- 3 tablespoons unsalted butter
- 2 cups 1% low fat milk 1% is best, but 2% is okay if you have it already
- 1 teaspoon salt
- 2 teaspoons sugar
- 3 large eggs
- 2 cups bread flour
- vegetable shortening* or cooking spray for greasing pans
Instructions
- Melt the butter in a small saucepan over medium heat, then add in the milk, sugar and salt. Stir until the sugar and salt dissolve and the milk is warm to the touch. Remove from the heat. In a medium bowl, whisk together the eggs until they're light and frothy, about 3 minutes.
- Sift in the flour, one cup at a time, and whisk until no lumps remain. Cover the batter and let rest for one hour.***
- Preheat the oven to 450℉, then grease the outer 10 muffin cups on a pan, leaving the inner two cups ungreased. Place the muffin tin in the oven to heat up for about 5-10 minutes.
- Remove the muffin tin from the oven, then whisk the batter to recombine. Pour the batter into the cups about ¼ inch away from the top, leaving the middle two cups empty. This will ensure even cooking, and you may have some batter leftover.
- Bake, without opening the oven door until browned, about 15-20 minutes. Lower the oven temperature to 300℉, and continue to bake for an additional 10 minutes. Use a skewer to poke a small hole in the top of each popover, return to the oven and bake for an additional 5-10 minutes, or until deep golden brown.
- Remove popovers from the pan and serve immediately.
Notes
- Butter is not recommended for greasing the pans due to its water content.
- Always use room-temperature eggs and milk. This will make it easier to mix the ingredients together and result in a smooth batter.
- Do not over-mix the batter. Overmixing can result in dense popovers, so stop as soon as the batter is smooth and everything is incorporated.
- Let the batter rest. This will help the bread flour fully absorb the liquid for better texture.
- Do not overfill the muffin cups. Only fill them ¾ of the way to give them space to rise as they bake without over-spilling.
- Leaving the middle two muffin cups empty will promote even cooking.
- Once the popovers are in the oven, avoid opening the oven door, especially during the initial baking period. Sudden temperature changes can cause them to deflate.
- To help the steam escape and prevent the popovers from deflating, pierce each popover with a skewer or toothpick a few minutes before the end of the baking time.
Nutrition
This post may contain affiliate links.

First time making popovers and they turned out perfectly!
Thank you for the clear instructions and recipe!
So glad they turned out perfectly for you! Thanks for leaving a review!
Fabulous recipe — only had whole milk & buttermilk in the house, so we mixed those together (50:50), instead of 1% milk, then used coconut oil (to grease the muffin tin) & WOW! Never tasted anything so delicious — crusty on the outside & creamy on the inside! Yum! Thank You! Thank You!
I've always wanted to make popovers but don't have the pan.. I found your video on YouTube and tried this tonight to go with our Irish lamb stew. They were really, really good! Mine didn't collapse like yours did, but once you broke into them they are soft and hollow inside. I'll definitely make these again - they are so easy, and I am terrible about planning ahead to make real bread, so these are a definite hit with me! Thanks for posting them!
I'm so glad they turned out well!! I absolutely fell in love with this recipe, and I'm happy you did too! 🙂
These look so good! I've never tried popovers before but I am TOTALLY giving this a whirl 🙂
Ahhh you MUST give them a try!! They're like little crispy air clouds.