Brown Butter Chocolate Chip Cookies
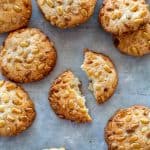
These brown butter chocolate chip cookies will ruin you for all other cookies! With their irresistible crispy edges, chewy centers and melty pools of chocolate, they are a cookie lover's dream.
The addition of browned butter gives them a subtle nutty, caramelized flavor, and a little flaky sea salt on top creates the perfect salty-sweet balance to keep you reaching for just one more!

I'm obsessed with chocolate chip cookies, or CCC's as we call them, and this brown butter version might just be the best I've ever made.
While I love my classic crispy, chewy Chocolate Chip Cookies, and my mom's famous Oatmeal Chocolate Chip Cookies, the extra step of browning the butter elevates these cookies to something truly special.
The toasty notes from the browned butter complement both dark and semisweet chocolate perfectly. The nutty aroma that fills your kitchen is worth the effort, but the rich, caramelized flavor that develops in the final cookie is absolutely next level!
These cookies come out crispy on the outside, chewy on the inside, and are loaded with melty pools of chocolate. What are you waiting for? MAKE THEM!
Love CCC's too? Try my decadent Chocolate Toffee Chunk Cookies with big candy pieces, these coffee spiked Chocolate Chip Espresso Shortbreads that are slice-and-bake, or these chewy Chocolate Chip Cookies with Almond Flour.
Why This Recipe Works
- Brown butter adds a deep, nutty flavor as milk solids caramelize.
- Egg plus egg yolk creates the perfect crispy-edge, chewy-center texture.
- Chilling the dough prevents spreading and develops complex flavors.
- Flaky sea salt enhances sweetness and adds irresistible contrast.

Ingredient Notes
Vanilla Extract - Use high-quality pure vanilla extract for the best flavor. I recommend trying my homemade vanilla extract for an extra special touch that makes a noticeable difference.
Unsalted Butter - The star of this recipe transforms through the browning process. Using high quality unsalted butter gives you complete control over the salt content in your cookies.
Chocolate - Use really good quality chocolate - bittersweet, semi-sweet, or a combination of both for complexity. While chocolate chips work perfectly fine, chopping a bar of chocolate into chunks creates those beautiful melty pools throughout the cookies that make them extra special.
Flaky Sea Salt - I prefer Maldon sea salt for its big, thin flakes that provide the perfect finishing touch. This coarse sea salt creates an ideal balance with the sweetness and enhances all the flavors in the cookie.
Dark Brown Sugar - Adds essential moisture and a rich molasses flavor that beautifully enhances the nutty notes from the browned butter.
*Find the full ingredient list in the recipe card below!
Helpful Equipment
- Medium saucepan or medium skillet for browning butter
- Stand mixer or electric mixer (a wooden spoon works too)
- Mixing bowl (large bowl) and small bowl
- Rubber spatula
- Baking sheet or cookie sheet
- Parchment paper
- Cookie scoop or ice cream scoop
- Wire rack or cooling rack for baked cookies
Step by Step Instructions


Brown the Butter
- Melt butter in a medium saucepan over medium heat, swirling until it bubbles.
- Watch carefully until the milk solids at the bottom of the pan turn golden brown and release a nutty aroma.
- Remove immediately and pour into a bowl to stop the cooking process.
- Cool browned butter to room temperature until solidified but still soft. Refrigerate to speed this up if needed.
Pro Tip: The line between perfectly browned and burnt butter is thin. Look for an amber color - the milk solids should be golden brown, not black. Once it crosses that line, there's no saving it.


Make the Cookie Dough
- Beat cooled browned butter with granulated sugar and dark brown sugar for 3 minutes until fluffy.
- Add vanilla extract, egg and egg yolk. Beat for 1 minute until combined.
- In a separate small bowl, whisk together all-purpose flour, kosher salt, and baking soda.
- Add dry ingredients to wet ingredients. Mix on low just until flour is incorporated.
- Fold in chocolate chips or chopped chocolate with a rubber spatula.
- Refrigerate dough for at least 30 minutes. Overnight is even better for flavor development and texture.


Bake the Cookies
- Preheat oven to 350°F and line baking sheets with parchment paper.
- Scoop 2-tablespoon sized balls of dough onto baking sheets, 2 inches apart.
Pro Tip: Press extra chocolate chunks into dough balls for bakery-style presentation.
- Bake cookies for 12-15 minutes until golden brown around edges.
- Rest on baking sheet for 5 minutes before transferring to a wire rack.
- While still warm, sprinkle with flaky sea salt to taste.


Tips for Success
- Measure flour precisely - Too much creates dry, cakey cookies instead of chewy ones with crispy edges. Ideally, use a kitchen scale.
- Don't skip chilling - This prevents spreading and develops flavor. The dough keeps well in the refrigerator for up to 3 days.
- Add chocolate on top - Press extra chocolate chunks into dough balls before baking for bakery-style presentation.
- Slightly underbake - Pull cookies when centers look slightly underdone for perfectly chewy centers.
- Pan Bang - About 2 minutes before the cookies are finished baking, gently bang the pan on the oven rack to deflate, then continue baking. This gives them an even more beautiful texture and appearance!
Serving Suggestions
Serve these cookies warm when chocolate chunks are still melty and the contrast between crispy edges and chewy centers is most pronounced.
For something special, make ice cream sandwiches with vanilla ice cream, or pair with my Italian Affogato - the combination of espresso, ice cream, and these nutty, chocolate-studded cookies is truly incredible.
They also pair perfectly with a glass of cold milk or my Cold Brew Coffee for a more casual treat.
These homemade chocolate chip cookies make excellent gifts! Package them in an airtight container or cellophane bags tied with ribbon.

How to Store
Store cookies in an airtight container at room temperature for up to 5 days. Add a slice of bread to maintain moisture without affecting flavor.
For longer storage, freeze raw cookie dough balls for up to 3 months. Place balls of dough on a baking sheet, freeze until solid, then transfer to a freezer bag. Bake directly from frozen, adding 2-3 minutes to the baking time. The second time around will be just as delicious!
FAQ
Yes, but reduce added salt. Browning concentrates the butter's flavor, including salt.
Absolutely! Try milk chocolate for a sweeter cookie, or a combination for variety. You can also use chopped up chocolate candy for a special treat!
Look for an amber color and brown bits at the bottom of the pan. The nutty aroma is unmistakable.
There are many reasons that could cause excess spreading, such as using warm butter, not enough flour, undercreaming butter, or not chilling the dough long enough, among others. Check your recipe card to confirm all steps.
Yes! This recipe creates cookies with crispy edges and soft, chewy centers.


Did you LOVE this recipe? Please leave a star ⭐️ rating and comment and tag your creations @ColeyCooks on Instagram!
Want to Save This Recipe?
Enter your email & I'll send it to your inbox.
By submitting this form, you consent to receive emails from Coley Cooks.

Brown Butter Chocolate Chip Cookies
Ingredients
- 1 cup (2 sticks) unsalted butter
- ⅔ cup granulated sugar
- ⅔ cup dark brown sugar packed
- 2 teaspoons vanilla extract
- 1 large egg
- 1 large egg yolk
- 2 ¼ cups all-purpose flour
- 1 teaspoon salt
- 1 teaspoon baking soda
- 1½ cups semisweet or bittersweet chocolate chips OR chopped pieces of a chocolate bar
- 1 cup coarsely chopped pecans or walnuts
- flaky sea salt like Maldon, to sprinkle on top
Instructions
Brown the Butter
- First, start by melting the butter in a pan over medium heat, swirling it around until it starts to bubble and froth.
- Keep an eye on it for a few minutes, until it starts smelling nutty, and the milk solids on the bottom begin to brown.
- Remove from the heat immediately to prevent the butter from burning (this can happen FAST!) and pour into a bowl or measuring cup.
- Allow the browned butter to harden to room temperature, which will take a varying amount of time depending on how warm it is in your house. You can expedite this process by putting it in the refrigerator. You want the butter to be at room temperature, solid, but still soft.
Make the Cookie Dough
- Place the butter and both sugars in a mixing bowl and beat for about 3 minutes, until the mixture is fluffy and smooth.
- Add the vanilla extract, the egg and the egg yolk. Beat for another minute.
- Add the flour, salt and baking soda. Turn the mixer on low and beat until the flour is just incorporated, but not a second longer.
- Use a spatula to fold in the chocolate chips and nuts to avoid over mixing.
- Refrigerate the dough for at least 30 minutes before baking. Dough can be refrigerated for up to 3 days.
Bake the Cookies
- When you're ready to bake, line two baking sheets with parchment paper or a silpat and preheat the oven to 350 degrees.
- Scoop 2-tablespoon sized balls on to the baking sheets, leaving about 2 inches in between so the cookies can spread out as they bake.
- Bake the cookies for 12 to 15 minutes (longer if the dough is cold), until they're golden brown around the edges. Remove them from the oven, and allow them to rest on the baking sheet for at least 5 minutes before moving them.
- As soon as the cookies come out of the oven, sprinkle with sea salt, to taste - as much or as little as you like (I like a heavy sprinkle).
Notes
- Measure flour precisely - Too much creates dry, cakey cookies instead of chewy ones with crispy edges. Ideally, use a kitchen scale.
- Don't skip chilling - This prevents spreading and develops flavor. The dough keeps well in the refrigerator for up to 3 days.
- Add chocolate on top - Press extra chocolate chunks into dough balls before baking for bakery-style presentation.
- Slightly underbake - Pull cookies when centers look slightly underdone for perfectly chewy centers.
- Pan Bang - About 2 minutes before the cookies are finished baking, gently bang the pan on the oven rack to deflate, then continue baking. This gives them an even more beautiful texture and appearance!
Nutrition
This post may contain affiliate links.

The perfect combo of salty and sweet! Sprinkle of salt really makes it!
Yay! The salt really does make the biggest difference. Glad you liked them!
These have become our family cookies
SO glad you love the recipe! Thanks for leaving such a nice review. 🙂
As if a chocolate chip cookie couldn't get any better, you threw some ice cream into the mix. YUM. I think I know what i'll be making this evening haha!
Looks like such a good recipe, Joy always knows how to get a sweet tooth going! 🙂
Seriously, you can't go wrong with Joy's recipe. But brown all the butter. Always brown all of the butter. And when in doubt, add ice cream!!! 🙂
As if a chocolate chip cookie couldn't get any better you decide to put ice cream into the mix. YUM. I think I know what i'll be making this evening, Nicole!
Thanks for sharing this delicious recipe, Joy always knows how to get a sweet tooth going!
2393 mission street, apt 1, 94110 sf, ca. Ill be expecting a delicious package asap 😉
Brieannimal.tumblr.com Brieannrobyn.etsy.com
>
You got it boo, but you have to share with Donnel!
TOO funny!! I was just wondering why my choc. chip cookies that I JUST made (and I haven't made cookies in a while) became flat in the oven. I was searching the internet... found a couple of possibilities... then briefly checked my email to make it look like I'm actually doing something constructive on a Sunday... and HERE'S your blog about Chocolate Chip Cookies! Coincidence? I think NOT! hehehe!! Thanks for the pointers, but I wish you had posted this YESTERDAY before I made these semi-poor excuses of choc. chip cookies!
Its too late to make another batch of chocolate chip cookies.. said NO ONE EVER! lol, make a new batch, your family will LOVE THEM! XO