Homemade Pie Crust Recipe
This simple recipe for foolproof flaky pie dough will result in a perfect pie every single time. It comes together easily without a food processor or any fancy equipment and can be made up to 3 months in advance! Making a great pie crust from scratch is nothing to be afraid of and this recipe will prove it.
For more pie recipes, try my homemade peach pie, creamy cranberry pie, or Italian ricotta pie.
Why This is The Best Pie Crust Recipe
- Butter gives flavor, structure and flakiness to the dough.
- Shortening gives tenderness and makes the dough easier to work with.
- Keeping everything cold ensures pieces of fat stay intact, which will create steam pockets as they melt and result in an ultra flaky crust.
- Easy roll-and-rotate technique ensures the dough doesn't stick to the surface and rolls out into an even circle.
- Easy to make ahead and freeze for a later date.
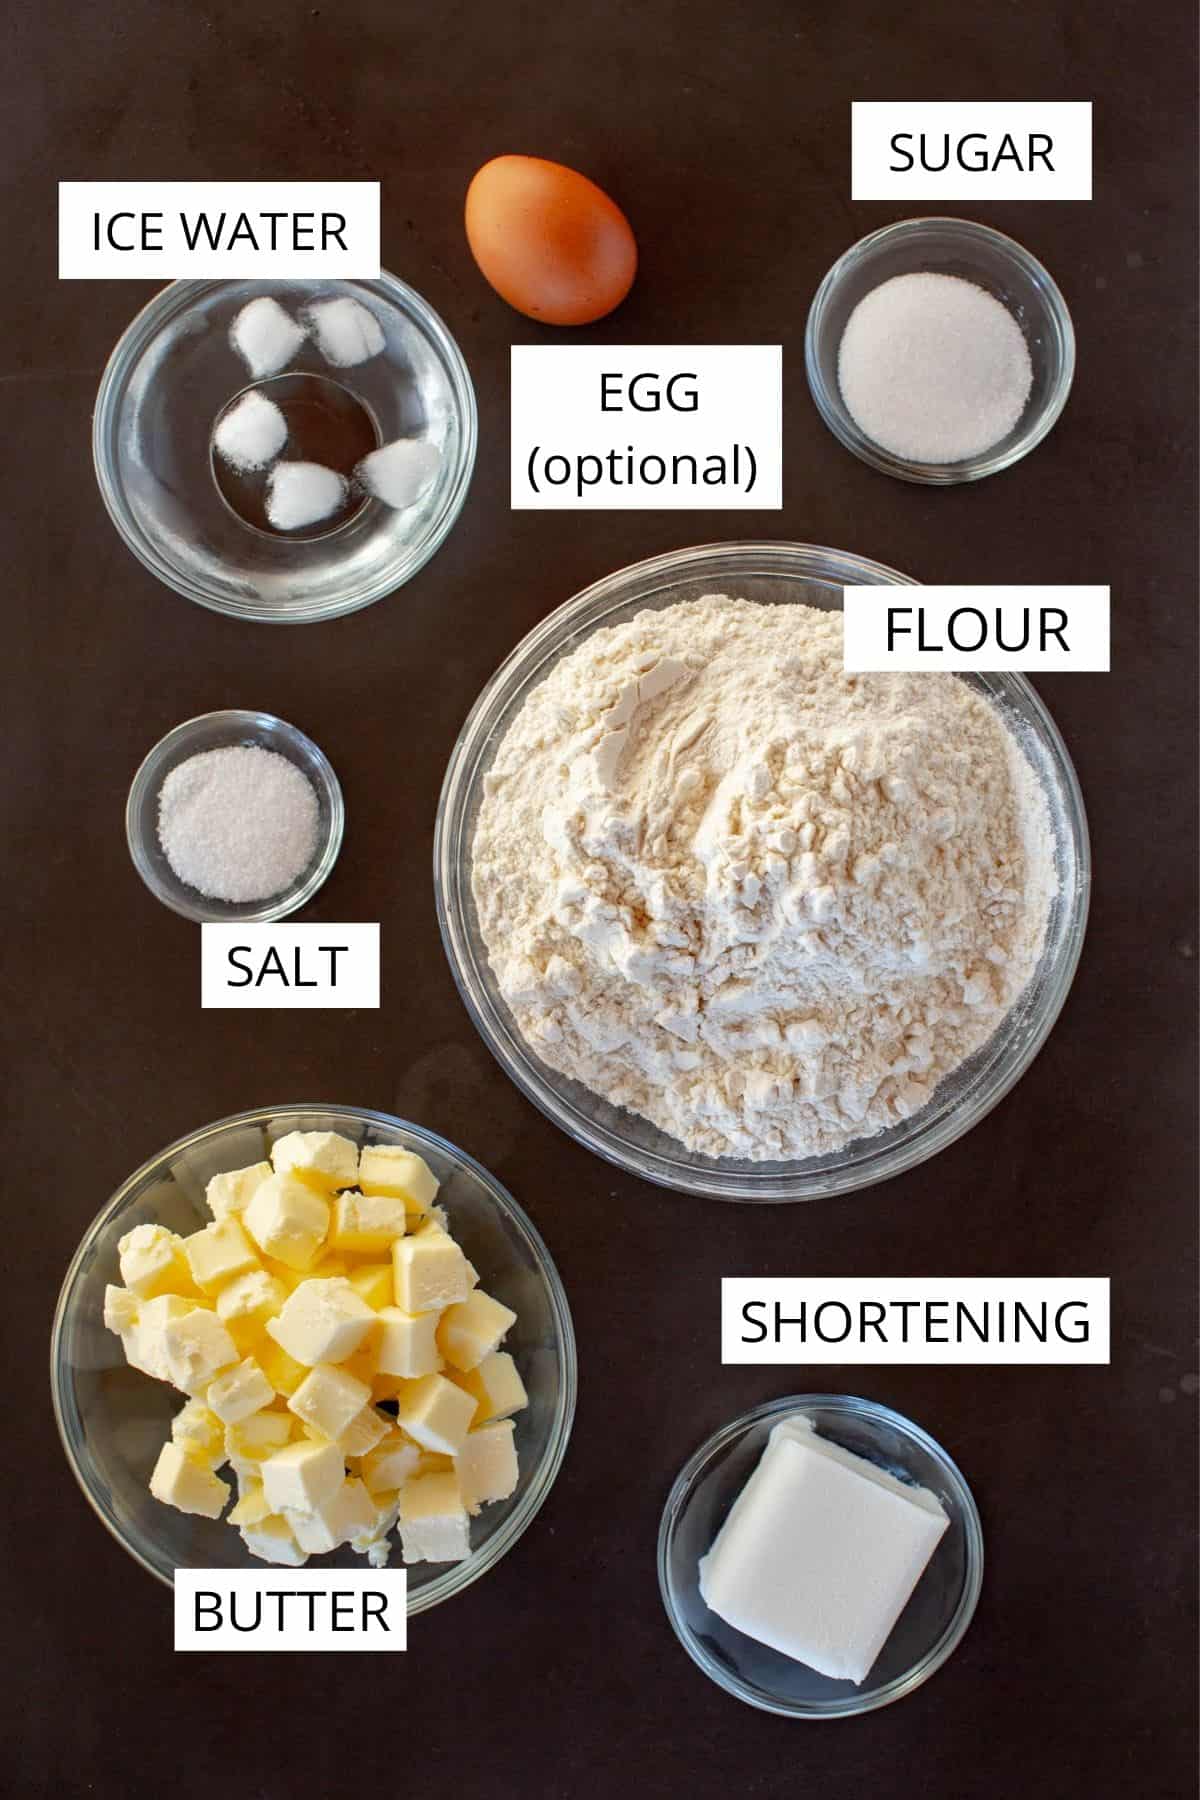
Homemade Pie Crust Recipe Ingredients
Butter - Unsalted. Must be COLD.
Shortening - You can go organic if you want but I think good ol' Crisco makes a better pie (like in this old fashioned Crisco pie crust from my grandma). So does my grandma.
Egg - This is only used for brushing the top of a double-crust pie before baking to help give it a nice shiny crust. It's not necessary for a single crust pie.
*Find the full ingredient list in the recipe card below!
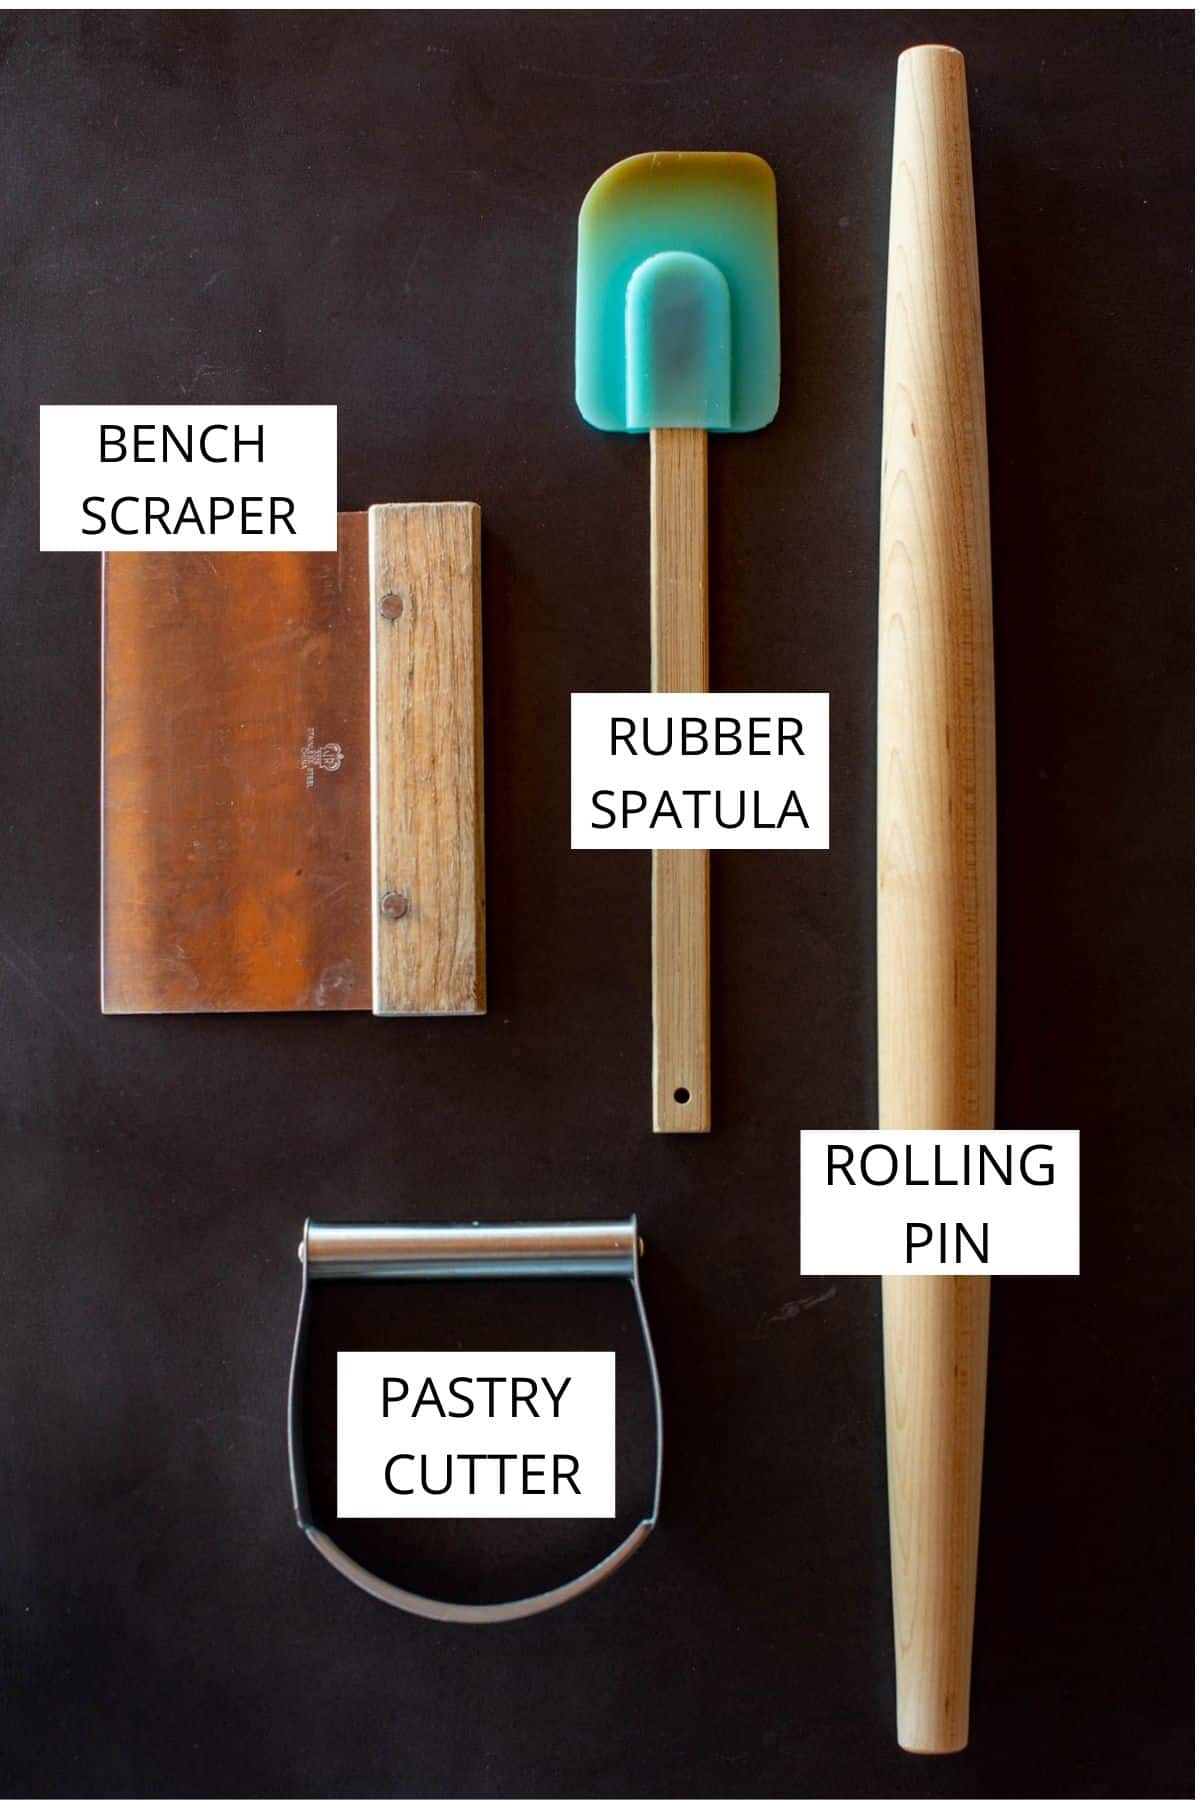
Helpful Equipment
How to Make Flaky Pie Crust
Mix The Dough
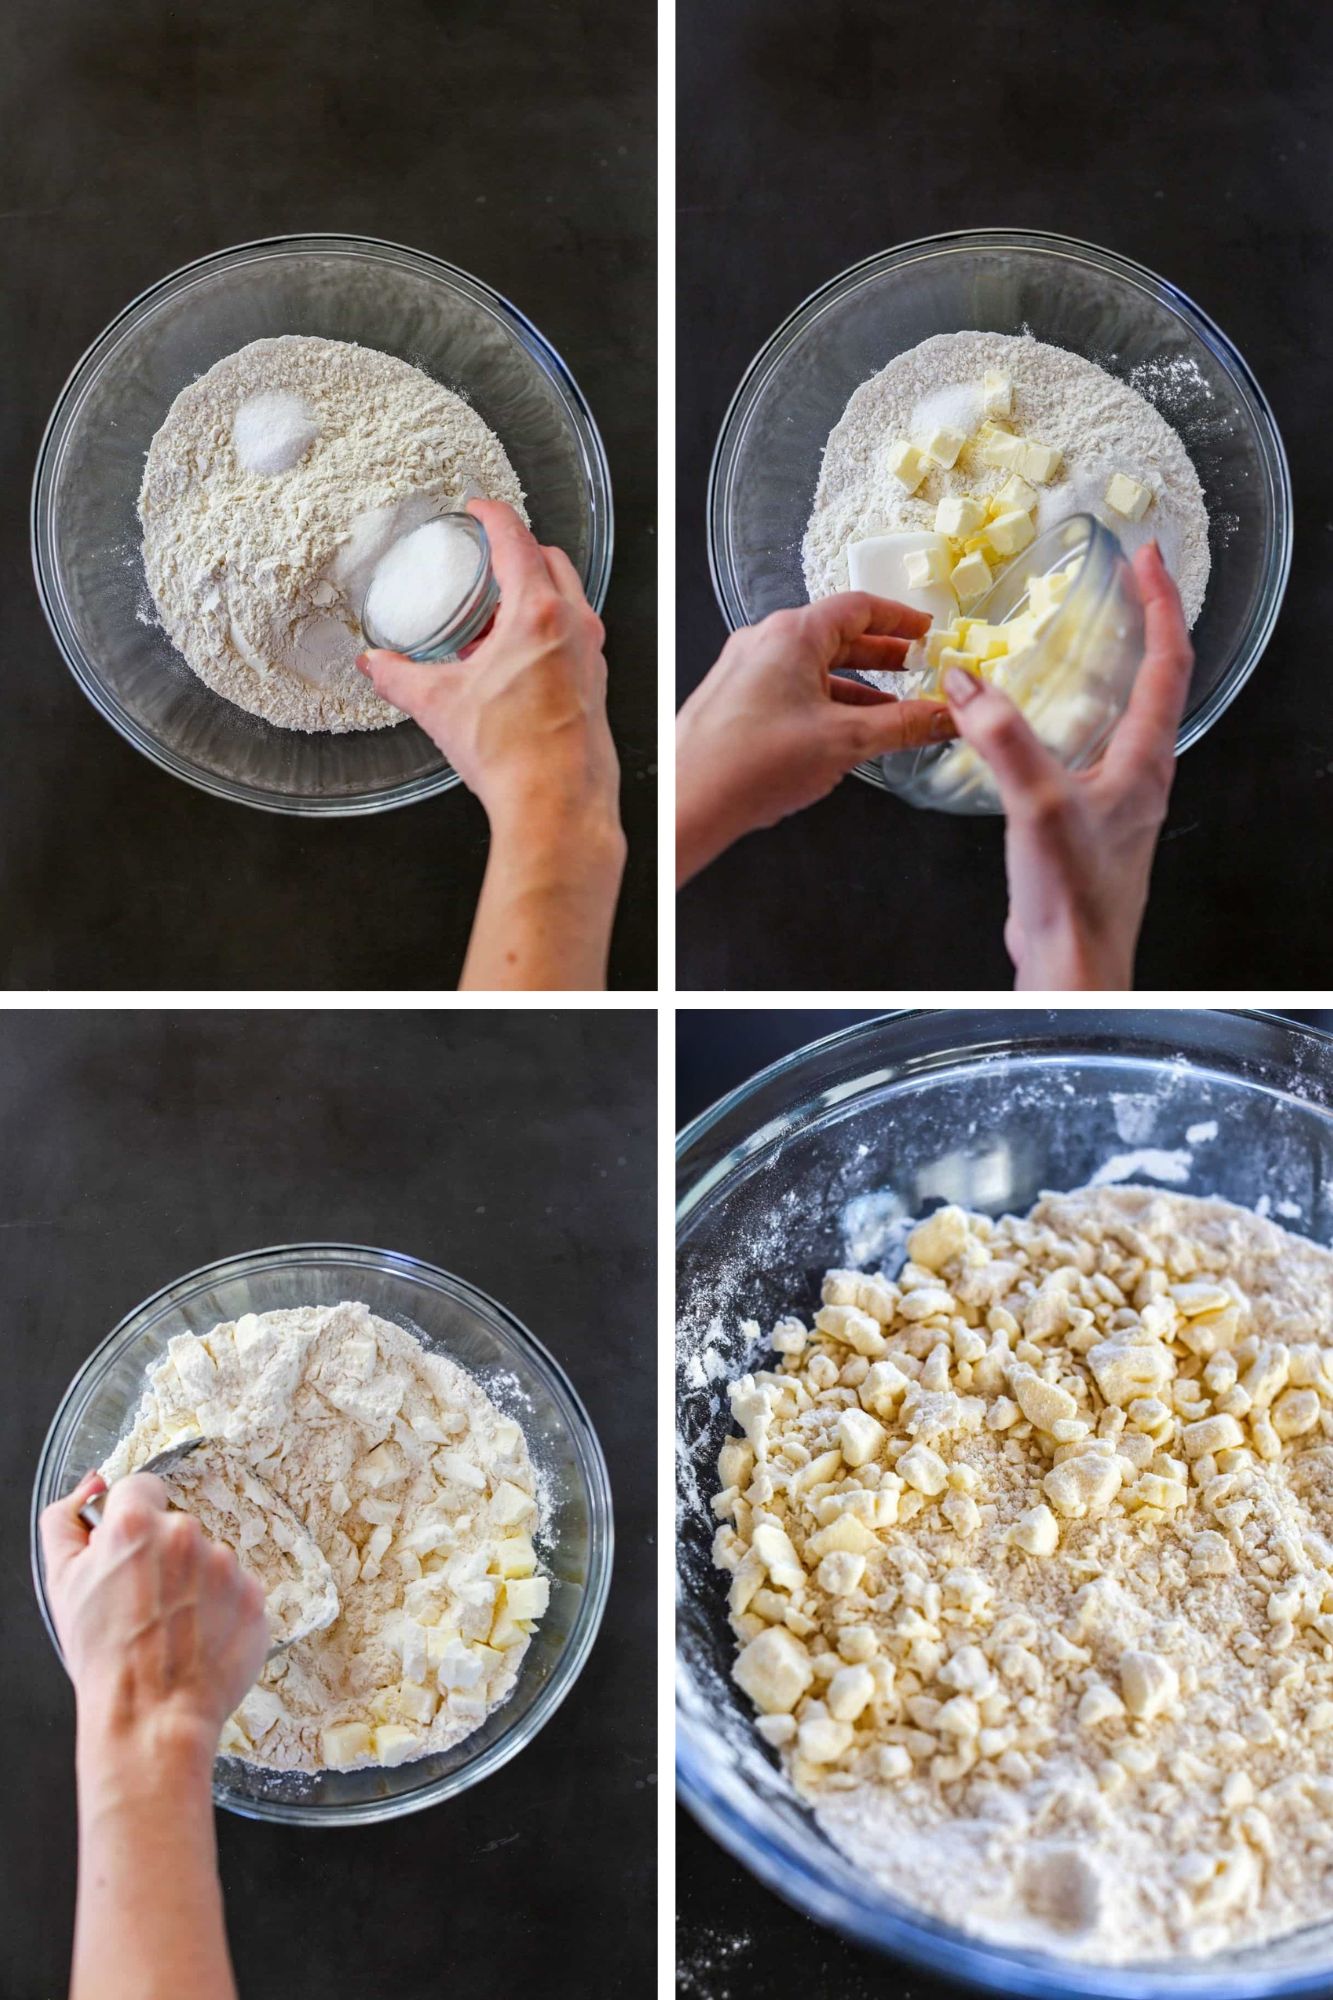
- Combine the flour, salt and sugar (omit for a savory pie) in a medium bowl.
- Add the cold butter and shortening.
- Use a pastry cutter or two butter knives to cut the fat into the flour and break it down into pieces about the size of large peas.
- Give the bowl a little shake every so often to check the size of the peas. Some will be bigger and some will be smaller - this is ok.
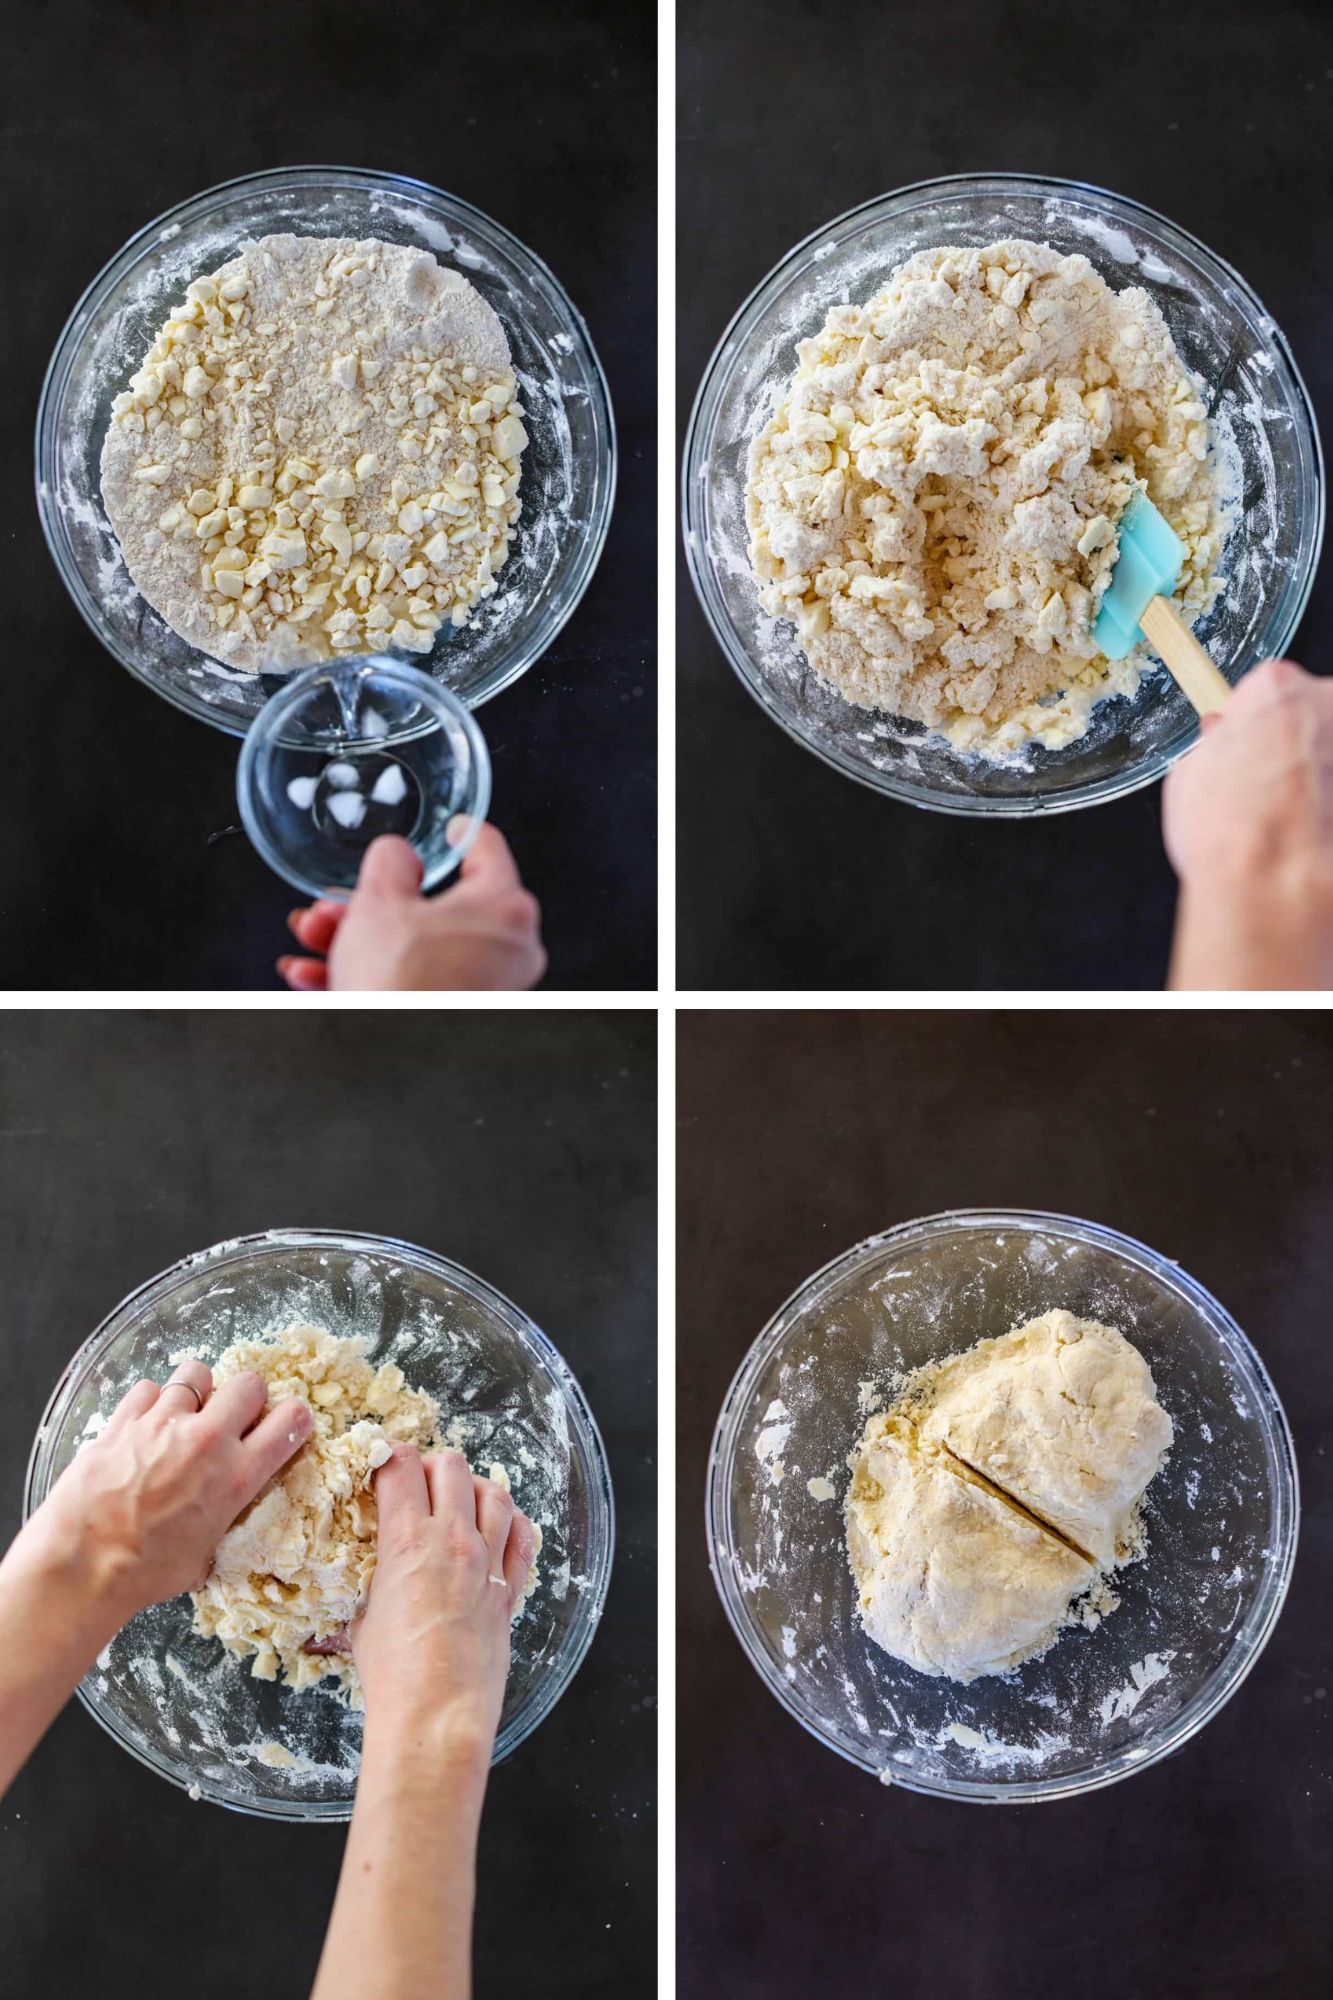
- Add 6 tablespoons of ice water (avoiding any chunks of ice).
Pro Tip: The amount of water needed to form the pie dough will always vary based on humidity. Always start with less and add more a little bit at a time until it forms a dough. You can always add more but you can't take it out.
- Mix with a rubber spatula, scraping the sides of the bowl, until all of the liquid has been absorbed and it forms a shaggy mass.
- Use your hands to press and gently knead the dough until it just forms a ball, adding more water one teaspoon at a time if needed. Be very careful not to work the dough too much at this step - less is more. The dough should not feel sticky, and you should be able to see bits of butter and shortening flecked throughout.
- Use a spatula or knife to cut the dough into two even pieces.
Form Dough Discs
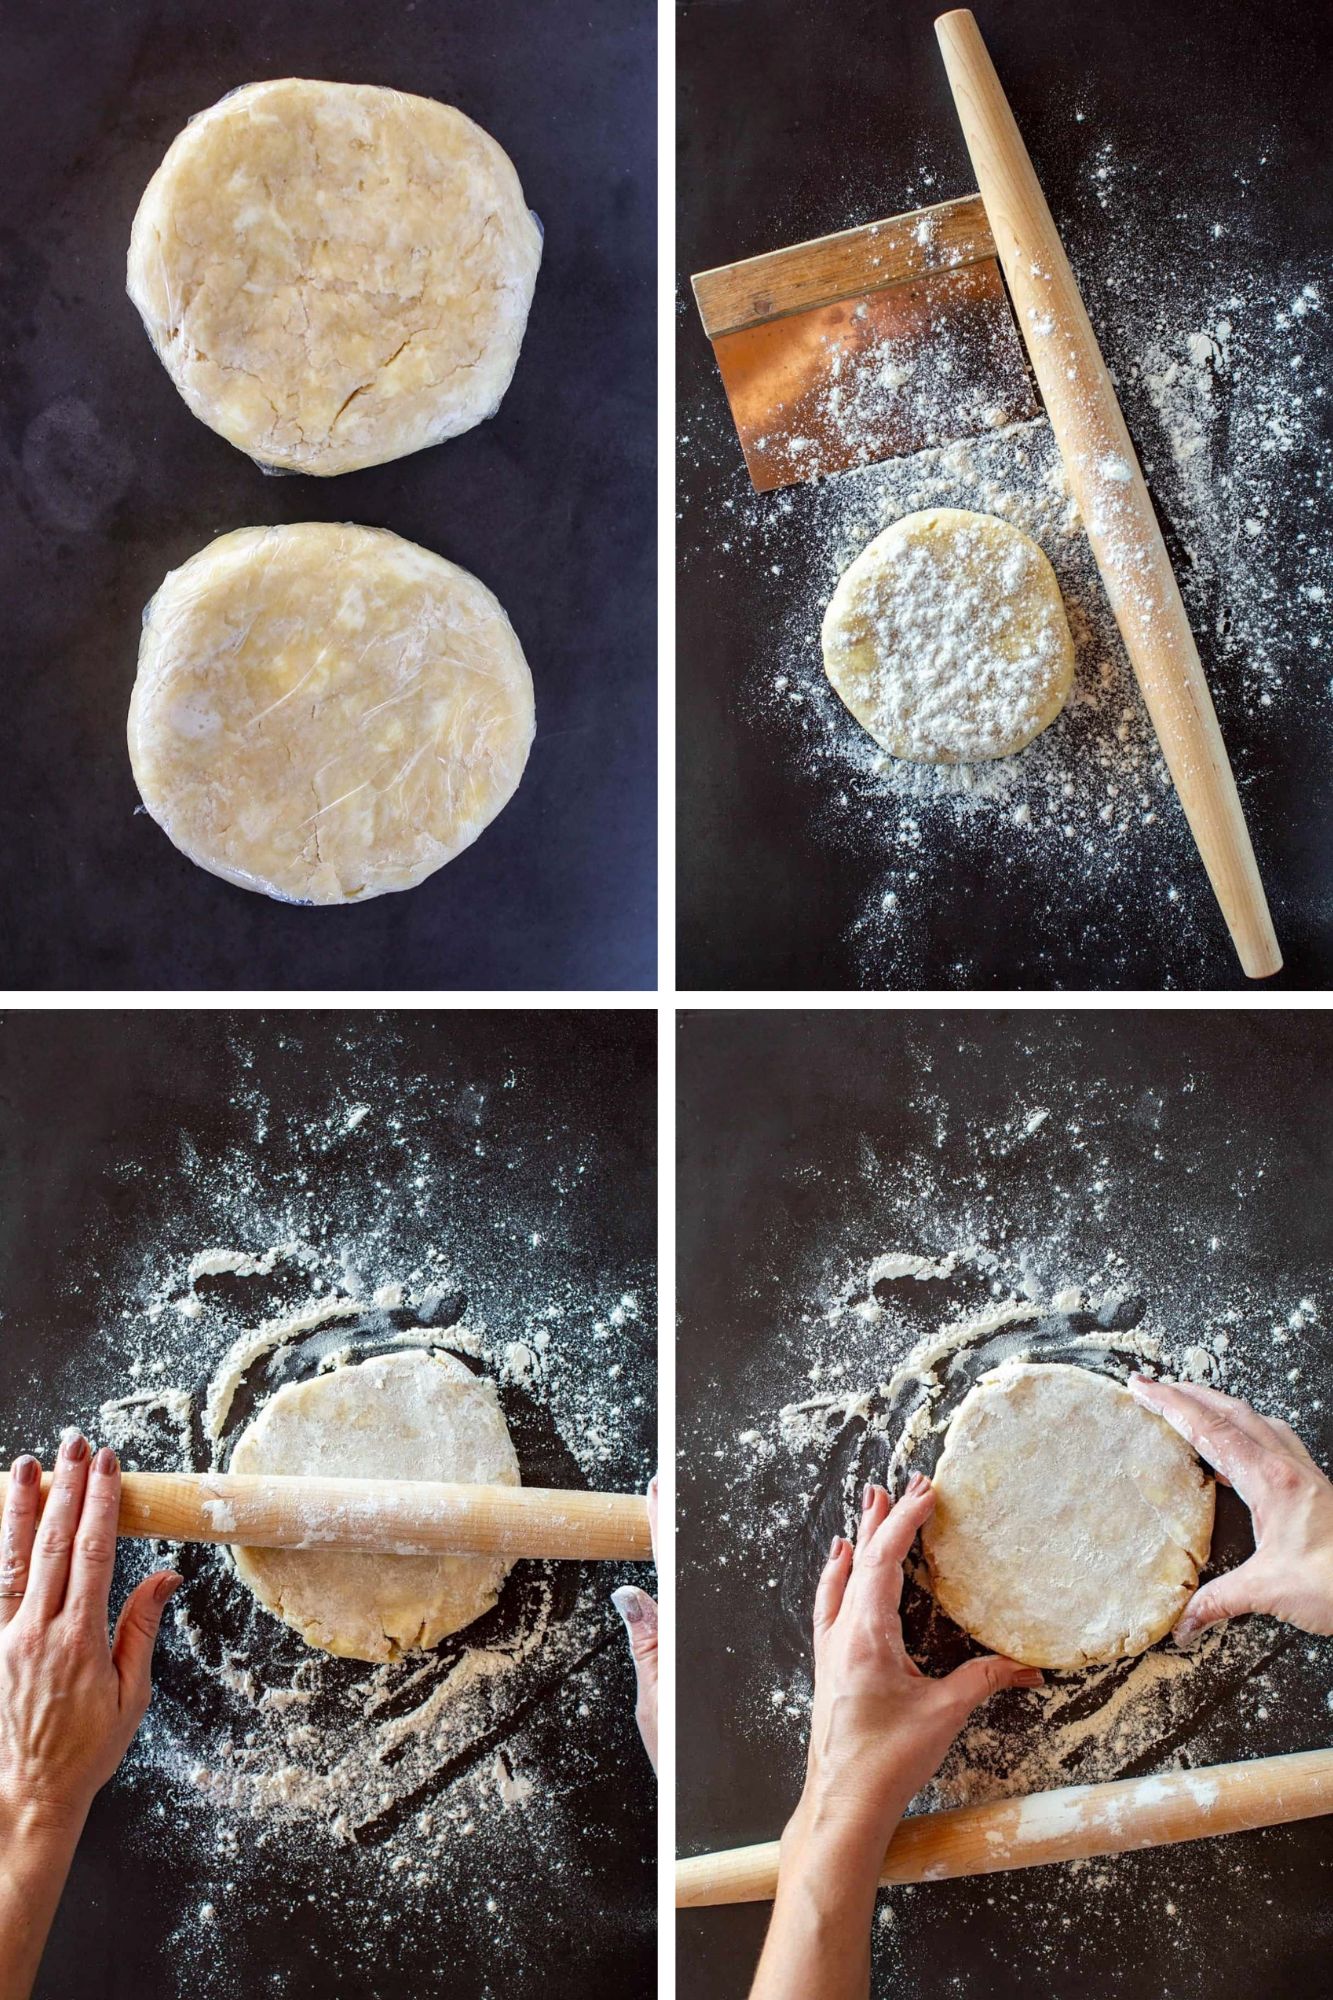
- Gently form each into a disc and wrap in plastic. Store in the refrigerator for at least 30 minutes to rest, or up to 3 days. For longer storage, keep wrapped tightly in the freezer.
- When you're ready to assemble your pie, remove one disc of dough at a time from the refrigerator, unwrap it and place it in the center of a generously dusted surface. Dust your rolling pin and bench scraper (if using).
Roll Out The Dough

Pro Tip: If your dough has been chilling for more than an hour, let it sit at room temperature for about 10-15 minutes before rolling to make it a bit easier.
- Begin rolling out the dough by starting at the bottom and pushing the rolling pin away from your body, Complete 2-3 rolls, then rotate the dough 90 degrees.
- Repeat this same movement over and over until the dough reaches about 12 inches around or roughly 3 inches larger than a pie plate. Use a tape measure or pie plate to help measure. Add more flour as needed and continuously rotate the dough to avoid sticking.
- Use a bench scraper to help roll the dough onto the rolling pin.
Put Your Pie Together

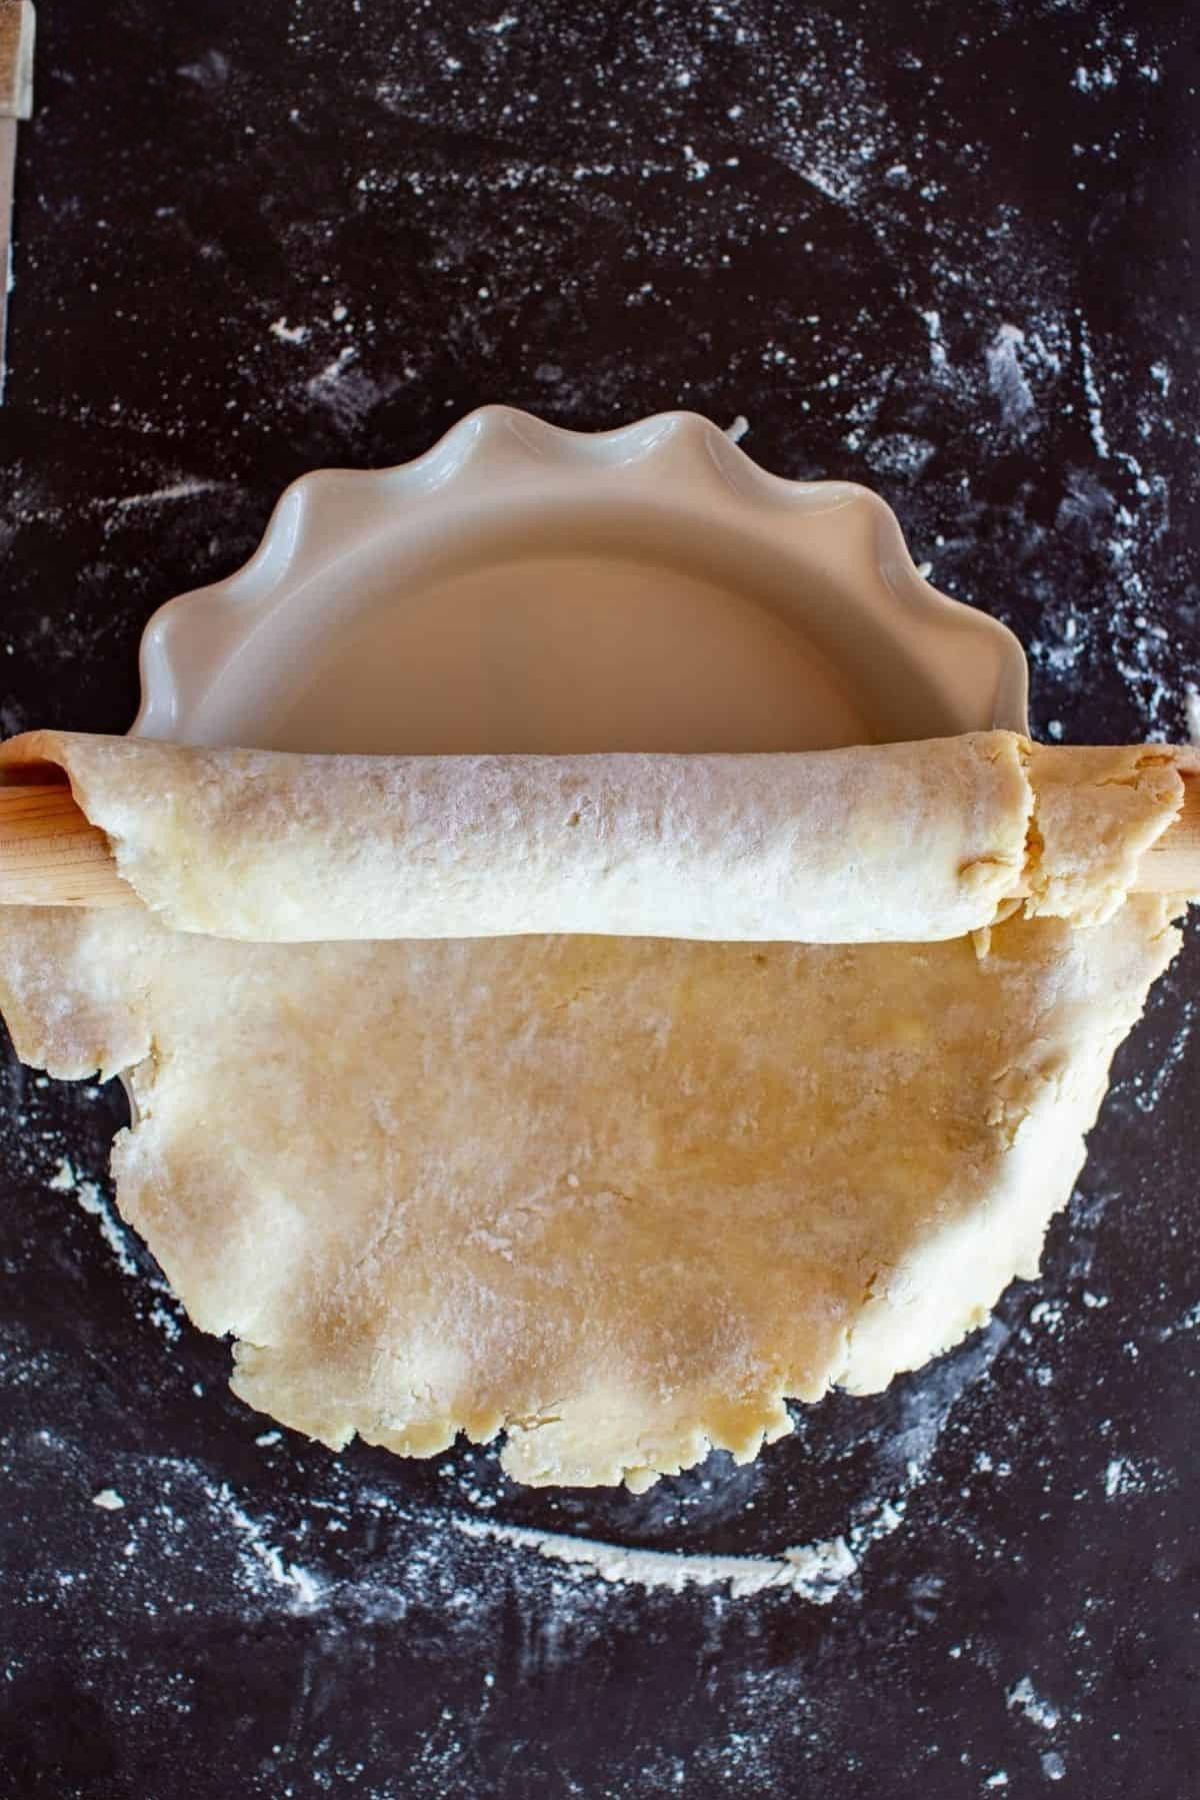
- Carefully unroll the dough into the pie plate and adjust it to fit. Tuck in any loose pieces.
- If making a single crust pie, tuck the edges under then your fingers to create a crimped edge and proceed with your recipe.
- If making a double crust pie, add your filling, then lightly moisten the outer edge by dabbing it with a little water.
- Roll out the remaining crust exactly the same way as the first and transfer to the top of the pie using the rolling pin.
- Use your fingers to press the top and bottom crusts together around the edges, then trim off any excess with kitchen shears (or leave it all if you love a lot of crust).
- To create a crimped edge, tuck your thumb under the dough, then use your index and middle fingers on top to press the edge into a ruffle.
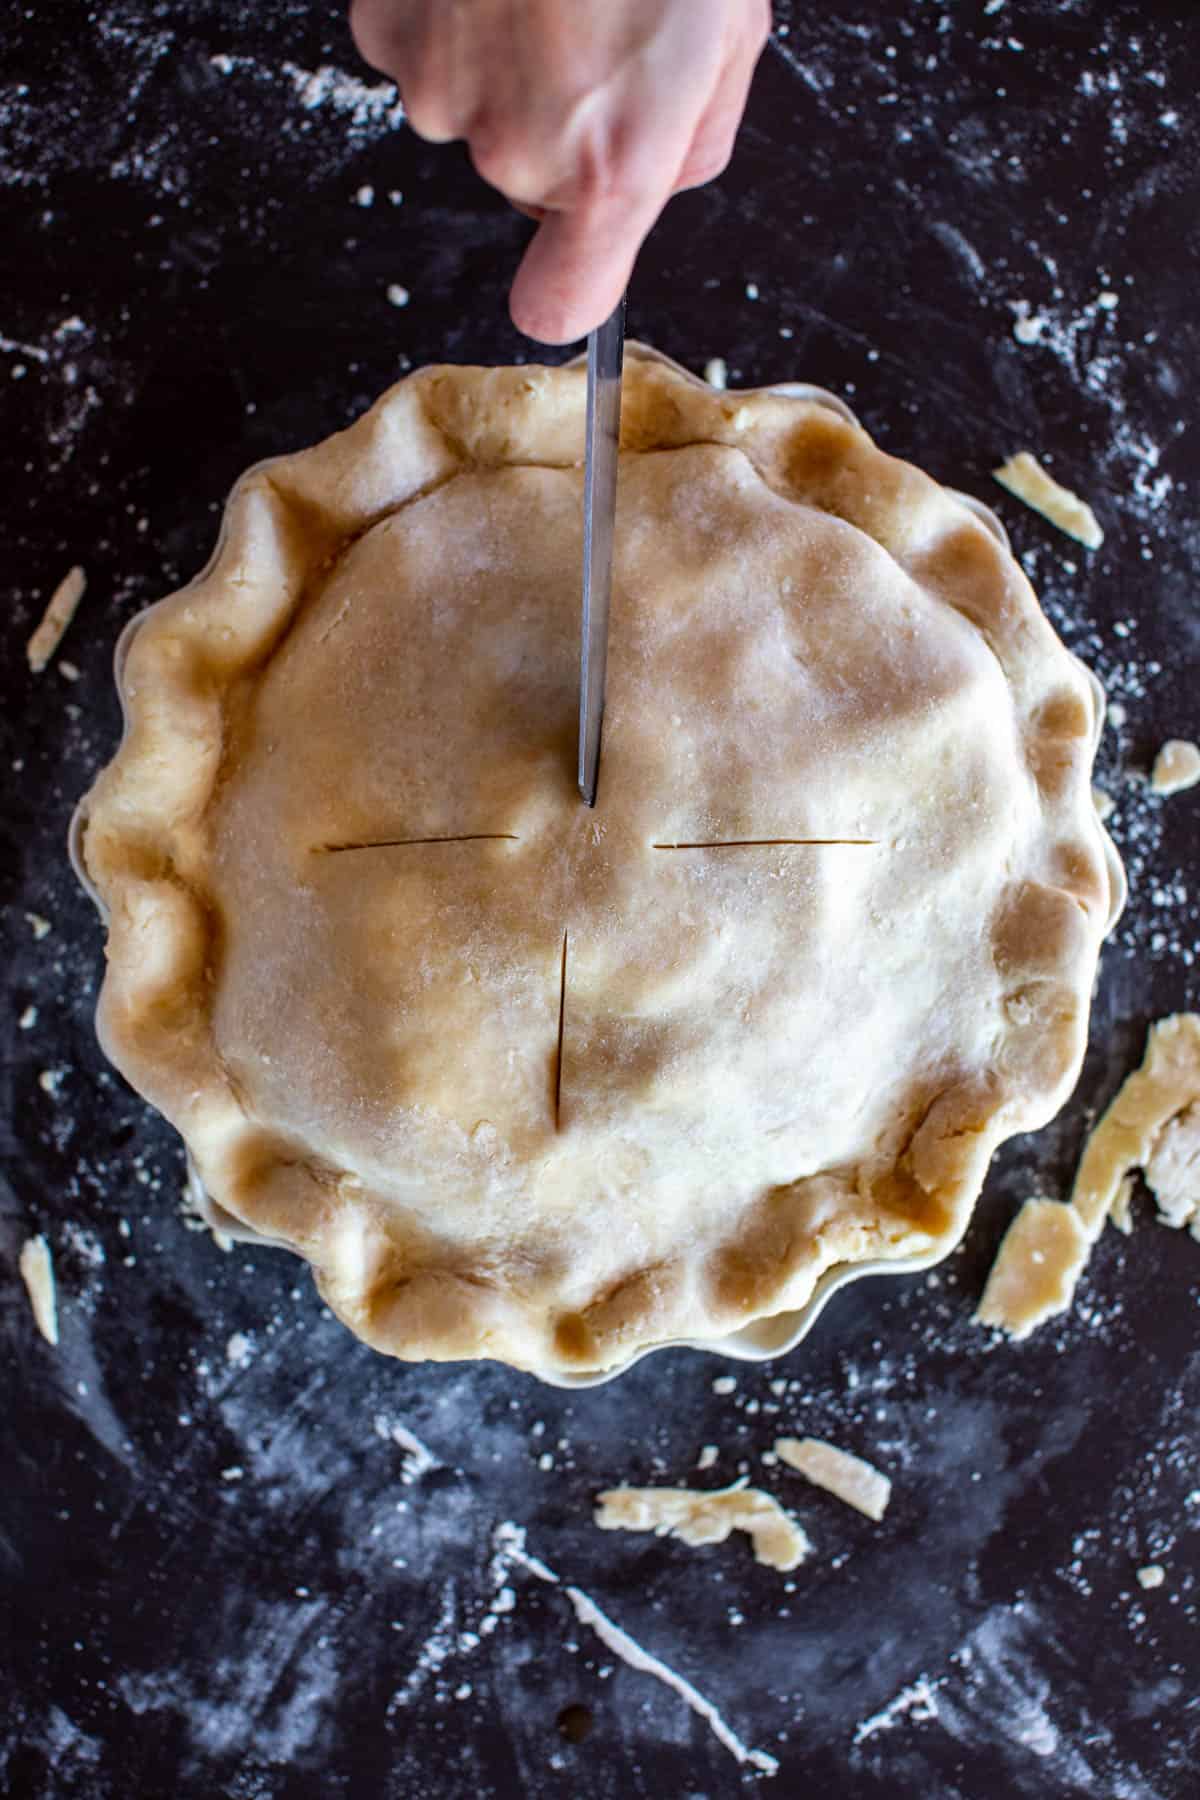
- For best results, cut a few vents in your pie to release steam as it cooks, then brush all over with egg wash for a shiny, browned crust. Proceed with baking directions or freeze for a later date.

Flaky Pie Crust Recipe Tips
- If you want to double or triple this recipe, make each batch separately for best results.
- Keep all ingredients cold at all times. If the dough starts getting warm at any moment, pop the bowl in the freezer or refrigerator (or outside) for a few minutes before continuing.
- I like to run my hands under cold water and/or hold on to some ice cubes prior to using my hands to mix or shape the dough. This helps keep it cold at all times.
Homemade Pie Crust Recipe FAQs
When rolling out your dough, use even more flour than your would normally. Continue adding it as you roll, using a bench scraper to lift up the dough and dusting with more flour underneath. The dough will absorb more flour as you roll.
Use a spray bottle to lightly mist the dough all over with water, then wrap in plastic and let sit for an hour. It will absorb the water and hydrate as it sits - repeat if needed.
Yes, with a cup-to-cup all purpose gluten free flour. My preferred brand is Cup4Cup.
Ways to use This Easy Pie Crust
This pie crust recipe works for all kinds of fruit pies like Homemade Peach Pie, Blueberry Pie, my Grandma's Apple Pie, old-fashioned Custard Pie or Italian Ricotta Pie. It also works in rustic free form tarts like this Apple Crostata or Blueberry Peach Crostata.
This post may contain affiliate links.
It's also great in savory pies like this double crusted Chicken Pot Pie, this savory pumpkin galette, this savory pear galette, or a spring Asparagus Goat Cheese Quiche.


Did you LOVE this recipe? Please leave a star ⭐️ rating and comment and tag your creations @ColeyCooks on Instagram!
Want to Save This Recipe?
Enter your email & I'll send it to your inbox.
By submitting this form, you consent to receive emails from Coley Cooks.

Foolproof Flaky Pie Crust
Ingredients
- 3 cups all purpose flour
- 1 teaspoon salt
- 2 tablespoons sugar omit for a savory pie
- ¾ cup butter (12 tablespoons or 1 ½ sticks) cold, cut into small cubes
- 6 tablespoons vegetable shortening COLD
- 6-8 tablespoons ice water (½ cup) or more, if needed
- 1 egg beaten (optional, for double crust pies only)
Instructions
Mix The Dough
- Combine the flour, salt and sugar (omit for savory pies) in a medium bowl.
- Add the butter and shortening, then use a pastry cutter or fork to break down the fat until it becomes the size of large peas.
- Pour in 6 tablespoons of water and mix gently with a rubber spatula or wooden spoon until the dough just starts to form a shaggy mass. Add more water one tablespoon at a time as needed.
- Use your hands to press the dough until it just comes together. Resist the urge to knead and squish - overmixing will make it tough. The dough should not be sticky, and you should be able to see the pieces of butter and shortening flecked throughout.
- Once the dough has formed, split it into two balls, then gently shape them into discs. Wrap them in plastic and refrigerate for a minimum of 30 minutes (or up to two days). For longer storage, wrap tightly and freeze for up to 6 months.*
Roll Out The Dough
- When you're ready to assemble your pie, remove one disc at a time from the refrigerator**, unwrap and place on a generously floured work surface. Dust a rolling pin with flour, and begin to roll out the dough by starting at the bottom and rolling the pin away from your body.
- Rotate the dough 90℉ after every 1-2 rolls. This will help ensure that it doesn't stick to the counter, and will also help keep it round. Use a bench scraper to get underneath the dough and dust with more flour as needed to prevent sticking.
- Roll the dough out to about 12 inches around or roughly 3 inches larger than the pie plate. If the dough does not roll out perfectly round, use a knife or a pizza cutter to trim the edges and even it out.
- Gently roll the dough onto the rolling pin and use it to transfer to the pie plate, then press it in to fit. For a single crust pie, tuck the loose pieces under, then use your fingers or a fork to crimp the edges. Proceed with your recipe.
Put Your Pie Together
- If making a double crust pie, add your filling, use your finger to dab the top edges of the crust with water.
- Remove the second disc of dough from the fridge and roll out the same way as the bottom, then use the rolling pin to transfer it over top to cover the filling.
- Use your fingers to pinch the top and bottom crusts together to seal in the filling, then snip off any excess with kitchen shears.
- Tuck and roll the overhang under, then use your fingers or a fork to crimp the edges.
- Cut a few slits to vent the top, then brush all over with the egg wash. Bake as directed.
Notes
- If making a single crust pie, you can either cut the recipe in half, or make the whole recipe and save one disc of pie dough in the freezer for a later date.
- Dough can be made up to 3 days in advance if kept in the refrigerator, or up to 6 months in advance if kept in the freezer. Thaw in the refrigerator overnight before using.
- If your dough has been chilling for more than an hour, let it sit at room temperature for about 10-15 minutes before rolling to make it a bit easier.
- If you want to double or triple this recipe, make each batch separately for best results.
- Keep all ingredients cold at all times. If the dough starts getting warm at any moment, pop the bowl in the freezer or refrigerator (or outside) for a few minutes before continuing.
- I like to run my hands under cold water and/or hold on to some ice cubes prior to using my hands to mix or shape the dough. This helps keep it cold at all times.
- The amount of water needed to form the pie dough will always vary based on humidity. Always start with less and add more a little bit at a time until it forms a dough. You can always add more but you can't take it out.


What temperature and for how long do you bake the pie?
I can't find this info anywhere in the recipe.
thank you.
It depends on the type of pie you're making:
How to Blind Bake For a Single Crust Pie
Transfer the rolled out pie dough to a pie plate and crimp the edges with your fingers or a fork, then in the freezer for a minimum of 30 minutes before baking. This prevents shrinkage!
Preheat the oven to 375° F.
Line the frozen crust with a layer of parchment paper or foil, then fill with either dried beans or pie weights, making sure they are evenly distributed.
Bake for 20 minutes, then remove the parchment and weights and let cool. It's now partially baked and ready to fill and continue baking.
For a fully baked crust, prick the bottom all over with a fork, then bake for another 20 minutes or until golden brown all over.
How to Bake For a Double Crust Pie
Preheat the oven to 425° F and make move the oven rack to the bottom third of the oven with enough space to fit the pie.
Brush the pie all over with egg wash, then place on a parchment lined baking sheet to catch any drips. Make sure there are a few vents in the top of the pie to allow steam to escape.
Bake for 20 minutes, then lower to 350 and bake for an additional 45 minutes to an hour. it should be golden brown all over with the filling bubbling up out of the vents.
So flaky and easy to work with!
Love this video, Coley! the quality of it is awesome, and the pie crust looks so beautiful and delicious!
Thanks, Cara! I hope you give my crust a try this month! 🙂
LOVE your videos, Coley! Was wondering if you've ever tried pork lard instead of vegetable shortening. I have some from our Amish farmer and wasn't sure how it would taste or turn out. btw- I was waiting for your signature "cutesy" move at the end and didn't get any. I kinda feel jipped!
Thanks, Joy! I have used lard before, and it makes an EXCELLENT, super flaky crust (and the farmer's lard is great). The only thing is it has a slightly porky flavor, so I don't recommend it for sweet pies. But for savory pies and other pastries, it's fantastic. I especially like it for empanadas! As for my signature "cutesy move" (lol), I'm sorry to have disappointed you! I'm just trying to see who's paying attention 🙂