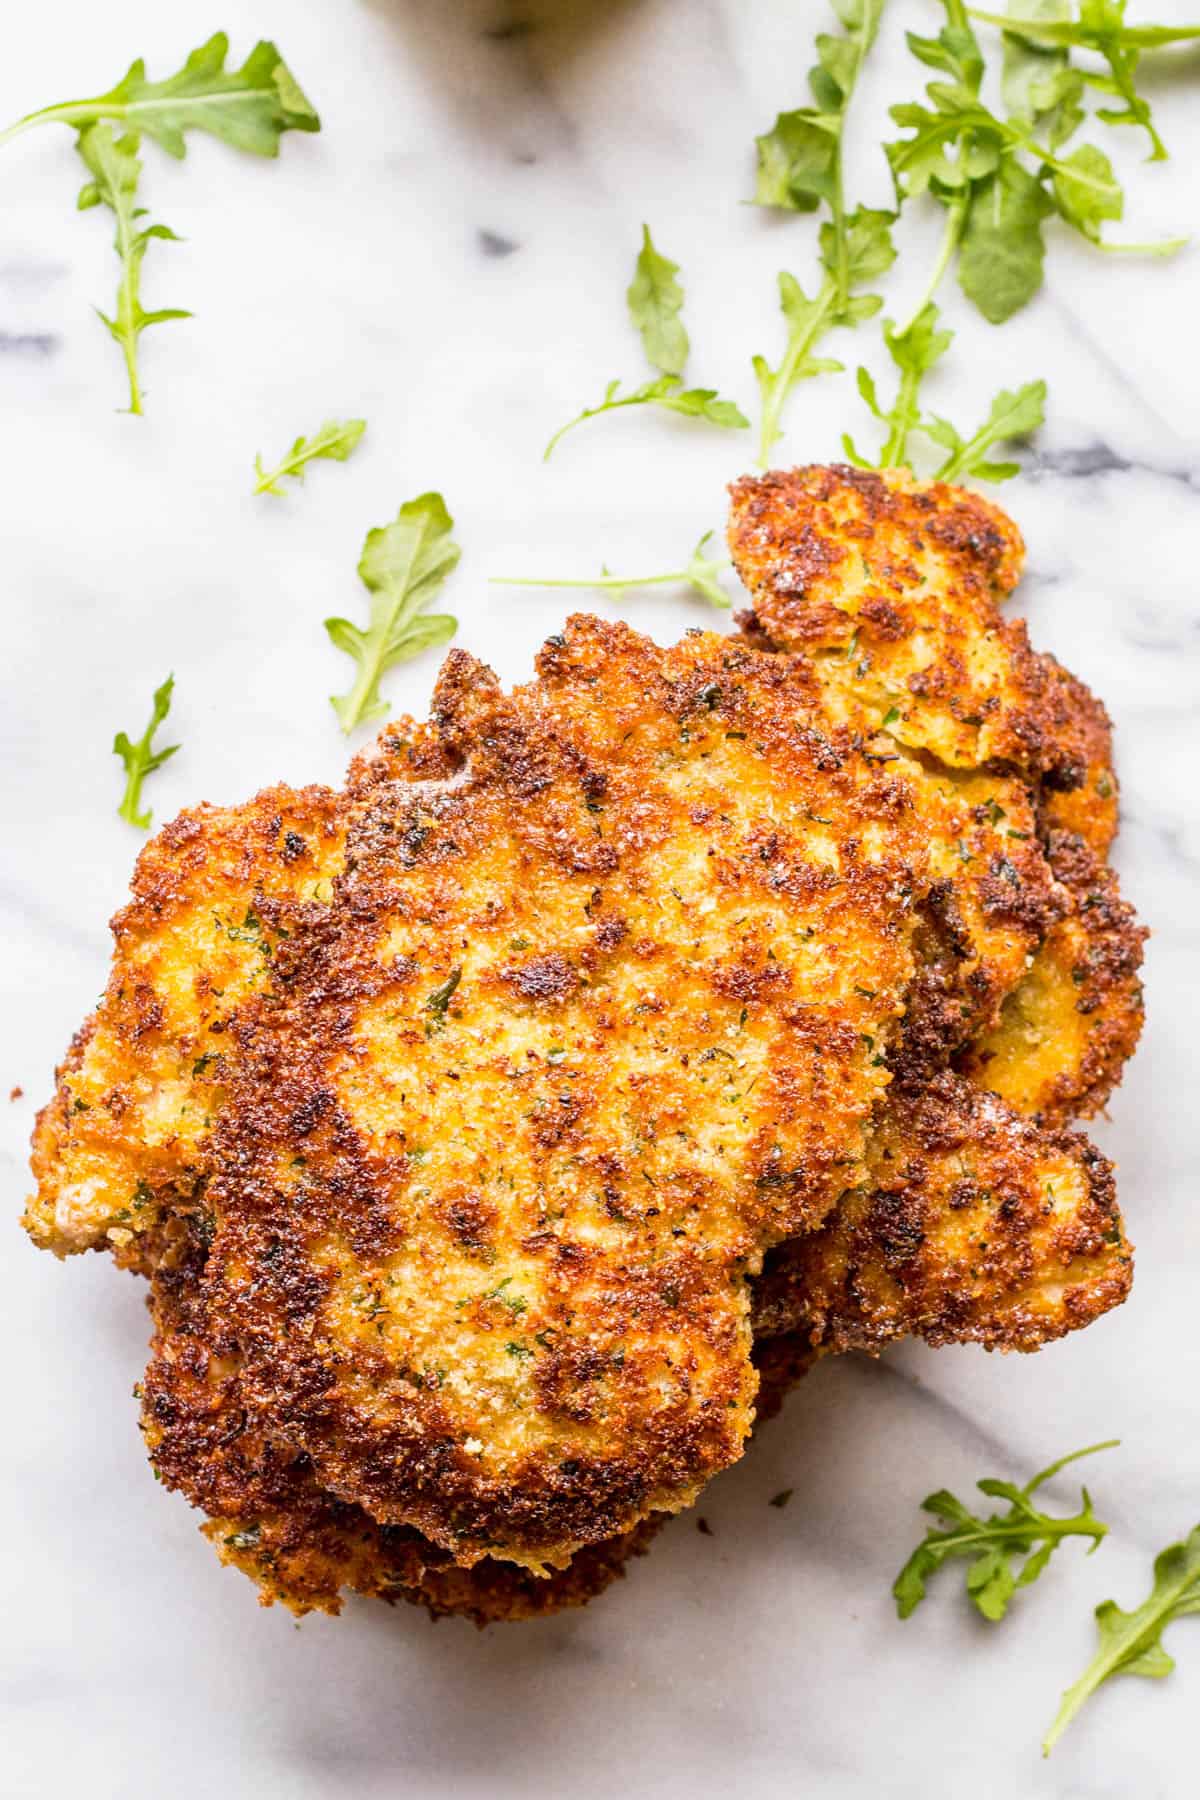
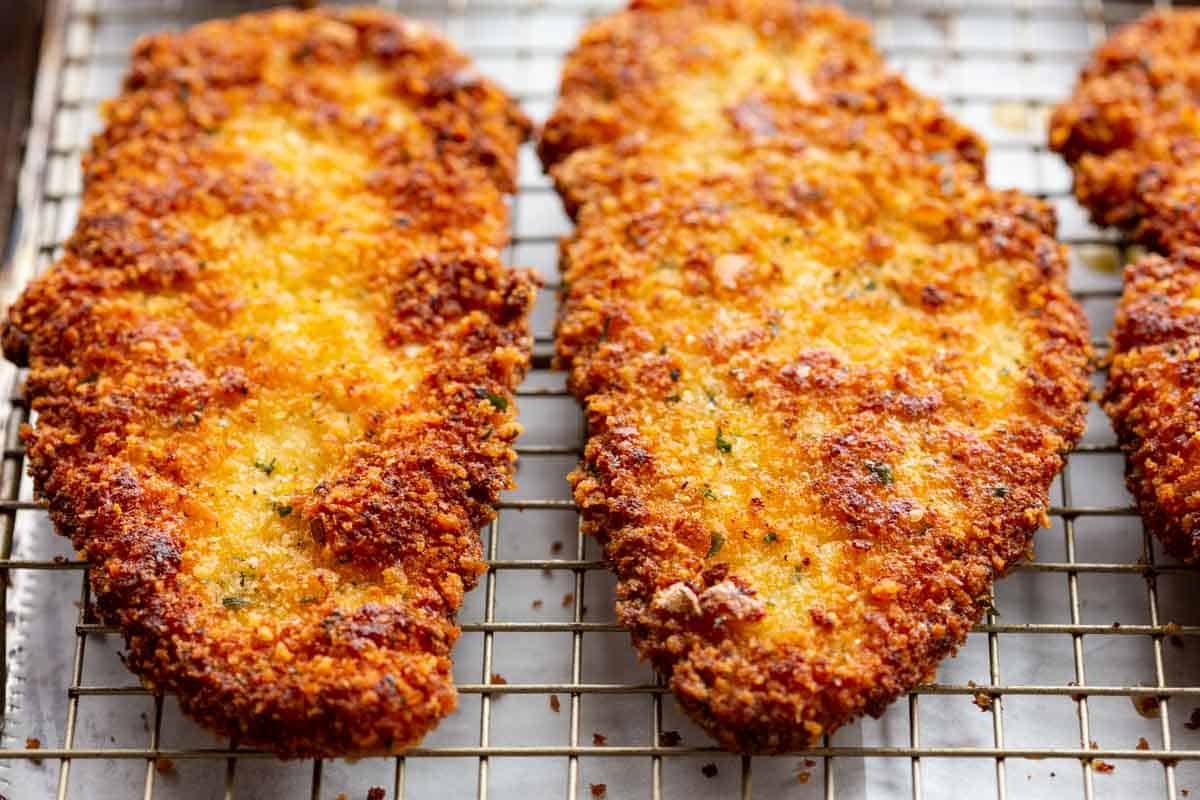
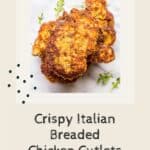
Crispy Italian Breaded Chicken Cutlets
This recipe for Crispy Italian Breaded Chicken Cutlets is the best you'll ever have! Thin slices of chicken breast are breaded with a homemade seasoned breadcrumb mixture then pan fried in extra virgin olive oil to get super crispy and flavorful.
This post may contain affiliate links.
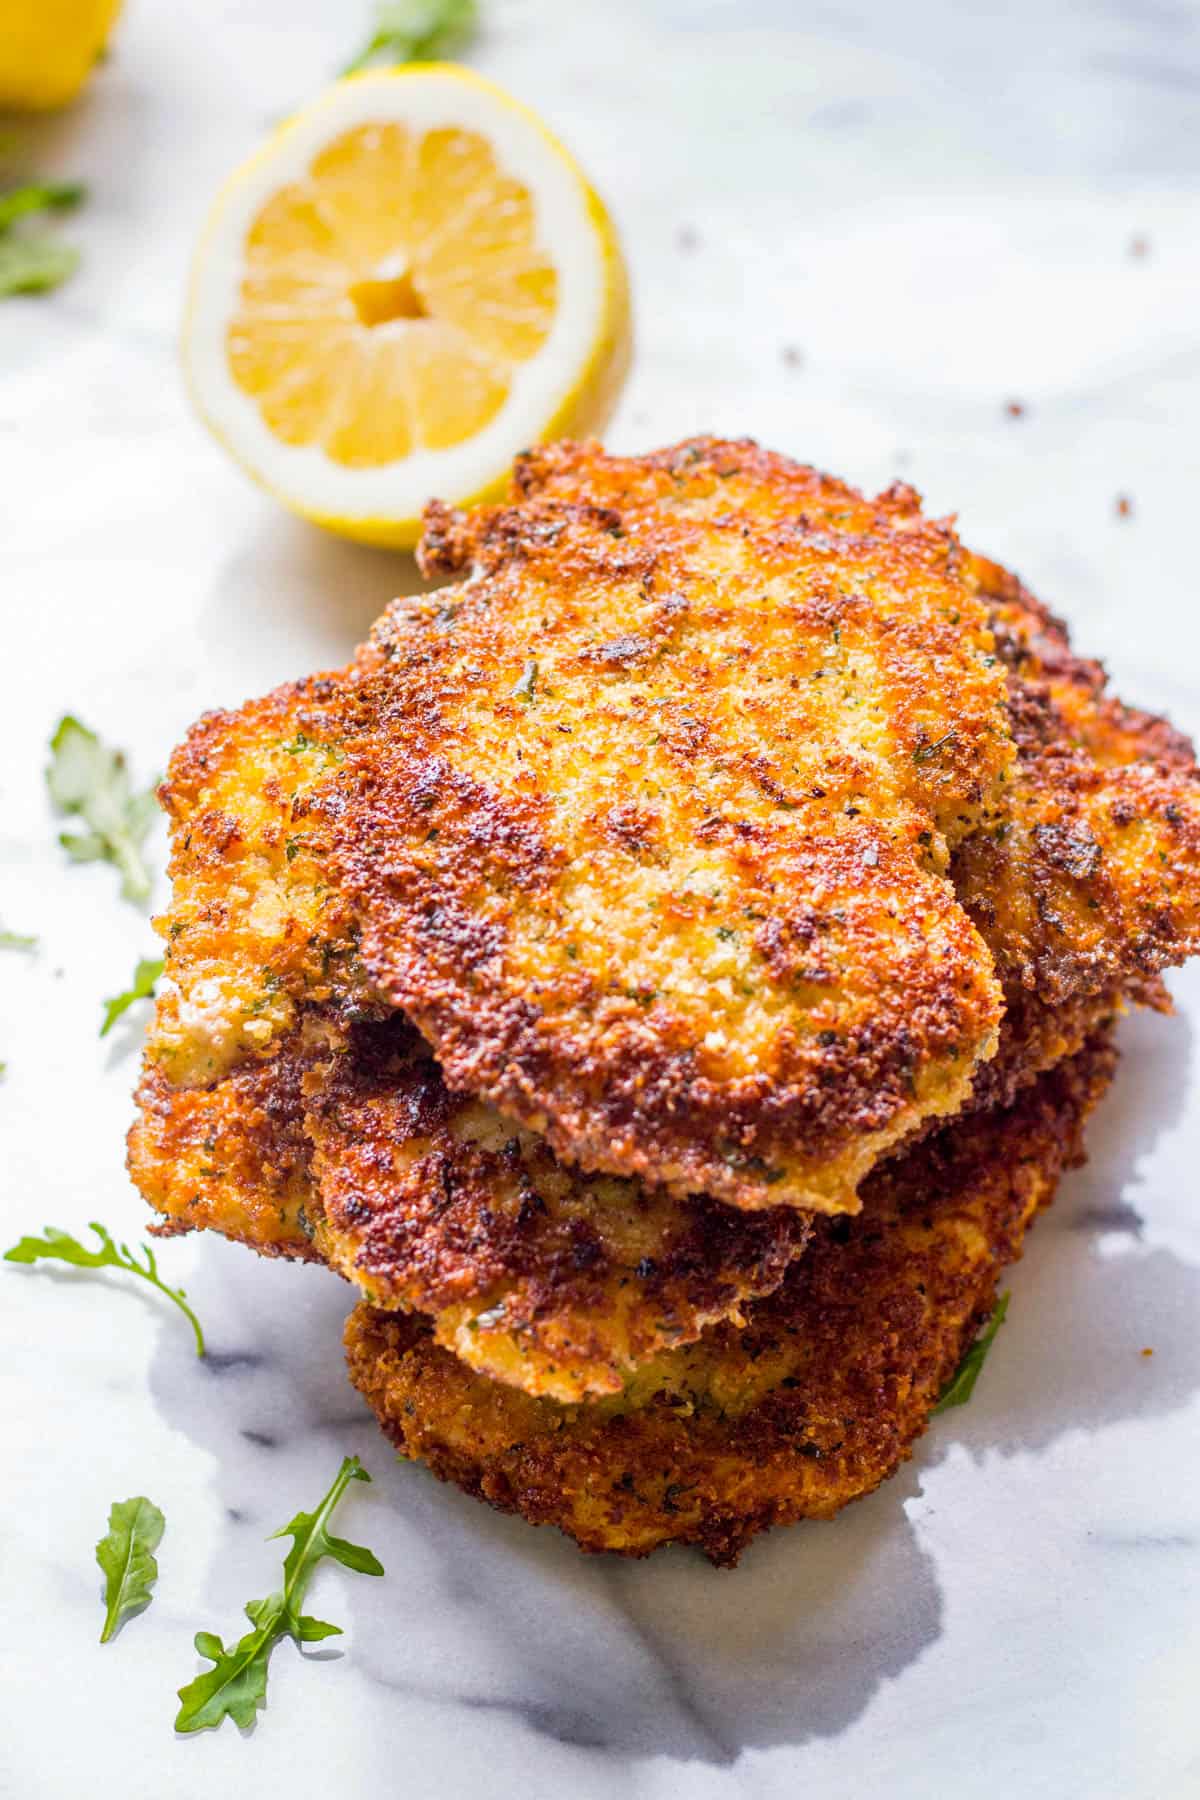
Here in New Jersey, Italian breaded chicken cutlets are a staple and this recipe is the best one you'll ever make. This is the most popular recipe on my website for good reason - it's perfect. Just read the comments!
This crispy chicken cutlet recipe was developed over several years. I took the recipe that was passed down through my Italian family and tweaked it with my professional chef experience to produce the crispiest, most flavorful chicken cutlets possible.
My old friend, chef Michelle, taught me some key tips for making these back when we cooked together at Lisa's Italian Market in Ventnor, NJ. Her cutlets are legendary and this recipe wouldn't exist without her!
Keep reading to learn all of my secrets to making the best Italian pan fried chicken cutlets you'll ever try!
Love crispy chicken cutlets? Try my recipe for crispy Chicken Milanese with lemony arugula salad, or check out this brilliant method for making the crispiest Chicken Parmesan recipe!
What is a chicken Cutlet?
A chicken cutlet refers to a boneless skinless chicken breast that has been thinly sliced and pounded out to an even thickness. They're used frequently in Italian recipes such as chicken Picatta, chicken Francaise, chicken saltimbocca and chicken Marsala. You can also make cutlets from veal, pork, or beef.
Chicken cutlets are similar to chicken scallopini in that they are sliced thin and pounded out, but chicken cutlets are usually bigger.
Why This Recipe Works
- A beginner friendly recipe - I started making these when I was just a kid!
- Instead of using store bought Italian breadcrumbs, these are made with homemade seasoned breadcrumbs to make them extra crispy and cheesy.
- Pounding out the chicken super thin ensures they cook through in the pan with no oven required.
- Seasoning each piece of chicken before breading makes the meat juicy and full of flavor.
- Adding grated cheese to the egg mixture makes the breading extra crispy and flavorful!
Ingredient notes
Breadcrumbs - If you have homemade breadcrumbs - use those. Otherwise, unseasoned Panko breadcrumbs are the way to go. They're lighter than traditional breadcrumbs and make the best crispy coating. I prefer to season my own breadcrumbs rather than using already seasoned Italian breadcrumbs because the flavor is so much better.
Grated Cheese - You can use either a good quality parmesan, such as Grana Padano or Parmigiano Reggiano, or a good quality Pecorino Romano, such as Locatelli. Use either one or both, just make sure you're using the good stuff - it makes a difference.
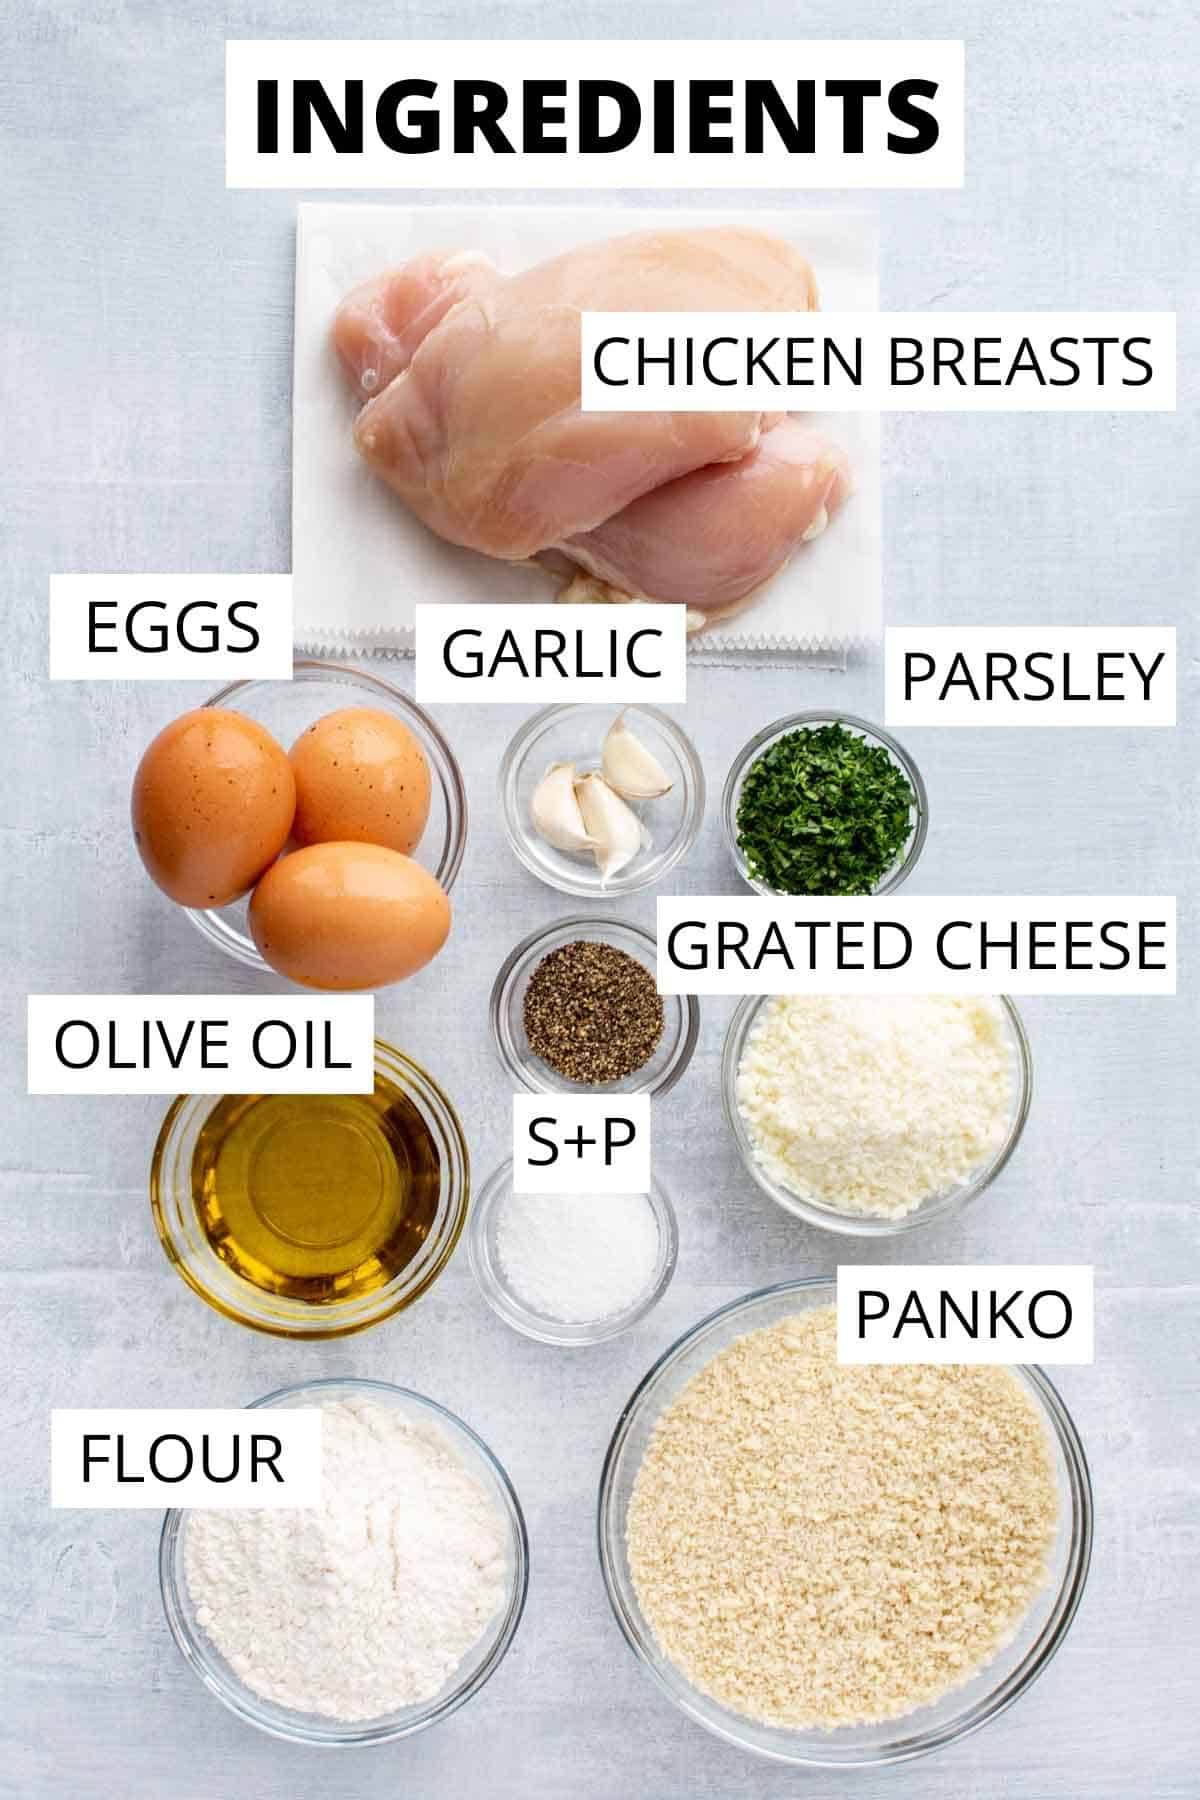
Chicken - Use boneless, skinless chicken breasts for this recipe. You can start with whole chicken breasts and slice them thin, or buy chicken breasts that have already been thinly sliced. We will take it one step further and pound the chicken out to be extra thin, because the thinner they are, the better they are.
Extra Virgin Olive Oil - Some people say you should never to fry in extra virgin olive oil, but I disagree. It makes all the difference in this recipe and gives the chicken much more flavor than when it's fried in vegetable oil. For frying, use a less expensive olive oil and not the top-shelf stuff that's best reserved for finishing.
*Find the full ingredient list in the recipe card below!
Helpful Equipment
Meat Mallet - Pounding out the chicken ensures it will fry up evenly without having to go into the oven to finish. A meat pounder works best, but you can use the bottom of a skillet or a flat bottomed coffee mug in a pinch.
Wire Rack - You can drain the fried chicken cutlets on paper towels, but a wire rack will help them stay extra crispy.
How to make chicken cutlets - Step by step instructions
Prepare the breading station
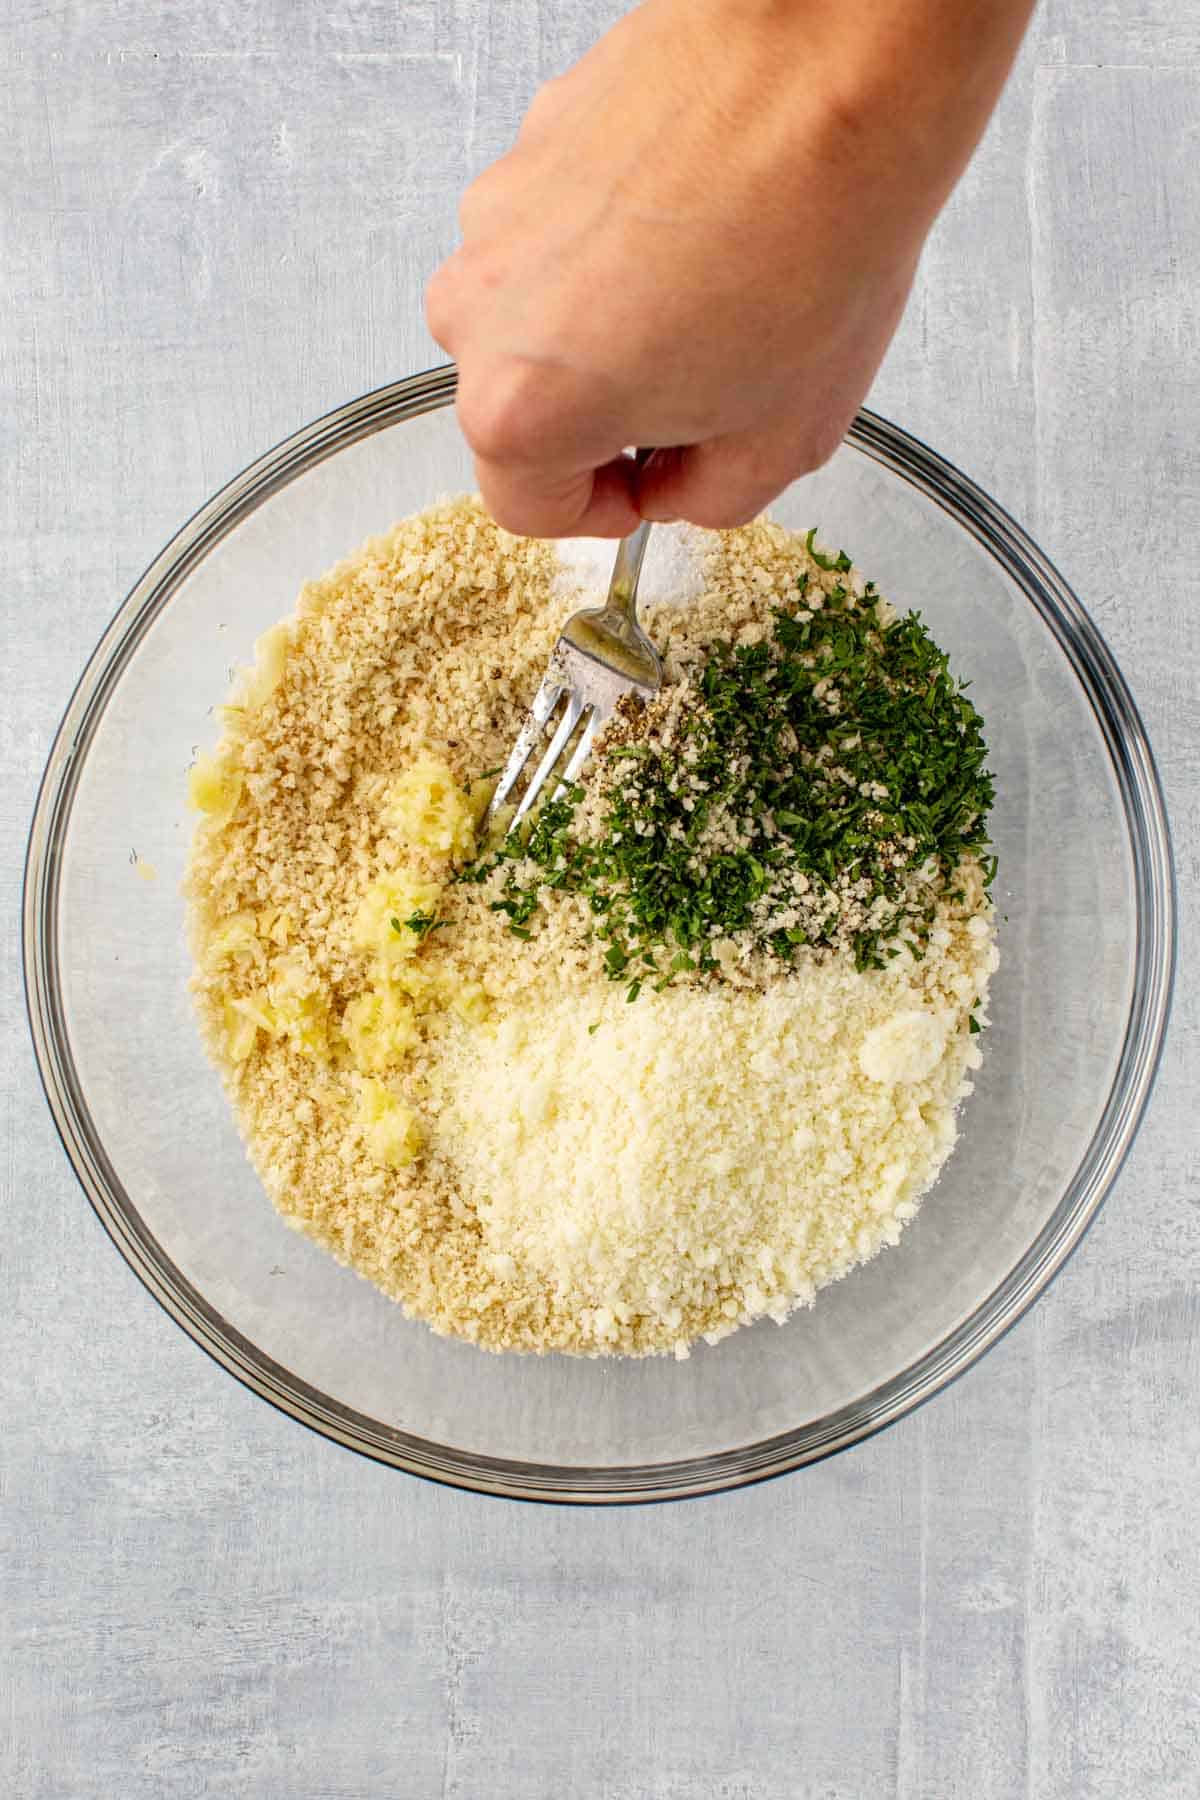
- Add the breadcrumbs, garlic, parsley, Italian seasoning, and ¾ cup cheese to a medium shallow bowl. Season with salt and pepper, then use your fingers to mix it together, working the garlic into the breadcrumbs until evenly distributed.
- In another medium, shallow bowl, whisk together 3 eggs with ½ cup cheese, a pinch of salt and pepper and 1 tablespoon water until combined.
- Pour the flour into another shallow bowl or plate, season with salt and pepper and mix to combine.
Prepare the chicken cutlets
- Slice: Take a whole chicken breast and lay it flat on a cutting board with the palm of your hand over top. Starting at the thickest side, use a long chef's knife or fillet knife to slice the chicken lengthwise into thirds. It's ok if they're not totally even. You can skip this step by purchasing thin sliced chicken breasts from the grocery story!
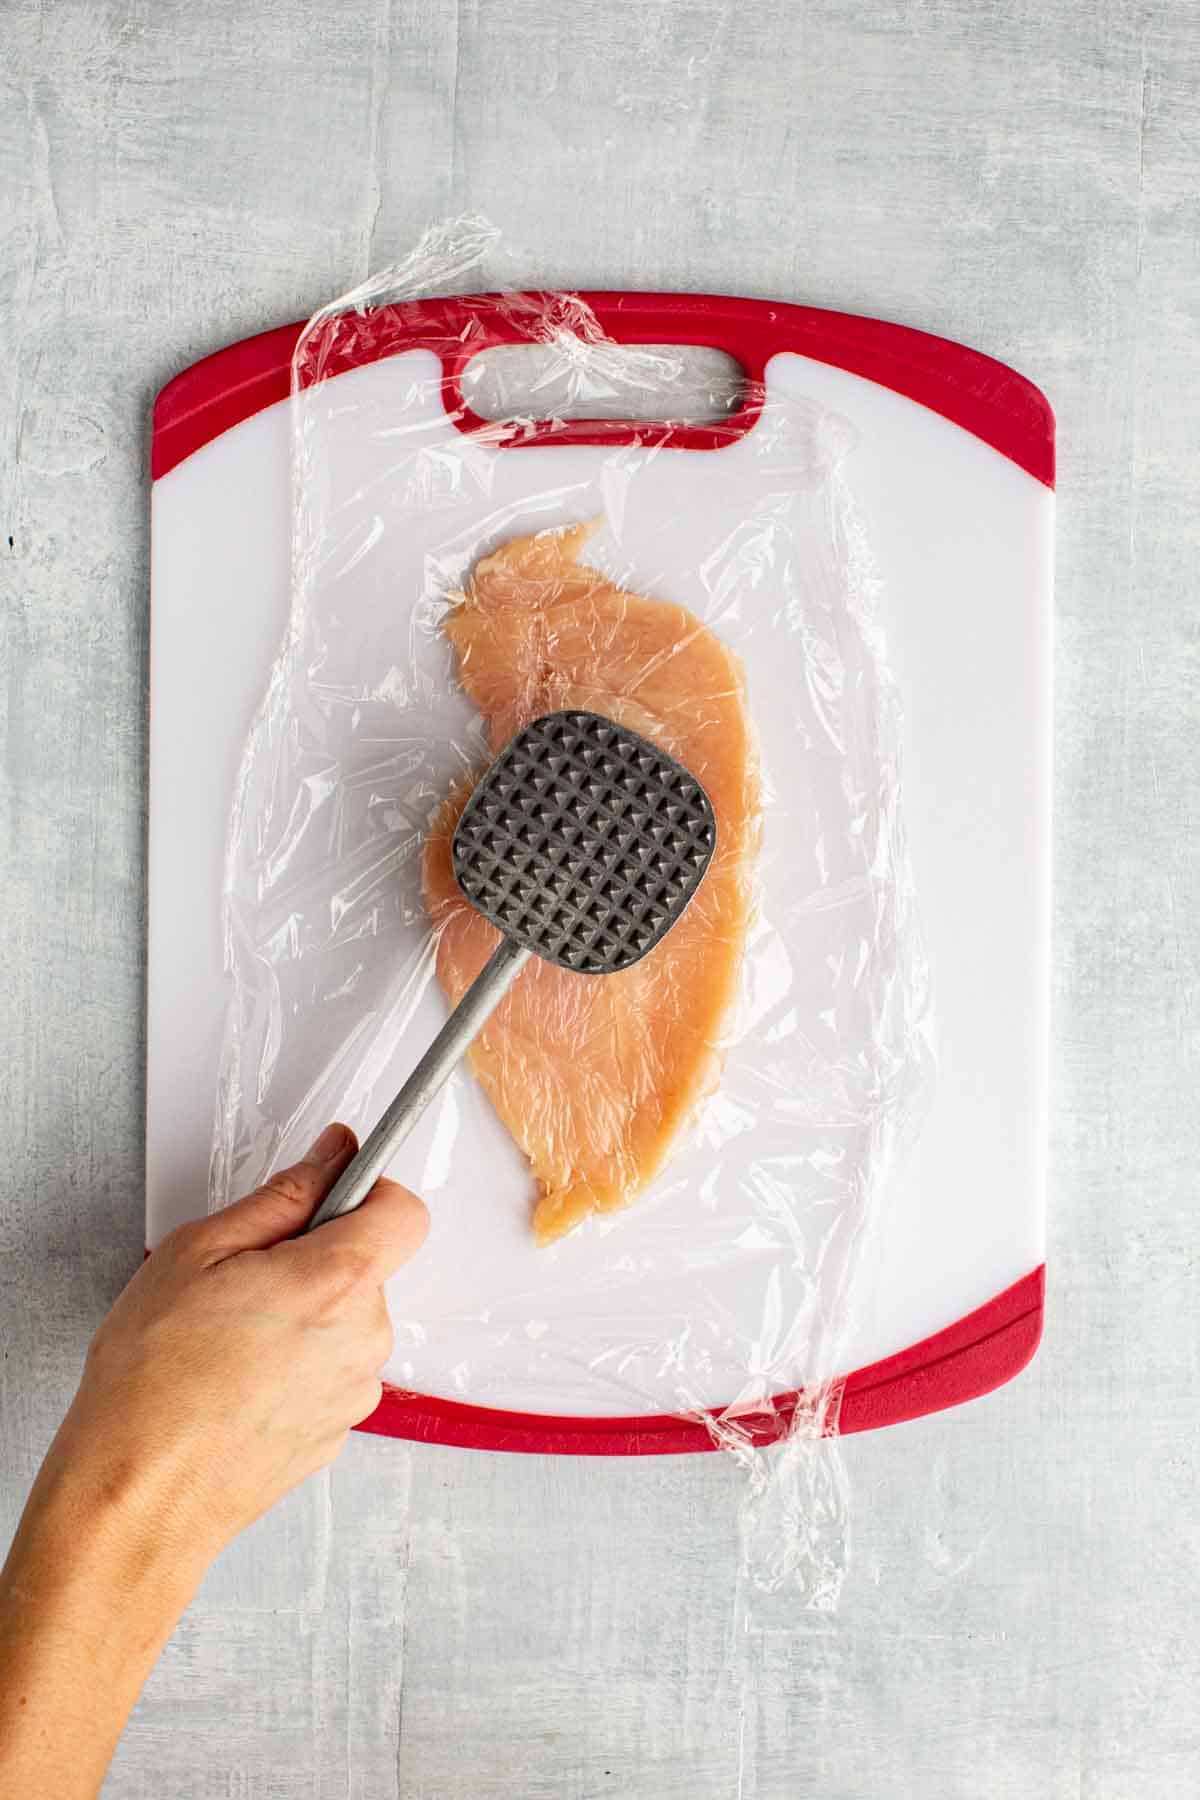
- Pound: Place a piece of plastic wrap over the sliced chicken breast, then use the flat side of a meat mallet to pound it out to be about ½ inch thick. Repeat with the remaining chicken. You can skip this step if your cutlets are already thin and even enough!
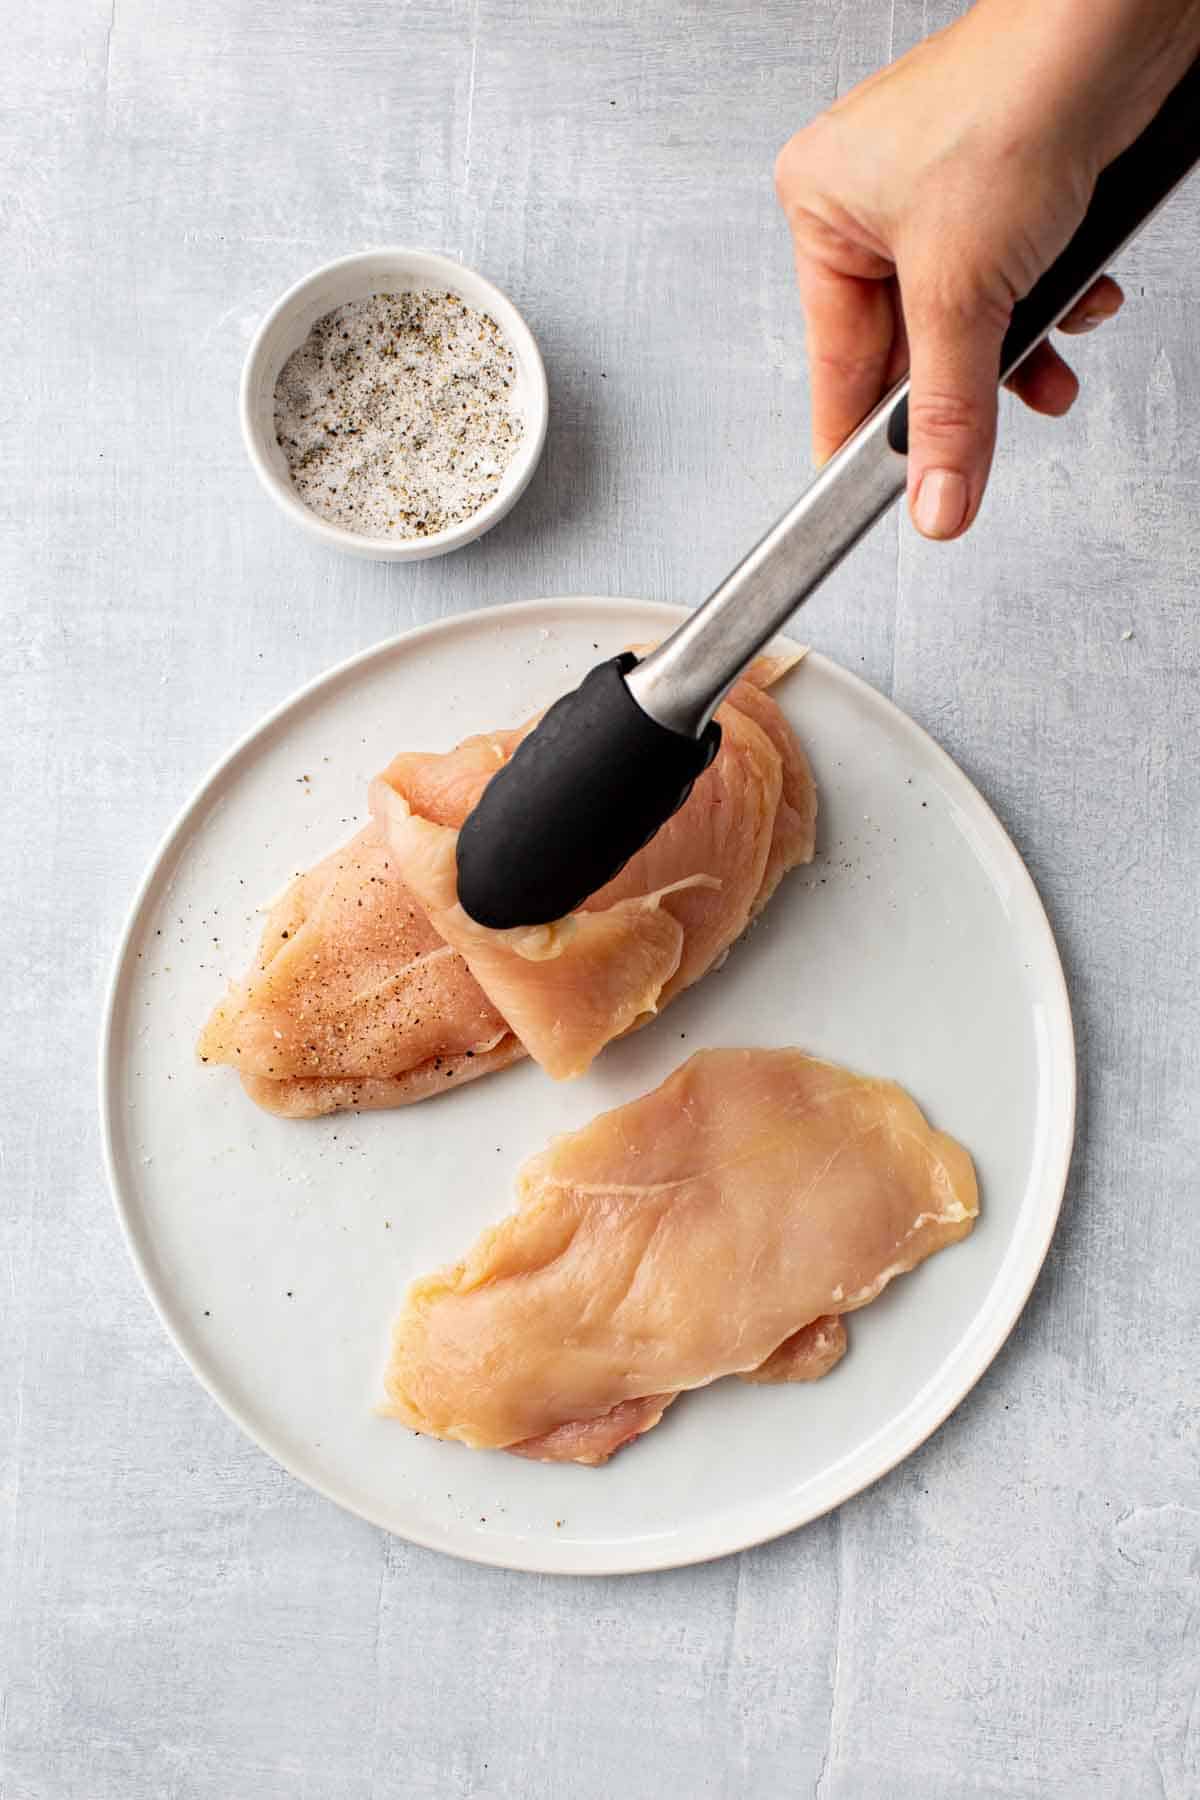
- Season each piece of chicken on both sides with salt and pepper.
Seasoning Tip!
To season the chicken cutlets faster, liberally season one side only, then stack another piece of chicken on top of it and repeat. This allows the seasoning to transfer onto the other piece, so both sides can be seasoned more quickly and efficiently.
Bread the chicken

- Set up the breading station so that the chicken is on the far left, then next to it the flour, then the egg, then the breadcrumbs, and then a landing plate or pan to hold the breaded chicken.
- Take a piece of chicken and dip it into the flour to coat on all sides, then tap off the excess (*See note).
- Next, dip it in the egg mixture and let the excess drip off.
- Transfer the chicken into the breadcrumbs. Be sure to press it down and move it around so that it's thoroughly coated. Place the chicken on the reserved plate, and repeat with the remaining pieces.
Pan Fry the chicken cutlets
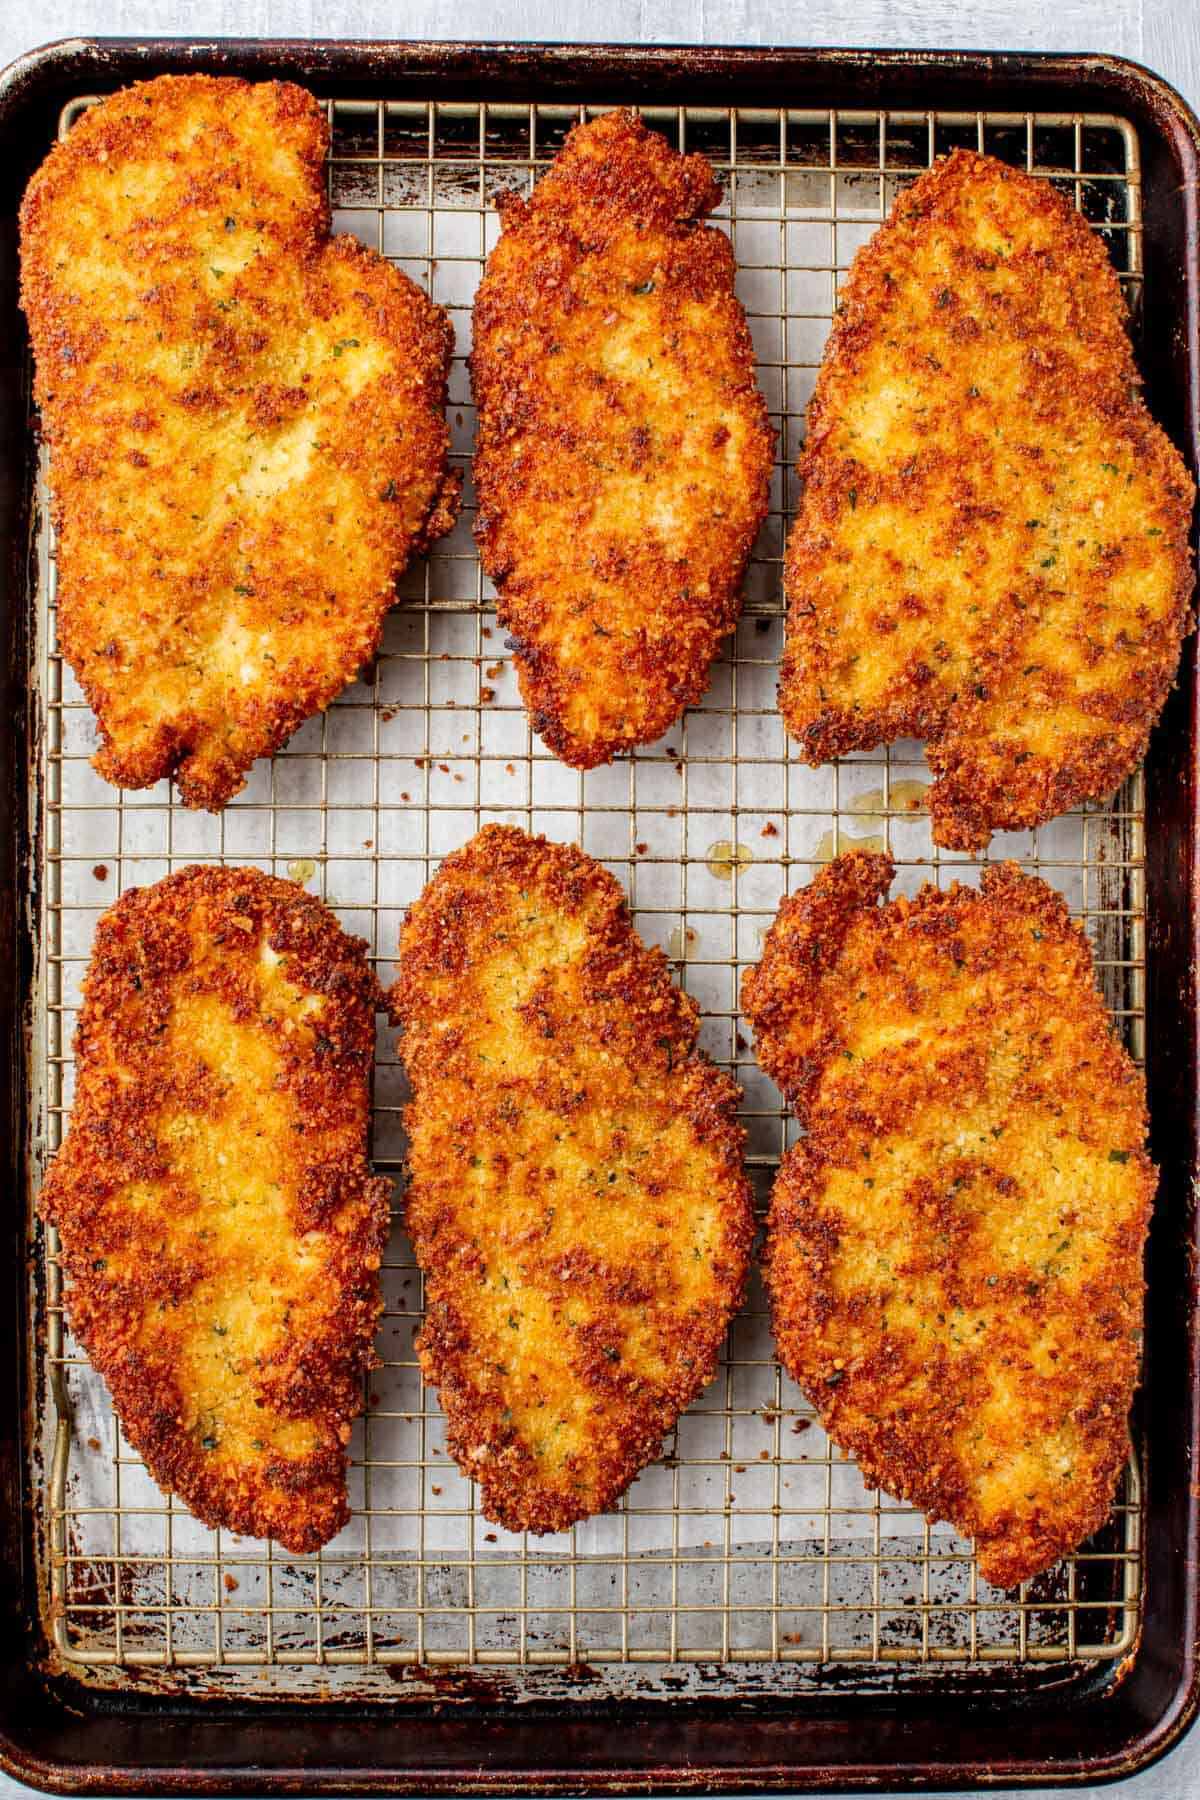
- Line a sheet pan with foil or paper towels, then top with a wire rack for draining.
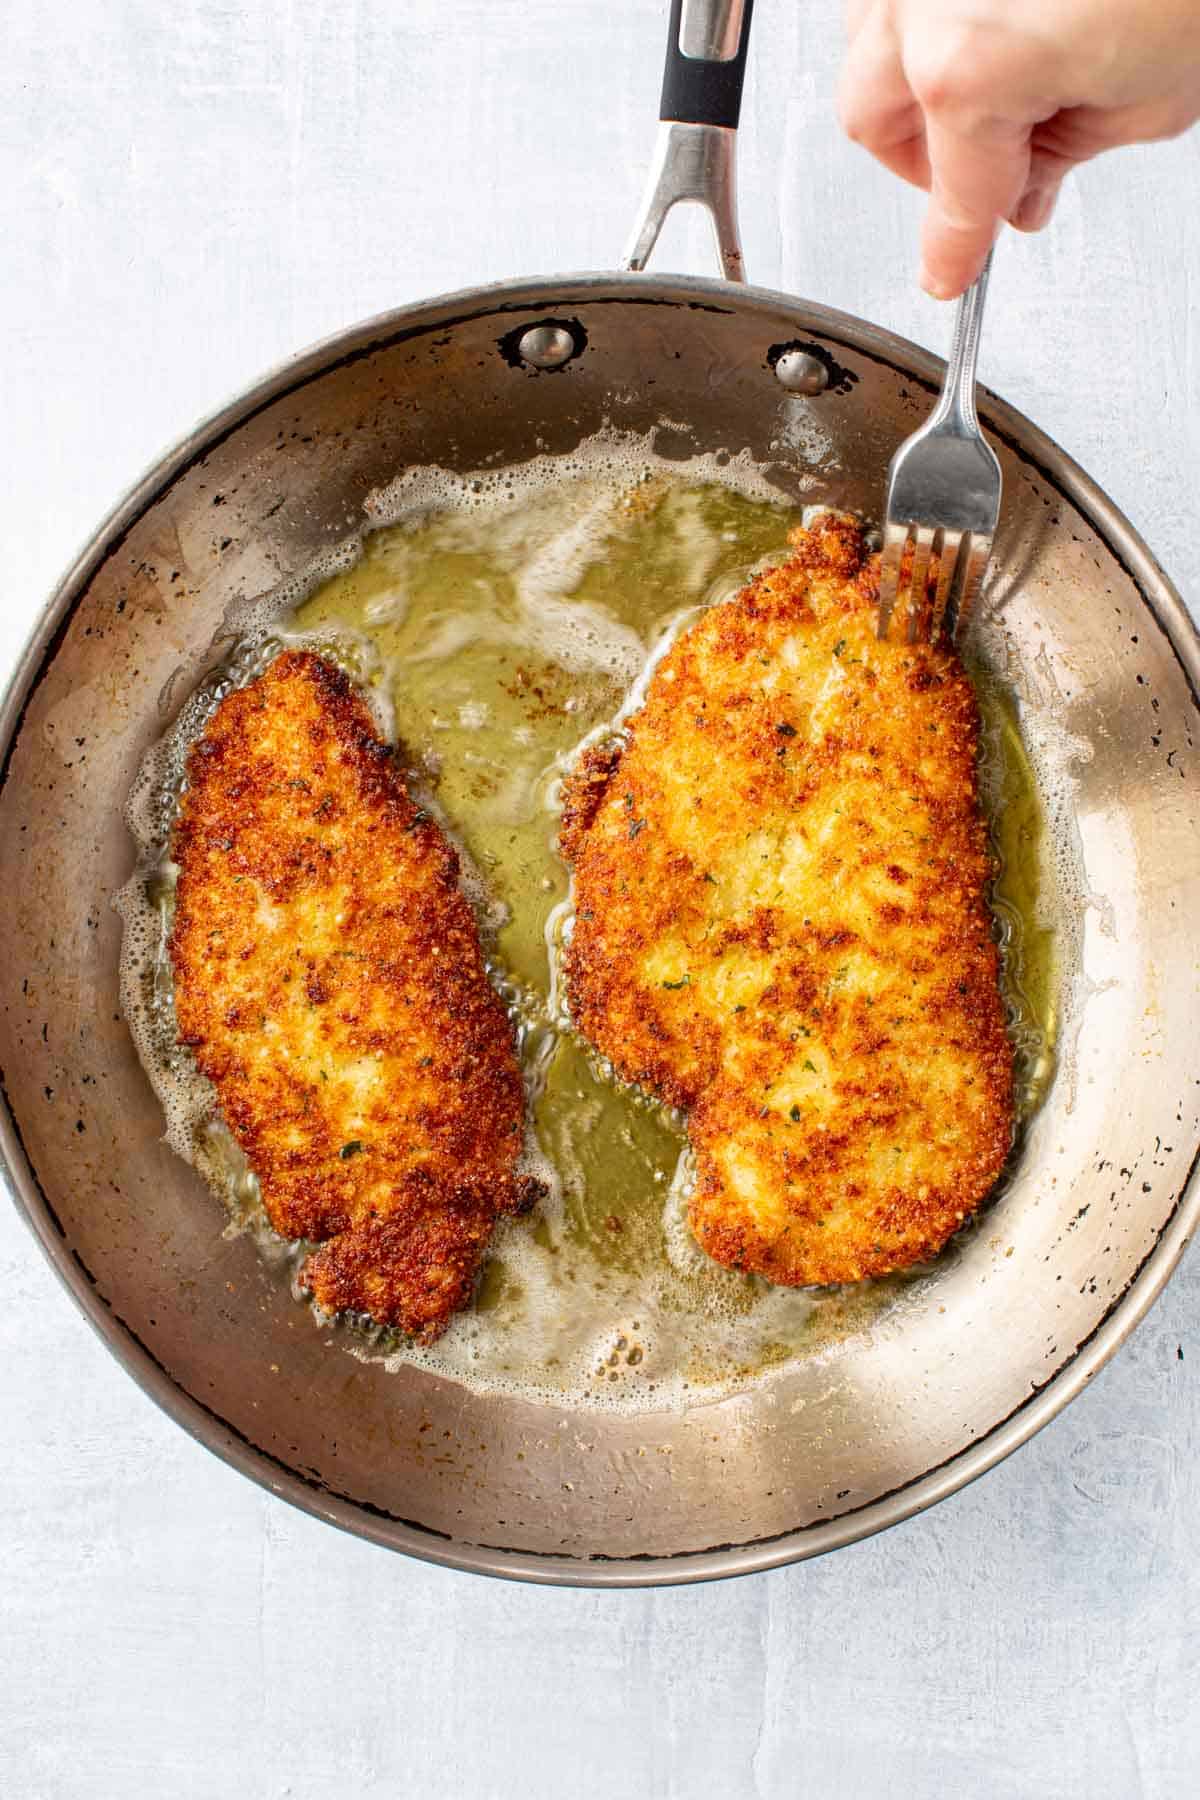
- Heat a generous amount of olive oil in a large, heavy bottomed skillet over medium-high heat.
- Place 1-3 chicken breasts in at a time, depending on how many your pan can hold. Don't overcrowd the pan.
- Cook until golden brown on each side, then remove to a rack or paper towels to drain.
- Serve immediately. or place in a 250 degree F oven for up to 1 hour before serving to keep warm.
Tips for Success
- Let the breaded chicken sit for about 30 minutes before you fry to help the breading stick.
- Don't overcrowd the pan when frying. Try not to fry more than two at a time, but depending on your pan or size of the cutlets you may only be able to fit one.
- Use a fork to bread the chicken and flip it in the pan. It's much easier than tongs!
- Drain fried chicken cutlets on a rack rather than paper towels to keep them crispier.
- If you have leftover breadcrumbs, freeze them in a zip-top bag and use them again the next time you make chicken cutlets!
Serving Suggestions
There's nothing like hot, crispy chicken cutlets right out of the pan! My favorite way to eat them is with a sprinkle of flaky sea salt and a squeeze of fresh lemon juice. Perfection!
We love making chicken cutlet sandwiches! Layer them on an Italian roll with sharp provolone, roasted Italian long hots and sautéed broccoli rabe, or smother them with marinara sauce and fresh mozzarella, then broil, for the best crispy chicken parm sandwich!
They also make a wonderful addition to salads, like this warm spinach salad or this kale Caesar salad. Serve it with a bowl of soup, like my famous New England clam chowder or a classic creamy Lobster Bisque and you have the perfect meal!
Italian chicken cutlets are fantastic leftover! I like to eat them cold, straight out of the refrigerator, often with my hands!
Chicken Cutlet Variations
To switch up the flavor profile, try seasoning your breadcrumbs differently.
Replace the grated cheese with za'atar and serve with a garlicky, lemony tahini sauce for a Mediterranean twist. For an Asian twist, omit the cheese and Italian seasoning and add sesame seeds, then serve with a simple soy based dipping sauce. Or leave the breadcrumbs plain and serve with honey mustard, barbecue sauce or ranch!
My Almond Crusted Chicken Cutlets are a perfect example of how you can use this base recipe to create something original!
You can also use a different type of meat, such as a veal cutlet, pork, or beef. For a vegetarian version, you can substitute eggplant, seitan or tofu!
Faq about Italian Breaded Chicken Cutlets
It helps to let the breaded chicken cutlets rest in the refrigerator for about 30 minutes before frying. This helps the breading adhere to the chicken and form a crust.
If the oil isn't hot enough, the breadcrumbs will absorb the oil and turn soggy, resulting in chicken cutlets that are more greasy than they are crispy. Make sure the oil has plenty of time to heat up before placing the chicken cutlets in the pan. It should look shimmery.Ho
The best way to keep the chicken crispy is to set a rack on top of a sheet pan and allow the cutlets to drain on that rather than paper towels. You can keep them in a 250 degree F oven for up to an hour before serving to keep them hot and crispy.
Yes. A lot of people prefer to fry in a neutral oil like vegetable or canola oil because they have a higher smoke point, but I find they have a much better flavor when fried in olive oil. If you're not comfortable frying in all olive oil, try a 50-50 mixture of olive oil and vegetable oil instead.


Did you LOVE this recipe? Please leave a star ⭐️ rating and comment and tag your creations @ColeyCooks on Instagram!
Want to Save This Recipe?
Enter your email & I'll send it to your inbox.
By submitting this form, you consent to receive emails from Coley Cooks.

Best Ever Chicken Cutlets
Ingredients
- 3 cups homemade breadcrumbs or panko
- 3 cloves garlic finely minced or grated
- 2 tablespoons fresh Italian flat leaf parsley finely minced
- ½ teaspoon dried Italian seasoning optional
- 1 ¼ cup finely grated pecorino Romano or parmesan cheese (or both) divided
- kosher salt to taste
- freshly ground black pepper to taste
- 3 large eggs
- 1 cup all purpose flour
- 2 lbs boneless skinless chicken breasts thinly sliced
- extra virgin olive oil for frying
Instructions
- Add the breadcrumbs, garlic, parsley, Italian seasoning, and ¾ cup cheese to a medium shallow bowl. Season with salt and pepper, then use your fingers to mix it together, working the garlic into the breadcrumbs until evenly distributed.
- In another medium, shallow bowl, whisk together 3 eggs with ½ cup cheese, a pinch of salt and pepper and 1 tablespoon water until combined.
- Pour the flour into another shallow bowl or plate, season with salt and pepper and mix to combine.
- Take one piece of thinly sliced chicken and place it on a cutting board. Place a piece of plastic wrap over top, then use a meat mallet to pound it out to be about ½ inch thick. Repeat with the remaining chicken.
- Season each piece of chicken on both sides with salt and pepper.
- Set up the breading station so that the chicken is on the far left, then next to it the flour, then the egg, then the breadcrumbs, and then a landing plate or pan to hold the breaded chicken.
- Take a piece of chicken and dip it into the flour to coat on all sides, then tap off the excess (*See note).
- Next, dip it in the egg mixture and let the excess drip off.
- Transfer the chicken into the breadcrumbs. Be sure to press it down and move it around so that it's thoroughly coated. Place the chicken on the reserved plate, and repeat with the remaining pieces.
- Heat a generous amount of olive oil in a large, heavy bottomed saute pan over medium-high heat. Place 1-3 chicken breasts in at a time, depending on how many your pan can hold. Don't overcrowd the pan.
- Cook until golden brown on each side, then remove to a rack or paper towels to drain.
- Serve immediately, or place in a 250 degree F oven for up to 1 hour before serving to keep warm.
Notes
- *When breading, I try to designate one hand for touching only dry things, like flour and breadcrumbs, and one hand for touching only wet, like the raw chicken and eggs. This prevents you from breading your fingers in the process.
- Serve as is with a squeeze of lemon, with a tomato arugula salad, or smother with marinara and mozzarella to make chicken parm. This procedure also works equally as well with veal and pork.
- Leftovers can be stored, wrapped tightly, in the refrigerator for up to 5 days, or in the freezer for up to 3 months.
- If you have leftover breadcrumbs, freeze them in a zip-top bag and use them again the next time you make chicken cutlets!
Nutrition


I made this after having made chicken cutlets many times before for my husband and he actually loved these so much his response was you may have my mom beat! That is WHAT an achievement!! This is a must make!
So glad you loved the recipe! What an amazing compliment!
I’ve followed this recipe several times and they always come out amazing. My family and I love them. Even the picky eaters like. Definitely the best chicken cutlet recipe I’ve had this far. Thanks for sharing!
This is so wonderful to hear! Thanks so much for leaving a review!
Five stars! Of course I did not have any fresh ingredients. Used jarred everything and Italian seasoned bread crumbs and the cutlets were delicious. Thank you
Amazing! Thanks so much for your helpful review!
This recipe is delicious! I only had a pound of chicken so I cut the recipe in half. It was easy to put together and didn't take long to fry. I will definitely make this again!
Thank you so much! I'm so glad you enjoyed the recipe.
Subbed the flour for corn starch and used gluten free panko crumbs, turned out excellent!
Thank you for sharing your gluten free modifications - this is so helpful! Glad you loved the recipe! 🙂
I have read this article thoroughly twice! I will be making 3 pounds of cutlets tomorrow night and I'm so excited to try this recipe I have everything on hand and will be making my own "panko" bread crumbs tomorrow I will leave a follow up comment to let you know how it turned out and I thank you for how thorough your directions are! I love to cook and try new methods! ❣️
Amazing! I hope you love it, please do report back! 🙂
The best! I’ve made this with three different sauces and its always the star
I'm so glad you think so! Thanks so much for leaving such a kind review! 🙂
We loved the Chicken. I'll be making this again and again!
I'm so glad you loved the recipe! Thanks for leaving a review!
It was really the best chicken. Thank you for the recipe.
I'm so happy you think so. 🙂 Thank YOU for leaving a review!
I made this recipe last night and adjusted amounts for 1 and a half the recipe quatity since I had three pounds of chicken and a big family. It is a bit labor intensive which is why I always try to cook enough for 2 or 3 days. The flavor is great and it was fun to make.
I did need to almost double the egg batter. I started with 5 eggs because of how much chicken I had, but ended up needing three more eggs and of course the additional grated cheese and tiny bit of water to mix in. Everything else worked out well. I do wish there were guidelines for about how much salt to add to each dish, like the breadcrumbs and flour. I didn't add enough salt I guess so my family just sprinkled a little on top and it was really good.
Using a meat thermometer was really helpful. I would cook on a lower heat next time as the outsides of mine got pretty dark fast. I used a large cast iron pan and was able to fit 5 cutlets each batch. I would definitely make this again and probably double the recipe to have scrumptious left overs. My kids loved it, even my kiddo that doesn't like to eat meat much.
Thank you for leaving such a thorough review! I usually don't give exact measurements for salt and pepper because it can be very subjective. My palate leans salty, and I've received feedback that dishes are too salty in some recipes where I do specify the salt quantities. But I'm glad you enjoyed the recipe!
so amazing recipe. it came out perfectly. its now my go to recipe. thanks.
So glad you loved the recipe!!
My husband and I have made these five times now and, every time, we agree that they're the best breaded chicken cutlets we've ever had! We always serve them with mashed potatoes, cream gravy and green beans - delightful! Would recommend to anyone!
That sounds so delicious! I'm so happy you loved the recipe, thanks for commenting!
These are delicious! I think my pan was too hot as my breading turned dark quickly. I finished in the oven for 10 minutes to make sure they were cooked through.
This will be on my Sunday meal prep routine!
Thank you! Yes, if your breading darkened really fast your pan was likely too hot. Just dial back the heat a bit next time and you'll be good to go!
Breading is very flavorful!
I'm glad you thought so! Thanks!
Way too much work and the ingredient measurements were way off. I ended up throwing away half or the panko mixture and needed another 25% of the egg mixture. It tasted good but I wouldn't make it again.
I'm sorry it didn't work out for you. You can always freeze the leftover panko for the next time you make them. It really depends on how thick your chicken pieces are, and I'd rather you not come up short.
Way too much panko. What a waste.
I'm sorry you thought so! It sounds like perhaps your chicken wasn't sliced thinly or pounded out enough, since that would result in using less breadcrumbs. If you have a lot leftover, you can always freeze them to use next time. Thanks for sharing your thoughts and hope you still enjoyed the chicken.
Love this recipe, great taste and very tender!
Amazing! Thanks for leaving a review!
I made this yesterday and it was amazing. I let the coated chicken sit in the fridge for 40ish minutes before frying it in corn oil + olive oil. It was perfectly crispy and so tasty. My husband also loved it! Can’t wait to keep making this recipe.
Thank you so much! I'm so happy you loved the recipe! 🙂
I'm on a keto diet. I used pork rind crumbs instead of panko and left out the flour.
That sounds great! Thanks for sharing your modifications!
Absolute 10/10! LOVED these!
Amazing! Thanks for leaving a review!