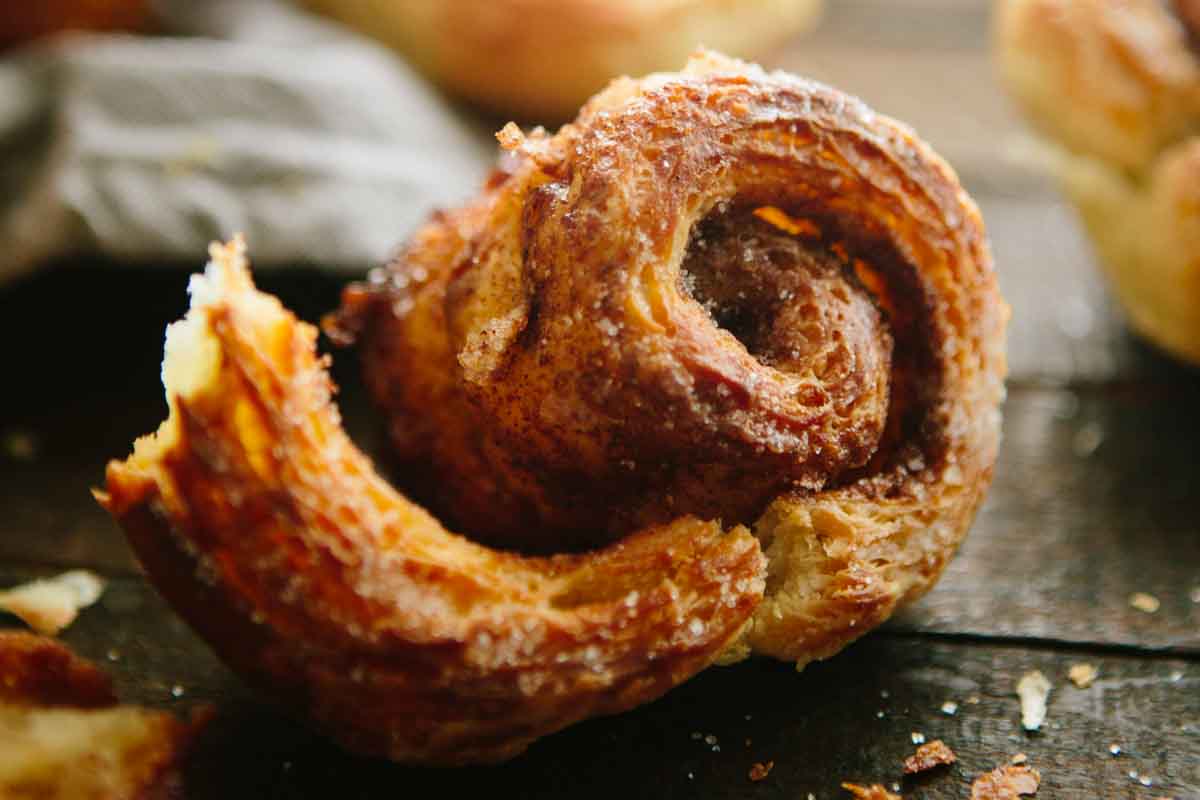
Flaky Morning Buns
These buttery, flaky Morning Buns are a mashup between a croissant and a sticky bun. If you love flaky layered pastries and fun weekend baking projects, then this one is for you! Start them Friday evening and they'll be ready to devour first thing Sunday morning.
This post may contain affiliate links.

These croissant morning buns are one of the more ambitious recipes on my site. It was inspired by the light and flaky morning buns at Tartine bakery in San Francisco. They are incredible!
They're made with a buttery laminated croissant dough so they're super light and crisp with a cinnamon sugar filling that caramelizes in the oven.
It's a fun baking project to do over a winter weekend because it takes a bit of time, but the process is relaxing and meditative, and the payoff is more than worth it.
What is a Morning Bun?
Morning buns fall into the same category as cinnamon buns, but they tend to be a little lighter, not as sweet and not iced.
This version is made with a laminated dough, like puff pastry, danish dough or croissant dough.
Lamination refers to the process of rolling and folding thin sheets of butter into dough to create puffed layers and crispy flakes once baked.
This is one of the most intimidating baking processes and, while I'm certainly no stranger to the struggle, it's a fun and rewarding technique to learn.
Don't get frustrated if your buns don't turn out perfect the first time, it's normal. Baking, like anything else, is a practice.
Yet unlike most other things, even when the results are less than perfect, they're usually still pretty delicious and that always counts as a win in my book!
This morning buns recipe is a slight adaptation of Tartine's famous morning buns. It does take a substantial amount of time, but most of it is inactive. Your best bet is to start these laminated morning buns on a Friday evening, work on them throughout Saturday, and then they'll be ready to bake on Sunday morning. As long as you don't have to leave the house for longer than an hour on Saturday, the process can actually be pretty leisurely.
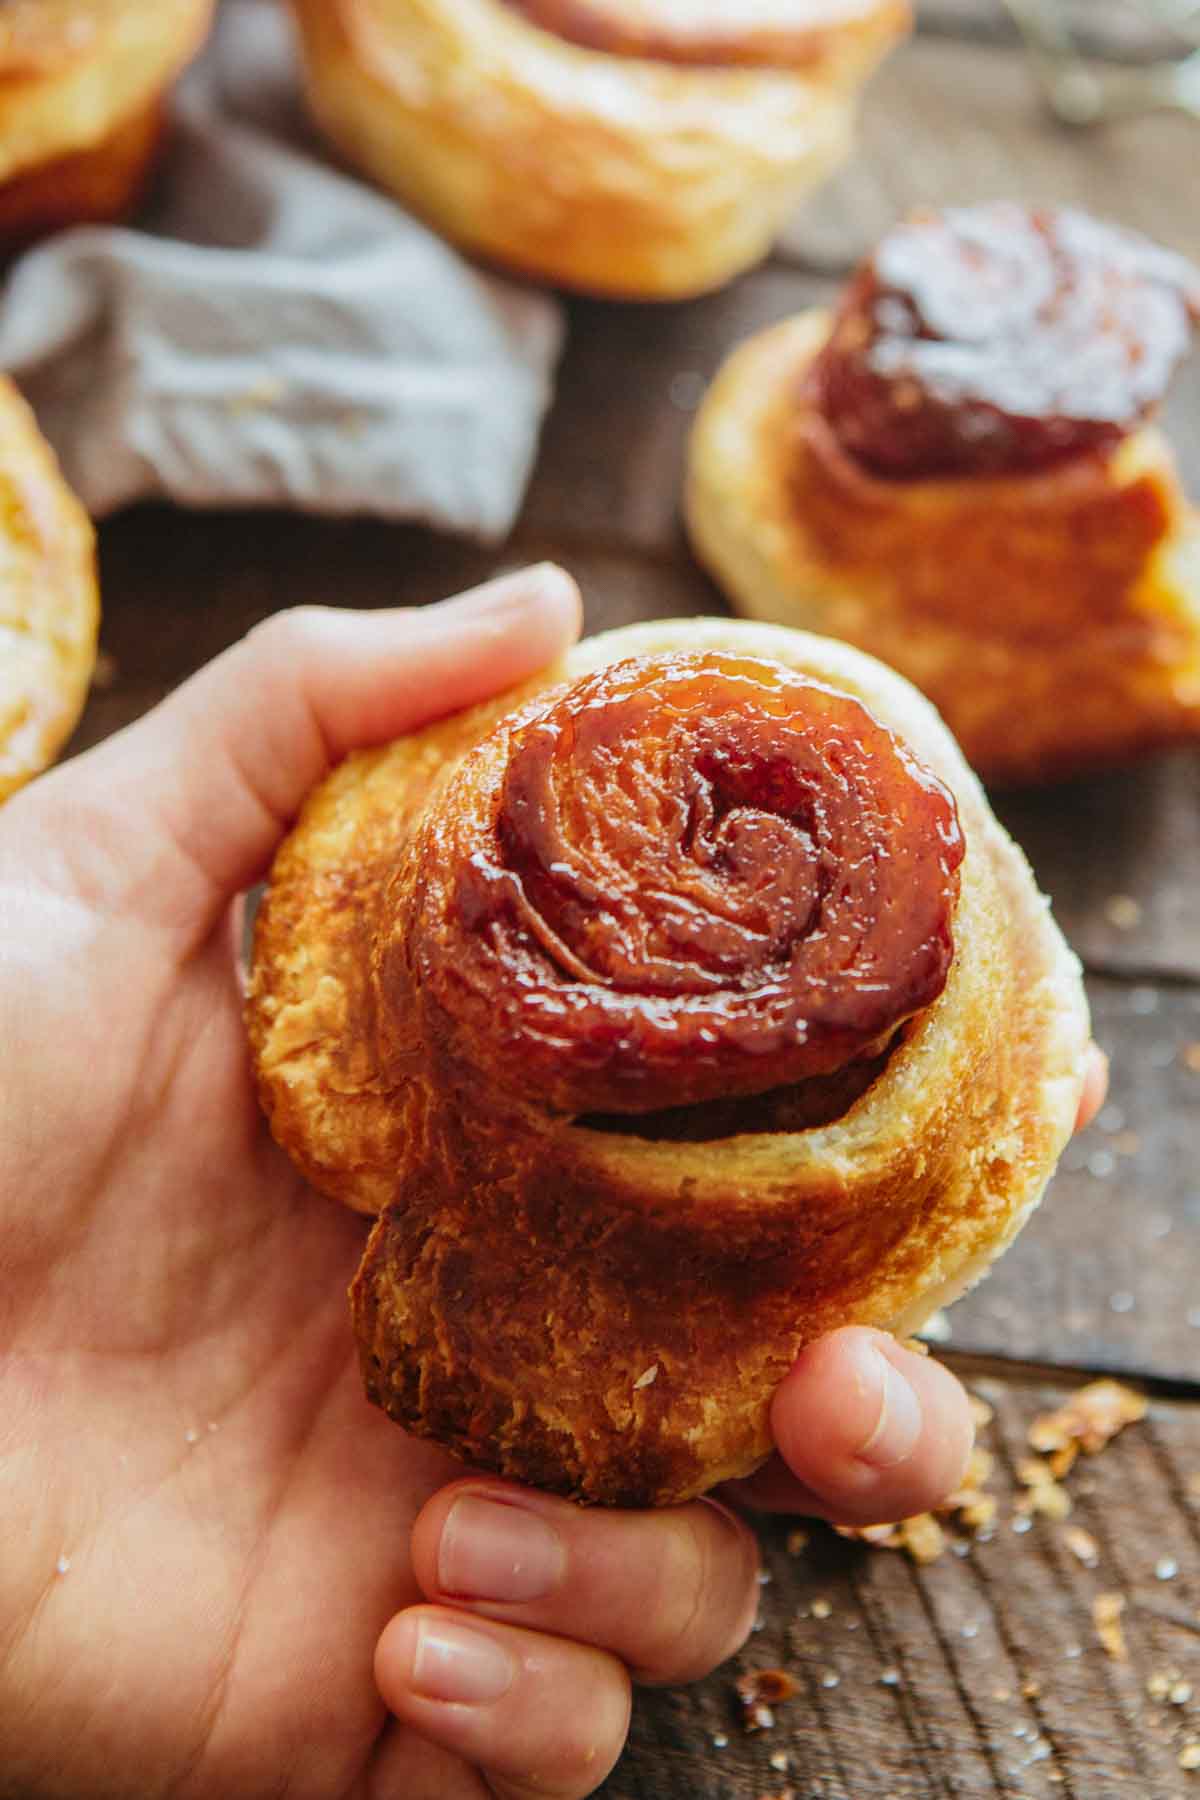
The best way to describe them is a glorious mashup between a croissant and a sticky bun!
The first step to making these is to make a preferment for the yeasted dough, which adds structure and flavor. From there, the dough is made and then the lamination happens. This step is the trickiest, but don't let it scare you. The key, as I've learned, is getting the butter to the right consistency.
You want the butter to be somewhere between firm and soft, cool but not cold, and definitely not warm. It sounds tricky, but you'll know when you're there. It needs to be malleable enough to spread into an even layer, but not so soft that it's like icing a cake.
The best way to achieve this is by beating cold butter in a stand mixer for a few minutes. Focus on getting this right and you shouldn't have any problems.
The butter gets spread onto the dough and then folded again and again. This is what creates all those gorgeous flaky layers in the finished buns. After each fold or "turn", the dough needs to chill a bit before doing it again.
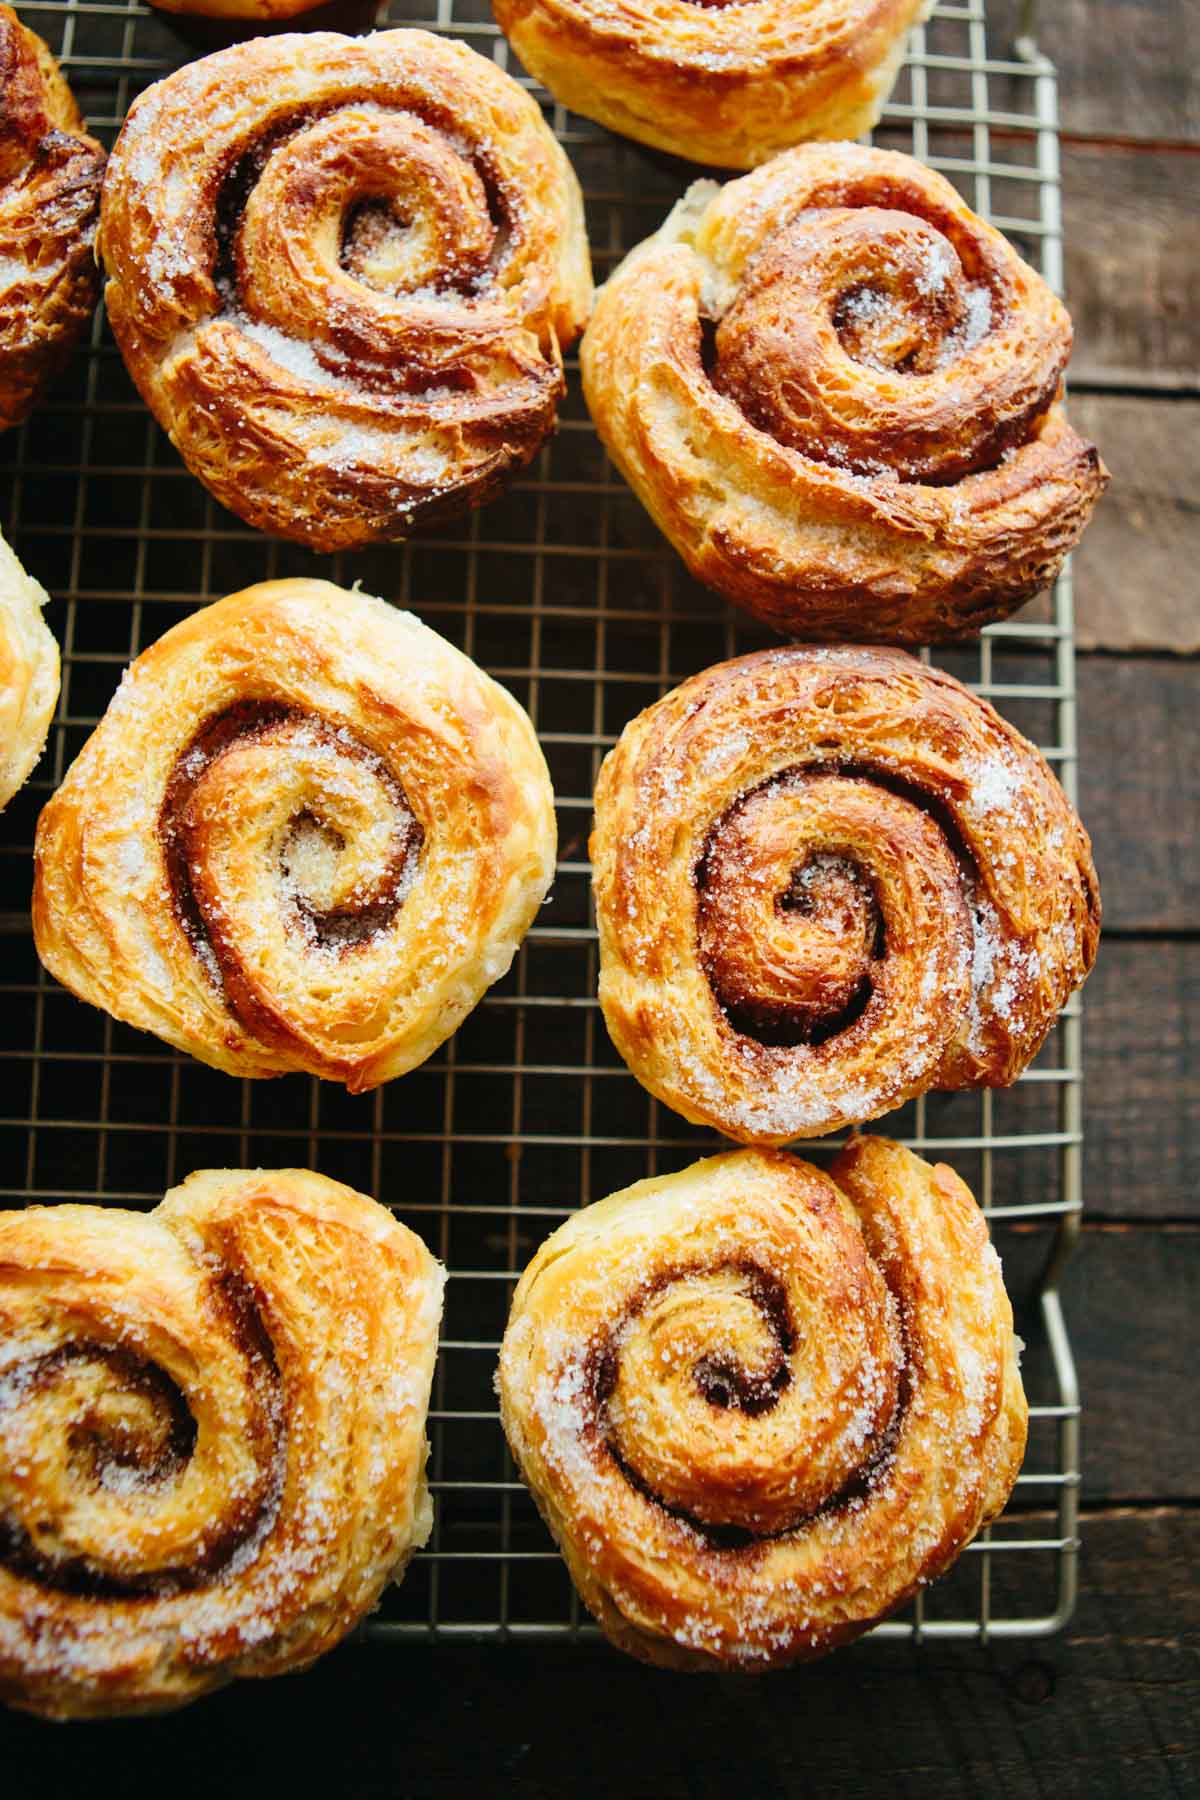
The laminated dough then gets rolled up with a filling of more butter, cinnamon, sugar and orange zest, then gets plopped into a buttered and sugared muffin tin. Once baked, the dough puffs up to become light and crisp while the butter and sugar caramelize together to create the most incredible flavor and texture.
The shattering crunch of the outer layers, the tender inner crumb, the sticky sweet caramel on the bottom and the little bits of butter that gush out when you bite down. Come onnnnnn!
Want more great pastry recipes? Try my Quick and Easy Cinnamon Rolls, these fun Nutella and Banana Phyllo Pastries or a rustic Apple Crostata for an easy fruit dessert.
Why This Recipe Works
- It's the perfect mash up of a croissant and a sticky bun.
- Takes some time to prepare, but most of the work is inactive.
- The preferment adds structure and flavor to the dough.
- The lamination process is clearly explained and helps you achieve that signature flaky texture.
- Getting the butter to the right consistency helps make lamination easier.
- The cinnamon sugar caramelizes as they bake for a sticky caramel crust.
Ingredient Notes
Butter - Use unsalted butter throughout the recipe so you can better control the seasoning and get that clean buttery flavor. Make sure it's cool but pliable when it's time to laminate.
Active dry yeast - You can also use instant yeast if that is what you have on hand. Active dry yeast is usually dissolved in warm liquid before using, while instant yeast can be mixed directly into the dough.
Flour - All purpose flour works well here and gives the right balance of tenderness and strength. Avoid swapping in other types of flour, since that can affect the texture.
Milk - Whole milk gives the dough richness and helps create a soft interior. Warm it gently so it doesn't get too hot or it could harm the yeast.
Light brown sugar - Adds sweetness and helps create that caramelized layer on the bottom of the buns. Make sure it is packed when measuring so you get the right amount.
Orange zest and cinnamon - These bring brightness and warmth to the filling. Use fresh zest and a good quality ground cinnamon for the best flavor.
Salt - I use Diamond Crystal Kosher salt, which is less salty than other brands. You may need to adjust to taste.
*Find the full ingredient list in the recipe card below!
Helpful Equipment
- Stand mixer
- Dough hook
- Rolling pin
- Offset spatula
- 12 cup muffin tin
- Sheet pan
- Plastic wrap
- Wire rack
- Serrated knife
How to Make Morning Buns
Make the Preferment
- Heat the milk in a saucepan over medium low heat until warm (80-90°F is ideal). Transfer to a medium bowl, then stir in the yeast. Let sit for a minute, then mix in the flour until smooth. Cover and let rise until doubled in volume, about 2-3 hours at room temperature or overnight in the refrigerator.
Make the Dough
- Place the preferment in the bowl of a stand mixer fitted with a dough hook. Add the yeast and mix on medium speed for about 4 minutes, stopping to scrape down the sides and hook as needed.
- Add half the milk, then continue mixing on medium speed until fully incorporated. Add the remaining milk along with the flour, sugar, salt, and melted butter, then mix on low speed until it forms a shaggy dough, about 3 minutes. Cover and let rest for 20 minutes.
- Turn the mixer back on low speed and mix until the dough becomes smooth and elastic, about 3-4 minutes, but not any longer.
Pro Tip: Overmixing will cause the dough to become tough.
- Cover and let dough rise until the volume increases by half, about 1-2 hours.
- Dust a large work surface with flour, then place the dough on top. Press into a rectangle about 2 inches thick. Wrap in plastic wrap, then refrigerate for 4-6 hours.
Laminate the Dough
- About an hour before you're ready to laminate the dough, place the butter in the bowl of a stand mixer and beat with a paddle attachment until smooth and slightly softened. The goal is for the butter to be pliable enough to spread, but still cool and relatively firm. If the butter is too soft, it will ooze out of the dough. Once the butter is at the proper consistency, transfer to a piece of plastic wrap and form into a rectangle. Cover and refrigerate if the house is warm, otherwise leave it at room temperature until ready.
- Remove the dough from the refrigerator and transfer to a lightly floured surface. Roll the dough into a 20 x 10 inch rectangle with the long side facing you.
- Use your fingers and/or an offset spatula to spread the butter over the left two thirds of the dough, leaving the right third bare. Spread the butter as evenly as possible and leave a ½ inch border around the edges.
- Fold the bare third (on the right) over the buttered center, then fold the remaining buttered side (on the left) over that, like a letter. Gently pinch the seams together to encase the butter.
Pro Tip: If the dough starts to feel very soft at any point, chill it briefly so it is easier to work with and keeps its shape.
- Turn the dough ¼ of the way so that the long end is facing you again, then roll into another 20 x 10 inch rectangle, being careful not to release any of the butter. Fold the rectangle into thirds the same way you did before, then wrap loosely in plastic wrap, transfer to a sheet pan and refrigerate for 1-2 hours.
- Return the dough to the work surface, dusting with more flour if needed. Carefully roll out into another 20 x 10 inch rectangle and fold into thirds one more time. Rewrap in plastic, then transfer to the refrigerator for an additional 1-2 hours or overnight.
Pro Tip: The dough may also be frozen at this point for up to 3 months.
Assemble and Bake the Morning Buns
- Mix together the granulated sugar, brown sugar, orange zest, cinnamon, and salt in a small bowl.
- Brush the insides of a 12-cup muffin tin lightly with butter, then sprinkle with granulated sugar. Swirl the pan around to coat all sides, then tap out the excess sugar (reserve for finishing the buns). Line a sheet pan with parchment paper.
- Remove the dough from the refrigerator, transfer to a lightly floured work surface, and roll out to a 16 x 12 inch rectangle with the long side facing you. Brush the rectangle all over with the remaining melted or softened butter, then sprinkle the cinnamon sugar mixture evenly over the top.
- Starting with the long side facing you, carefully roll the dough into a tight log, then pinch the seams together to seal. Transfer to the parchment lined baking sheet, cover with plastic wrap, and chill for 30 minutes to firm up.
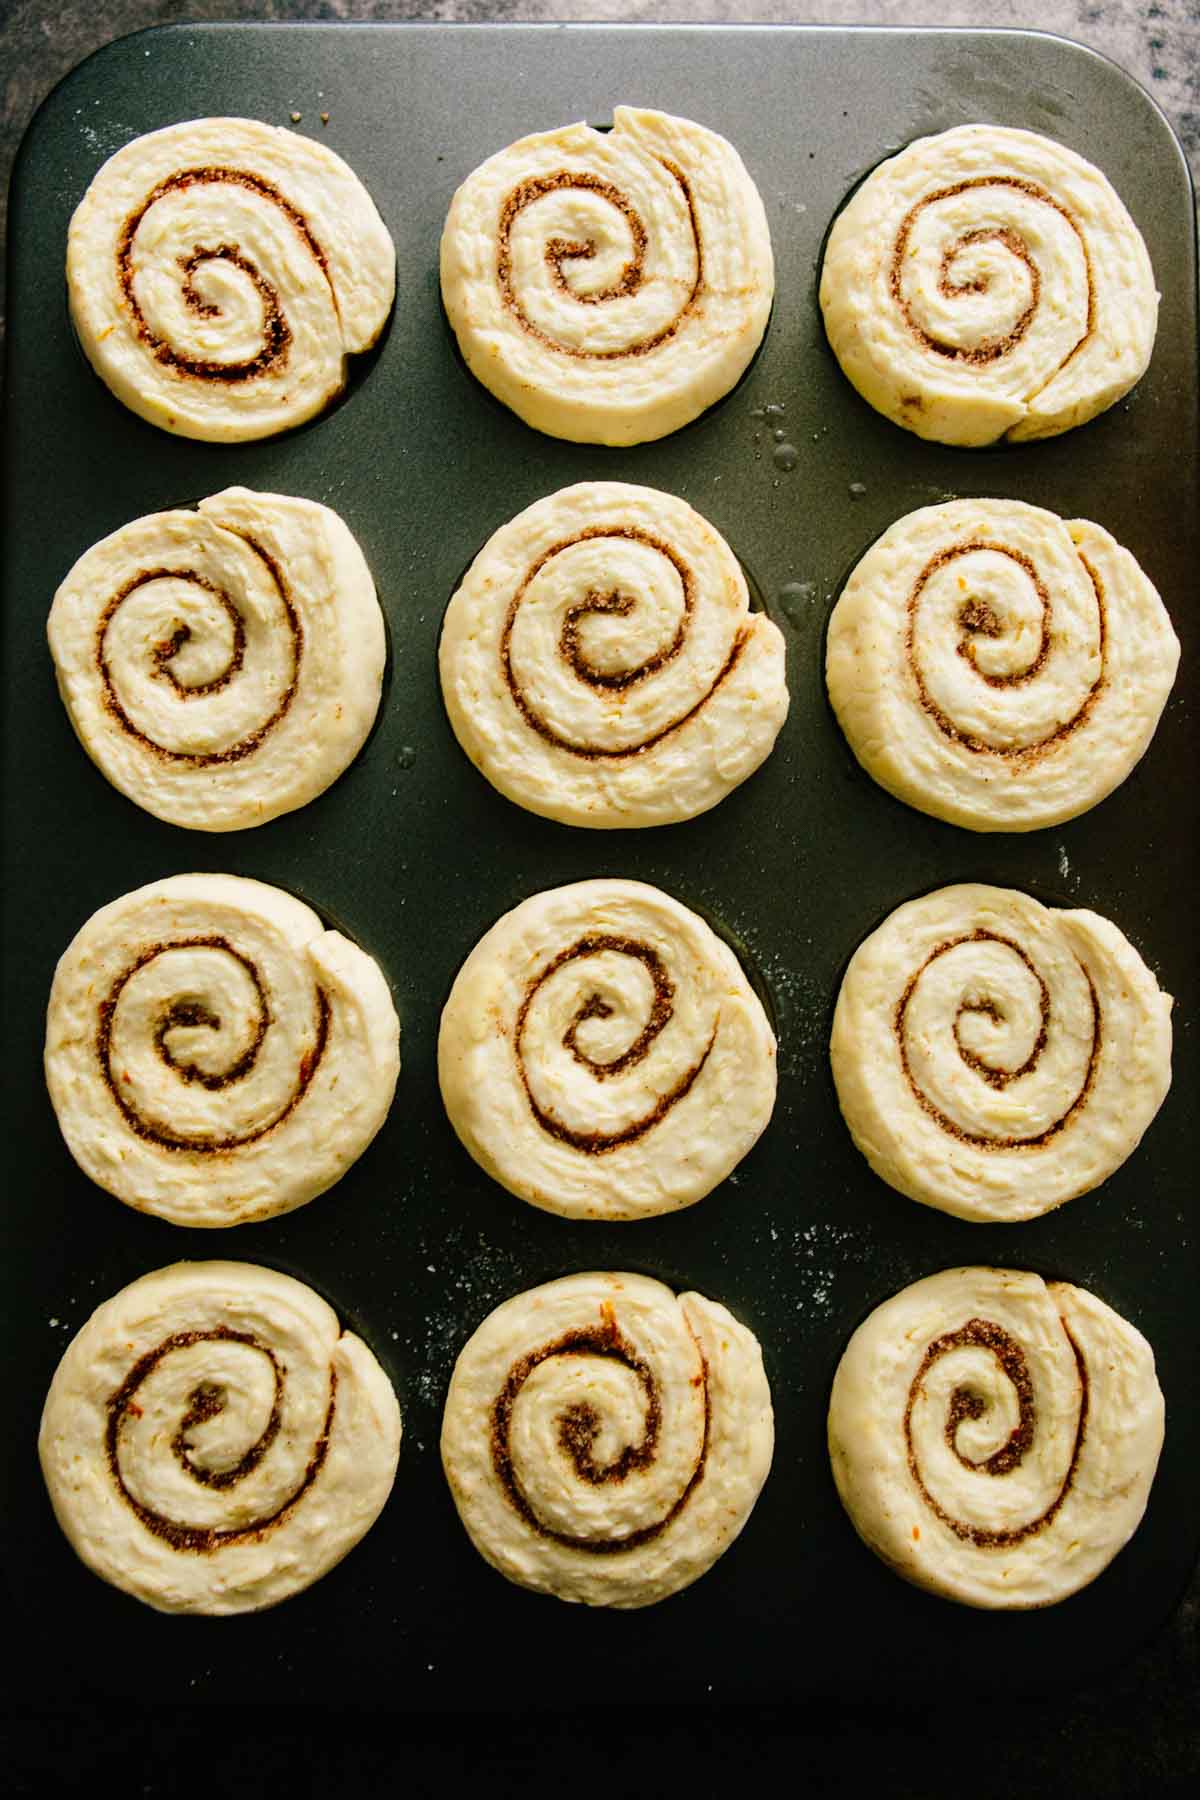
- Remove the log from the refrigerator, then use a sharp knife to cut into 12 even pieces. Start by cutting directly down the center, then cut each half in half, then each half into thirds.
- Place each piece into a muffin cup, then cover loosely with plastic wrap and let proof somewhere warm until puffed up, about 1 hour.
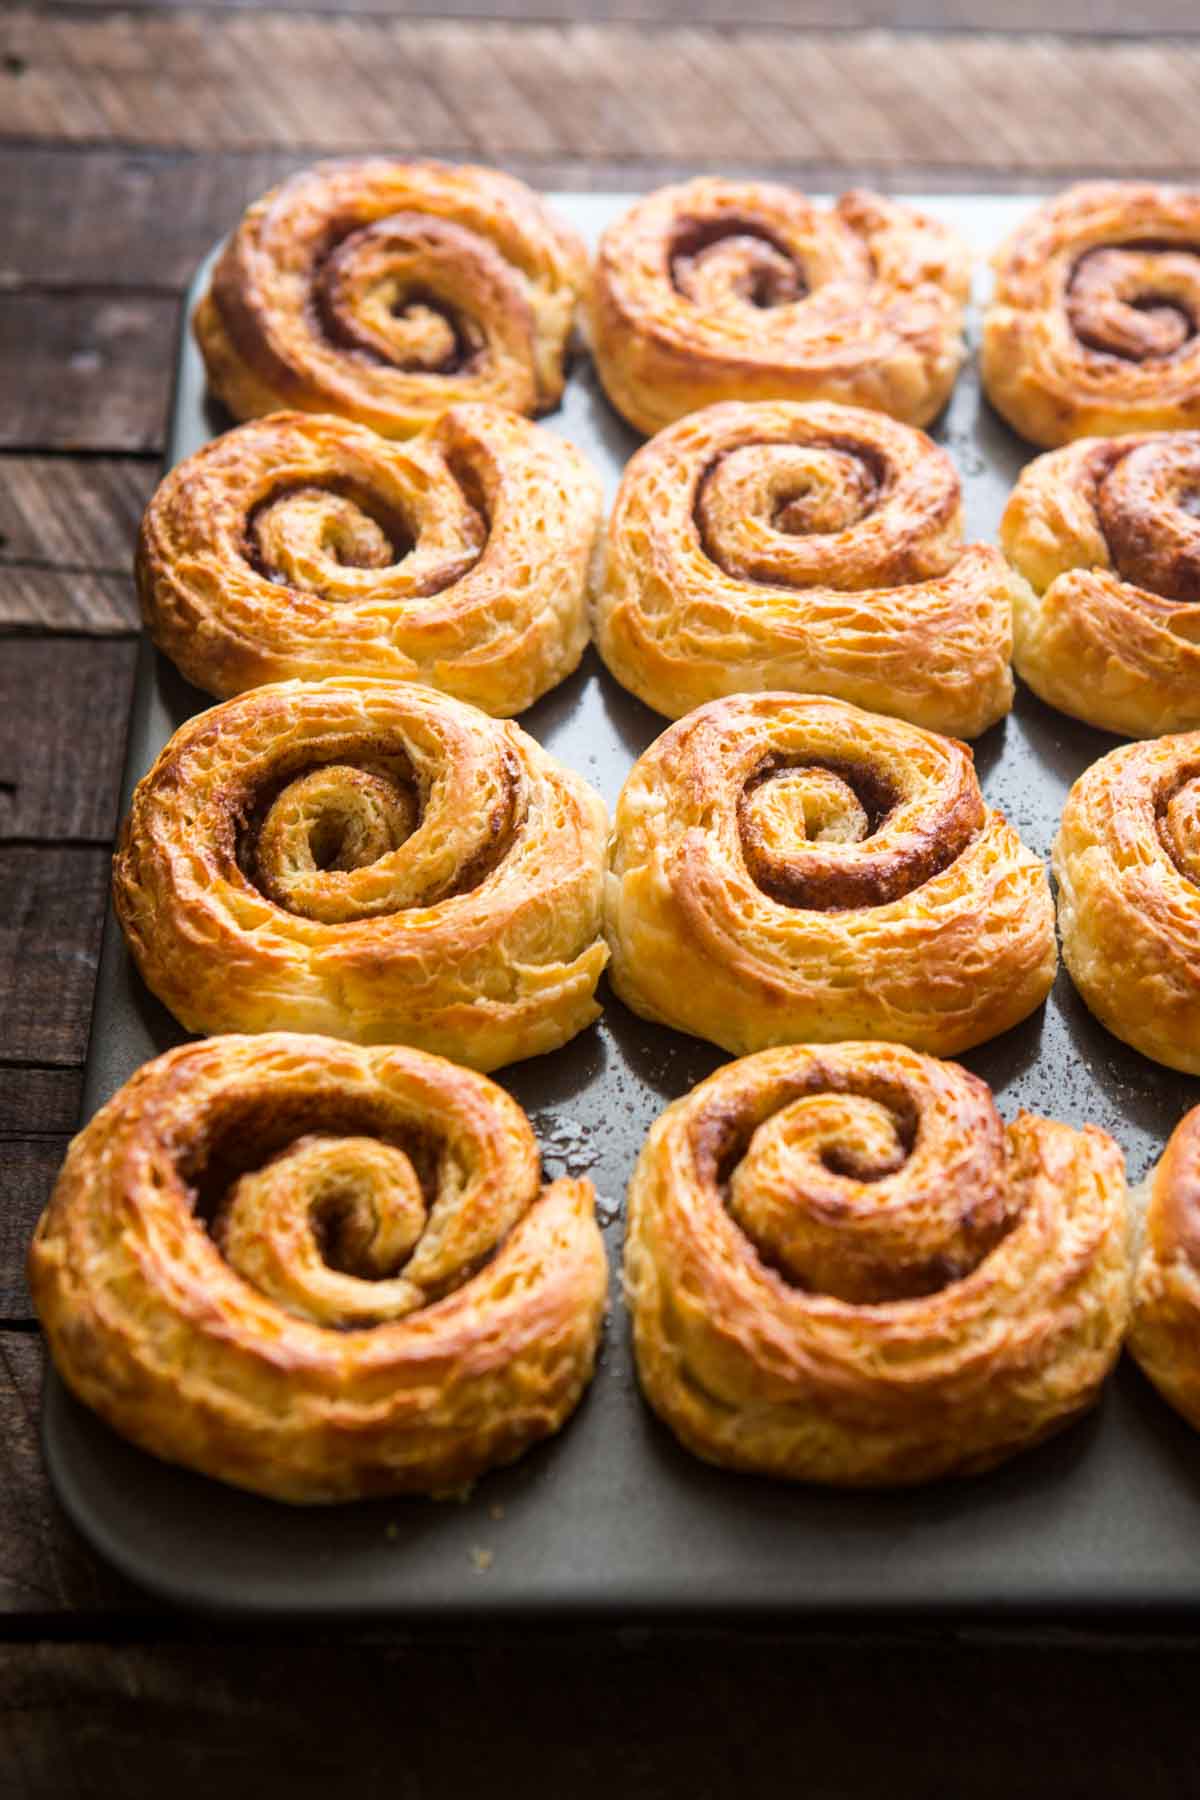
- In the meantime, preheat the oven to 375°F. Place the muffin tin on a parchment-lined baking sheet to catch any drippings, then transfer to the oven. Bake buns until deep golden brown, about 45 minutes to 1 hour.
- Generously dust the tops with granulated sugar as soon as they come out of the oven. Let the buns sit in the pan for about 2-3 minutes, then gently remove them from the pan and let cool upside down on a wire rack.
- Serve warm. Buns are best enjoyed the day of, but any leftovers can be frozen for later.
Tips for Making Laminated Morning Buns
- Pay close attention to the butter consistency during lamination so it spreads smoothly without getting too soft or melting.
- Keep the dough and butter cool at every stage to help build distinct layers. It helps to keep your kitchen cool and dip your hands in ice water occasionally while working with the dough.
- Give the dough enough time to rest between folds so it rolls out evenly without shrinking.
- Proof the shaped buns in a comfortably warm place so they rise slowly and evenly before baking.
Variations
- Add vanilla beans or vanilla bean paste to the filling.
- Use ground cardamom to make cardamom sugar or add nutmeg to the sugar mixture.
- Swap out the orange zest for lemon zest if you prefer a brighter citrus flavor.
- Finish the buns with a simple glaze or homemade salted caramel sauce instead of sugar for a texture closer to a sticky bun.
- Add some crushed nuts to the sugar filling for extra crunch.
Serving Suggestions
Serve these warm buns with hot cup of coffee, a chilled Cold Brew Coffee over ice or with an Affogato for a fun contrast of hot and cold!
The buns also go great alongside my Smoked Salmon Tart with a side of Candied Bacon for brunch with my Everything Bagel Pull Apart Bread for a little bit of sweet and savory!
How to Store and Rewarm
These are at their best shortly after baking, when the exterior is crisp and the centers are still tender. Store any leftovers in an airtight container at room temperature for up to 1 day.
To reheat, place the buns on a baking sheet and warm in a 300°F oven for about 5-8 minutes, just until heated through and refreshed.
For longer storage, freeze the baked buns in a single layer, then transfer to a sealed bag or container. Reheat from frozen in a 300°F oven until warmed through.
FAQs
Yes. Once the buns are shaped and placed in the muffin tin, you can cover them with plastic wrap and refrigerate overnight. In the morning, let them reach room temperature before baking.
You can freeze the buns before they go stale, then reheat them in the oven and they'll still be excellent. If you somehow wind up with stale leftovers (which I doubt), you can cut them into small bites and turn them into bread pudding.
Morning buns are made from a yeasted laminated dough, which is similar to what you'd use for croissants. The process starts by enclosing a cool, pliable butter block inside the dough, then folding and rolling it to build layers. This creates the flaky texture that makes these such delicious pastries. The dough needs time to rest between folds so the top of the dough stays smooth and workable, especially if the butter softens. Use cool but not cold butter, warm or room temperature butter would melt into the layers. Once fully laminated, the dough can rest until the next day before shaping and baking in a muffin pan.

Did you LOVE this recipe? Please leave a star ⭐️ rating and comment and tag your creations @ColeyCooks on Instagram!
Want to Save This Recipe?
Enter your email & I'll send it to your inbox.
By submitting this form, you consent to receive emails from Coley Cooks.

Tartine Bakery Morning Buns
Ingredients
Preferment
- 6 tablespoons milk
- 1 ½ teaspoons active dry or instant yeast
- ⅔ cup all purpose flour
Dough
- 2 teaspoons active dry or instant yeast
- ¾ cup plus 2 tablespoons milk
- 3 cups all purpose flour
- 3 tablespoons sugar
- 2 teaspoons kosher salt
- ½ tablespoon unsalted butter melted and cooled
- 2 ¾ sticks unsalted butter (22 tablespoons) cool but pliable
Filling and Assembly
- ⅓ cup granulated sugar plus more for the pan and dusting finished buns
- ⅓ cup light brown sugar
- 2 teaspoons orange zest optional
- 1 ½ tablespoons cinnamon
- ¼ teaspoon kosher salt
- 4 tablespoons unsalted butter melted and cooled
Instructions
Make the Preferment
- Heat milk in a saucepan over medium-low heat until warm, 80 to 90℉ is ideal. Transfer to a medium bowl, then stir in yeast. Let sit for a minute, then mix in flour until smooth. Cover and let rise until doubled in volume, about 2 to 3 hours at room temperature or overnight in the refrigerator.6 tablespoons milk, 1 ½ teaspoons active dry or instant yeast, ⅔ cup all purpose flour
Make the Dough
- Place the preferment in the bowl of a stand mixer fitted with a dough hook. Add yeast and mix on medium speed for about 4 minutes, stopping to scrape down the sides and hook as needed.2 teaspoons active dry or instant yeast
- Add half the milk, then continue mixing on medium speed until fully incorporated. Add the remaining milk along with the flour, sugar, salt and melted butter, then mix on low speed until it forms a shaggy dough, about 3 minutes. Cover and let rest for 20 minutes.¾ cup plus 2 tablespoons milk, 3 cups all purpose flour, 3 tablespoons sugar, 2 teaspoons kosher salt, ½ tablespoon unsalted butter
- Turn the mixer back on low speed and mix until the dough becomes smooth and elastic, about 3 to 4 minutes, but not any longer. Overmixing will cause the dough to become tough. Cover and let rise until the volume increases by half, about 1 to 2 hours.
- Dust a large work surface with flour, then place dough on top. Press into a rectangle about two inches thick. Wrap in plastic, then refrigerate for 4 to 6 hours.
Laminate the Dough
- About an hour before you're ready to laminate the dough, place butter in the bowl of a stand mixer and beat with a paddle attachment until smooth and slightly softened. The goal is for the butter to be pliable enough to spread but still cool and relatively firm. If the butter is too soft, it will ooze out of the dough. Once the butter is at the proper consistency, transfer to a piece of plastic and form into a rectangle. Cover and refrigerate if the house is warm, otherwise leave it at room temperature until ready.2 ¾ sticks unsalted butter
- Remove dough from the refrigerator and transfer to a lightly floured work surface. Roll dough into a 20 x 10 inch rectangle with the long side facing you.
- Using your fingers and/or an offset spatula, spread the butter over the left two thirds of the dough, leaving the right third bare. Spread the butter as evenly as possible and leave a ½ inch border around the edges.
- Fold the bare third, on the right, over the buttered center, then fold the remaining buttered side, on the left, over that like a letter. Gently pinch the seams together to encase the butter.
- Turn the dough one quarter of the way so the long end is facing you again, then roll into another 20 x 10 inch rectangle, being careful not to release any of the butter. Fold the rectangle into thirds the same way you did before, then wrap loosely in plastic wrap, transfer to a sheet pan and refrigerate for 1 to 2 hours.
- Return the dough to the work surface, dusting with more flour if needed. Carefully roll out into another 20 x 10 inch rectangle and fold into thirds one more time. Rewrap in plastic wrap, then transfer to the refrigerator for an additional 1 to 2 hours or overnight. The dough may also be frozen at this point for up to 3 months.
Assemble and Bake the Morning Buns
- Mix together the granulated sugar, brown sugar, orange zest, cinnamon and salt in a small bowl.⅓ cup granulated sugar , ⅓ cup light brown sugar, 2 teaspoons orange zest, 1 ½ tablespoons cinnamon, ¼ teaspoon kosher salt
- Brush the insides of a 12 cup muffin tin lightly with butter, then sprinkle with granulated sugar. Swirl the pan around to coat all sides with sugar, then tap out the excess, reserve for finishing the buns. Line a sheet pan with parchment paper.
- Remove the dough from the refrigerator, transfer to a lightly floured work surface and roll out to a 16 x 12 inch rectangle with the long side facing you. Brush the rectangle all over with the remaining melted butter, then sprinkle the sugar mixture evenly over the top.4 tablespoons unsalted butter
- Starting with the long side facing you, carefully roll dough into a tight log, then pinch the seams together to seal. Transfer to the parchment lined baking sheet, cover with plastic wrap and chill for 30 minutes to firm up.
- Remove the log from the refrigerator, then use a sharp knife to cut into 12 even pieces. Start by cutting directly down the center, then cut each half in half, then each half into thirds.
- Place each piece into a muffin cup, then cover loosely with plastic wrap and let proof somewhere warm until puffed up, about 1 hour.
- In the meantime, preheat the oven to 375℉. Place the muffin tin on a foil-lined sheet pan to catch any drippings, then transfer to the oven. Bake until deep golden brown, about 45 minutes to an hour.
- Generously dust the tops with granulated sugar as soon as they come out of the oven. Let the buns sit in the pan for about 2 to 3 minutes, then gently remove them from the pan and let cool upside down on a wire rack.
- Serve warm. Buns are best enjoyed the day-of, but any leftovers can be frozen for later.
Notes
- Pay close attention to the butter consistency during lamination so it spreads smoothly without getting too soft or melting.
- Keep the dough and butter cool at every stage to help build distinct layers. It helps to keep your kitchen cool and dip your hands in ice water occasionally while working with the dough.
- Give the dough enough time to rest between folds so it rolls out evenly without shrinking.
- Proof the shaped buns in a comfortably warm place so they rise slowly and evenly before baking.

after you place the morning buns in the muffin tins ,can they go in the refrigerator overnight and then come out in the morning? -an overnight rise?
I have not tried this but I think it can work. Just take them out of the refrigerator 1-2 hours before baking so they can come to room temperature and proof. Make sure they are puffed up a bit before baking. Let me know how they turn out!
#6 under ‘laminate the dough’ says you can freeze for up to 3 months.
Love that, they’ll be like fresh when you bake.
Yes exactly! Hope you love them!
It's delish! Makes ya dance while ya eat kinda food!
But like the TEA, I also follow this girl @_andrealoren who posts some amazing foods and idk if they're like rivals but maybe y'all should peep her food coz coley cooks but andrea COOOOOKS. Ya know what I'm sayin'
I made these over a few days so it wasn't overwhelming. They are delicious. I froze most of them as I live alone. How do you recommend to reheat them?
Thanks
Oh, I'm so glad! Freezing them is a great move. I would thaw first in the refrigerator if you can, then place in a low oven (or toaster oven) - around 200 degrees F - for about 10 minutes. They should be good as new!
This was a wonderful recipe and turned out delicious.
The one problem; there's no way this takes 45 min. to an hour to cook.. I cooked it at 375 for 25 minutes and they were more than done.
Glad you enjoyed the recipe, Steven! I'm sorry the cook times were off - that's interesting they cooked so quick for you!
That looks so delicious!! So fun to see a new way to make Croissant!
Thank you so much! They are dreamy 🙂
These look heavenly! Completely worth the time and effort.
Hi Coley
Nice recipe .I love all the pictures you posted .I would have liked if you had posted the procedure of making
thank you
Jenny