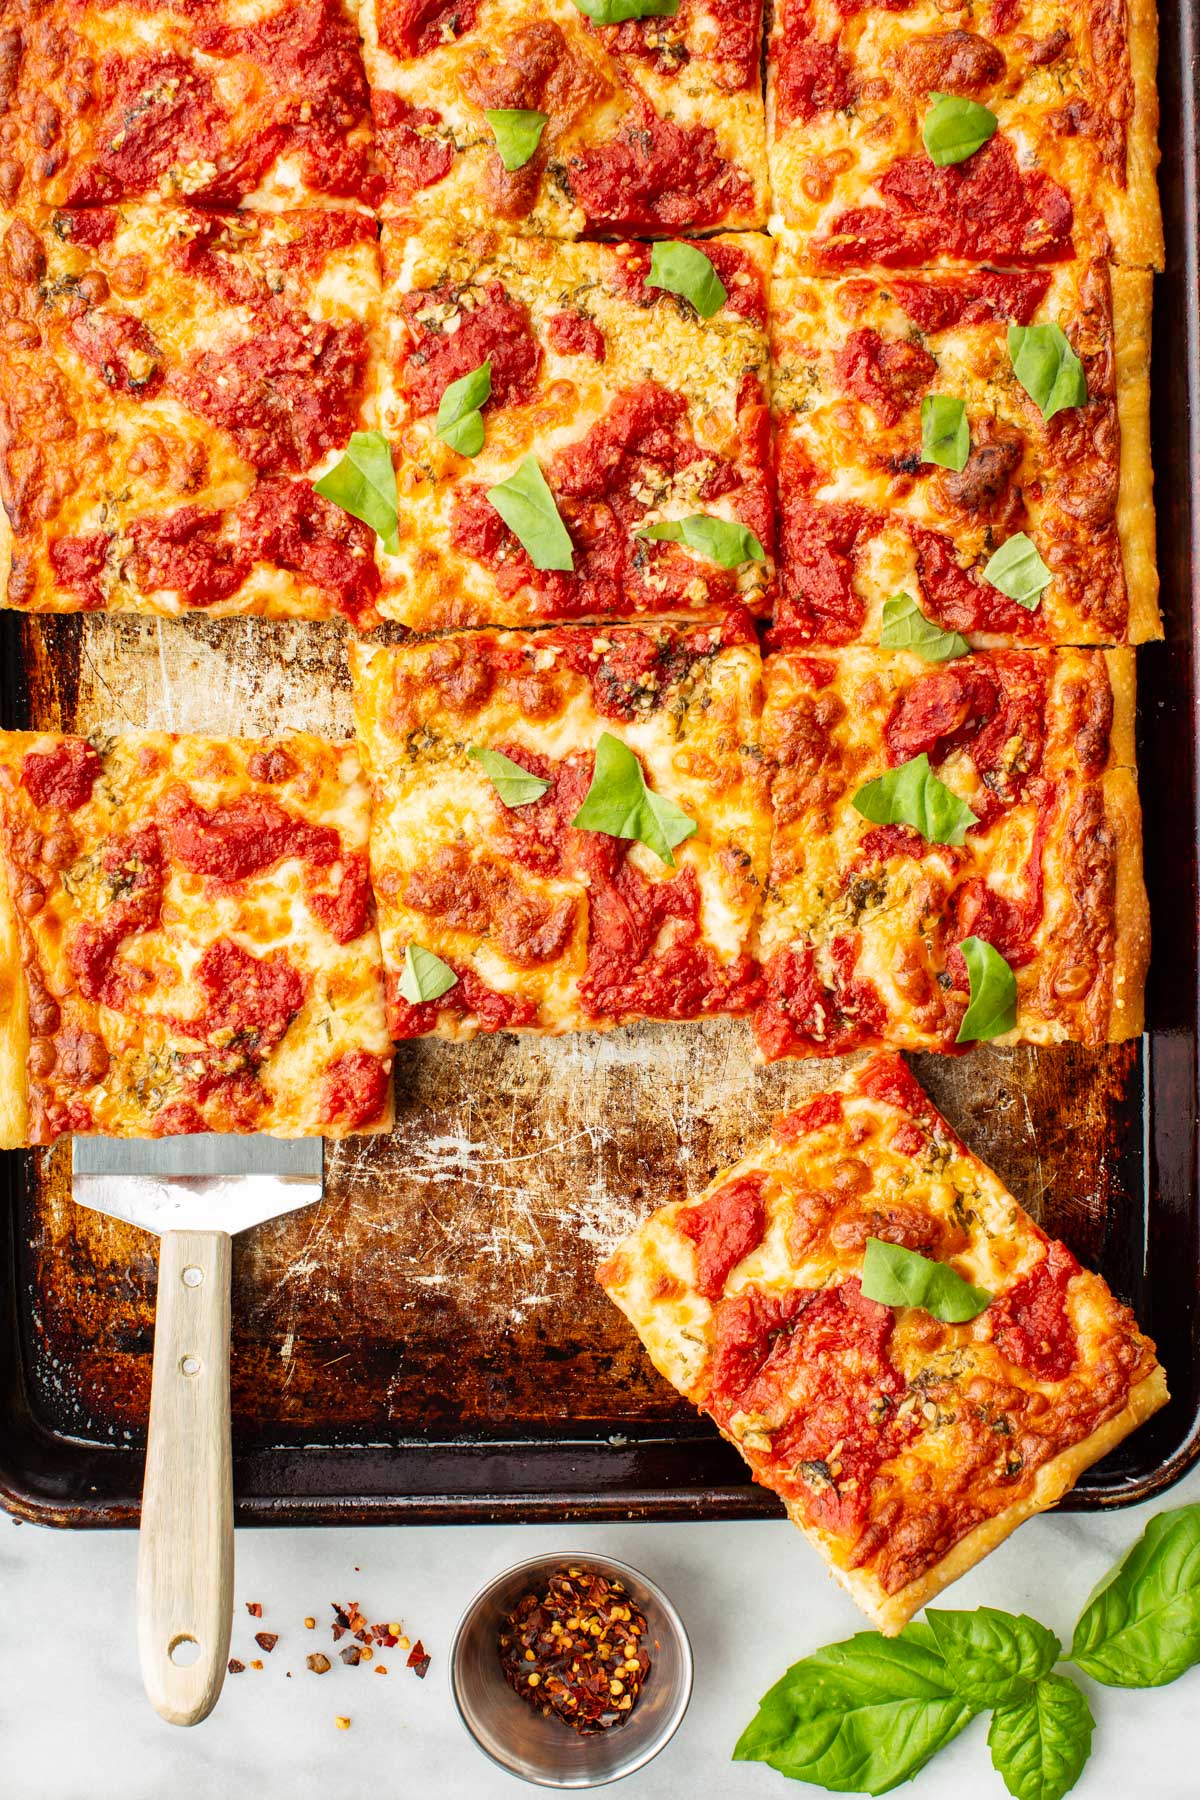
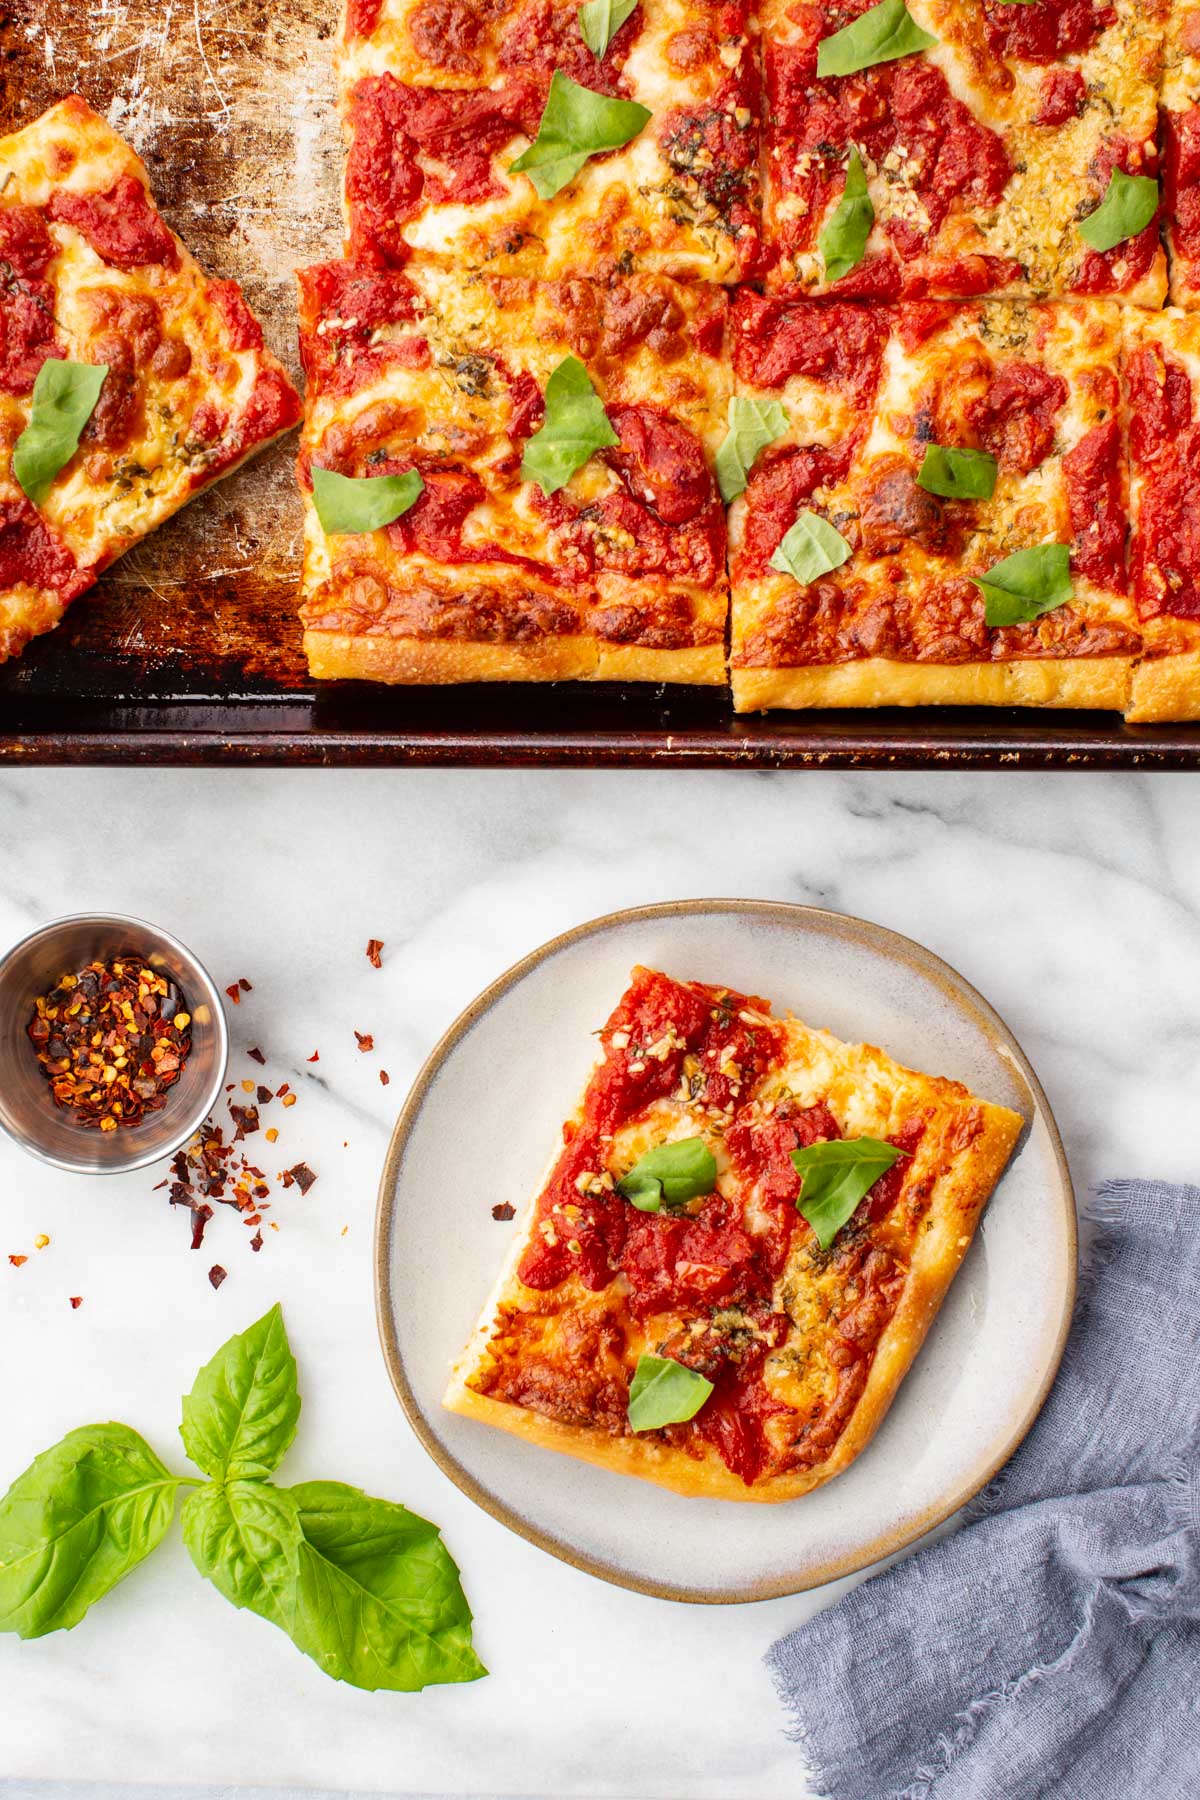
Grandma Pizza
This recipe for grandma pizza bakes up with a crackly, golden crust and a light yet chewy interior, topped with big chunks of tomato sauce, garlicky olive oil and plenty of cheese. I spent years testing different dough hydrations, fermentation times and baking methods until I landed on a version that I love. I'll walk you through the process step-by-step so you can make your own grandma pie at home, no pizza oven required!
This post may contain affiliate links.
Grandma pizza, or grandma pie as it's known here in New Jersey, is a classic.
There are a few great pizza places where I live in South Jersey that are known for their grandma pies, and over the years, they've become my absolute favorite. I love their light, crisp, almost fried crust that's not too thick or thin, with just the right amount of cheese, big chunks of tomato sauce, and lots of garlic.
This past year I got really obsessed with trying to master grandma pizza at home. I tested out multiple different styles of dough, ranging from my light and airy no-knead focaccia to my thin and chewy Neapolitan pizza dough. Neither one was quite right, so eventually I landed somewhere in between.
It's taken me a gazillion tries to get this recipe just right, but I finally made it happen! I think it's even better than the pies we get at the local pizza joints that inspired the recipe in the first place.
Today I'm sharing all the tips and techniques you need to follow to make a homemade grandma pizza yourself and nail it on the first try!
What is a Grandma Pizza?
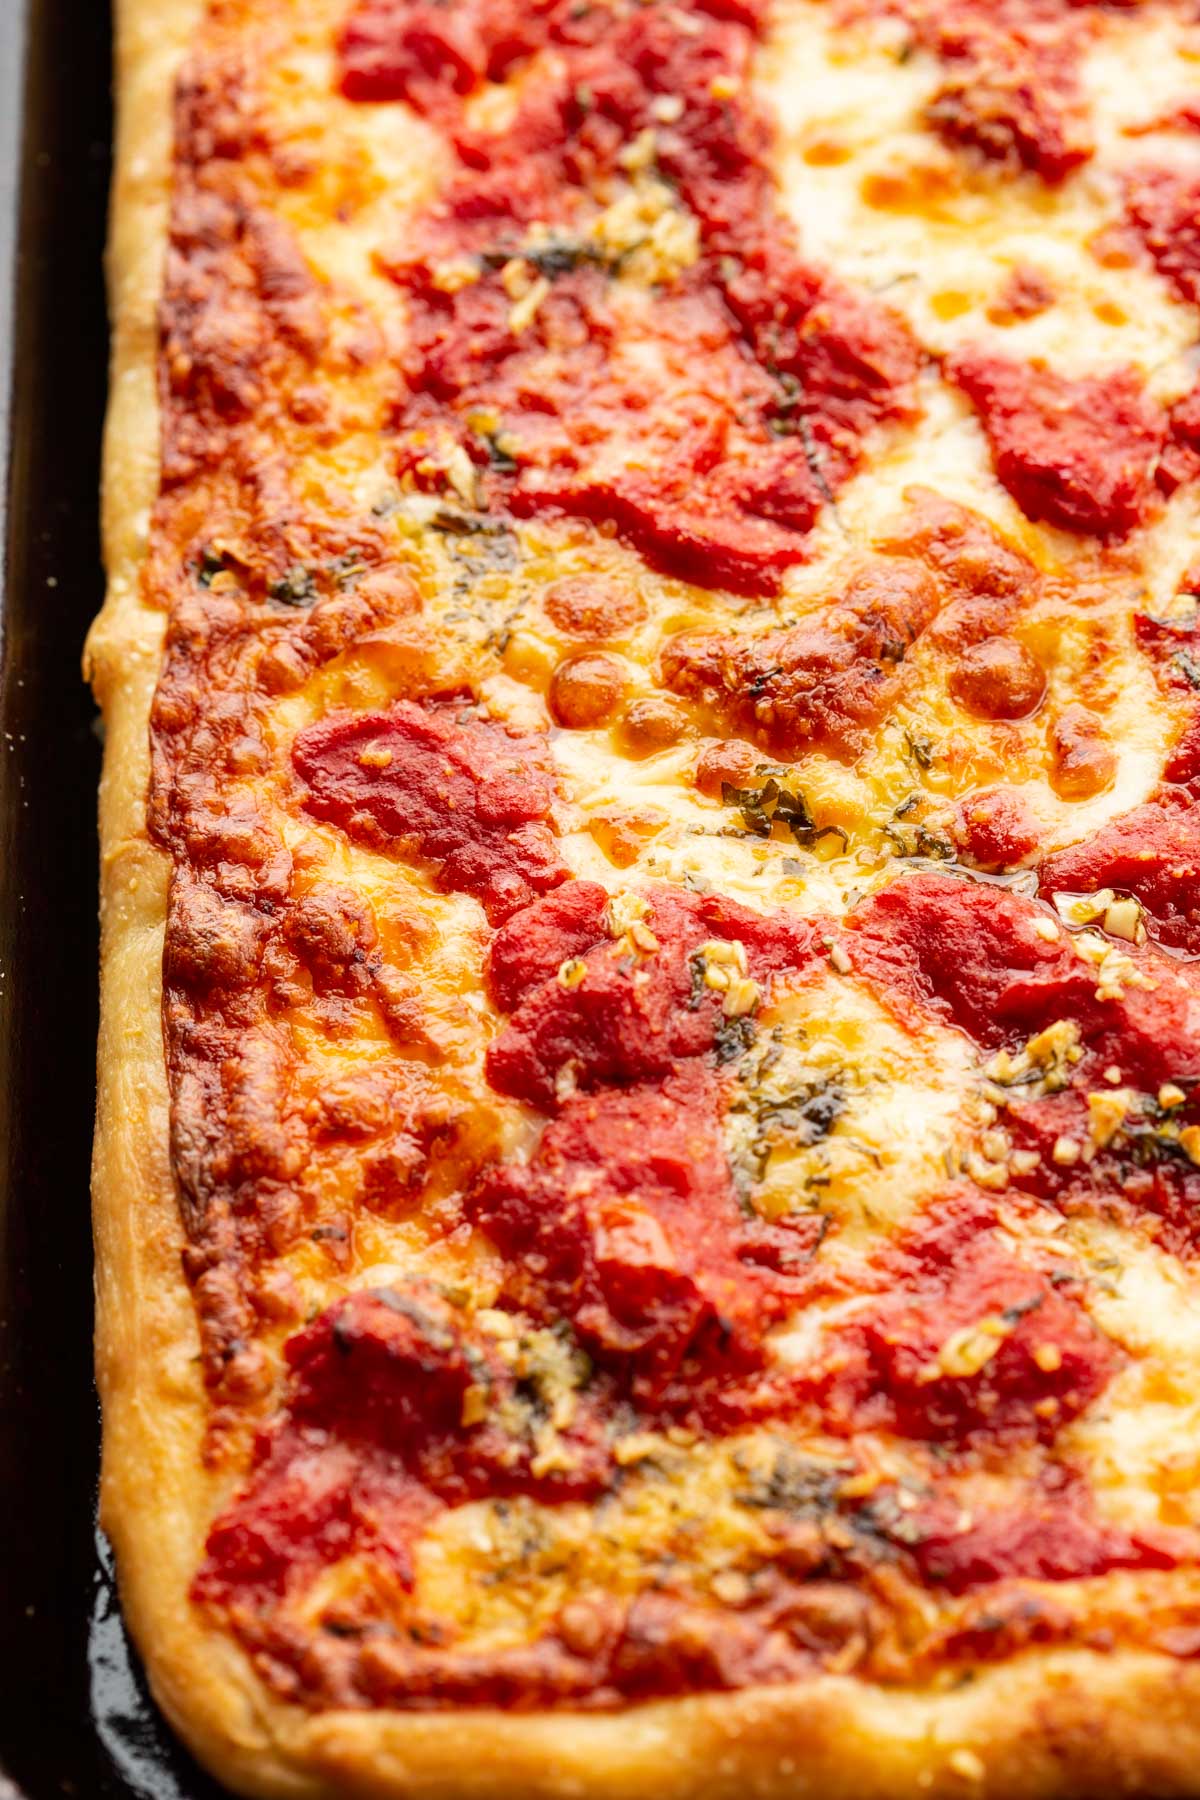
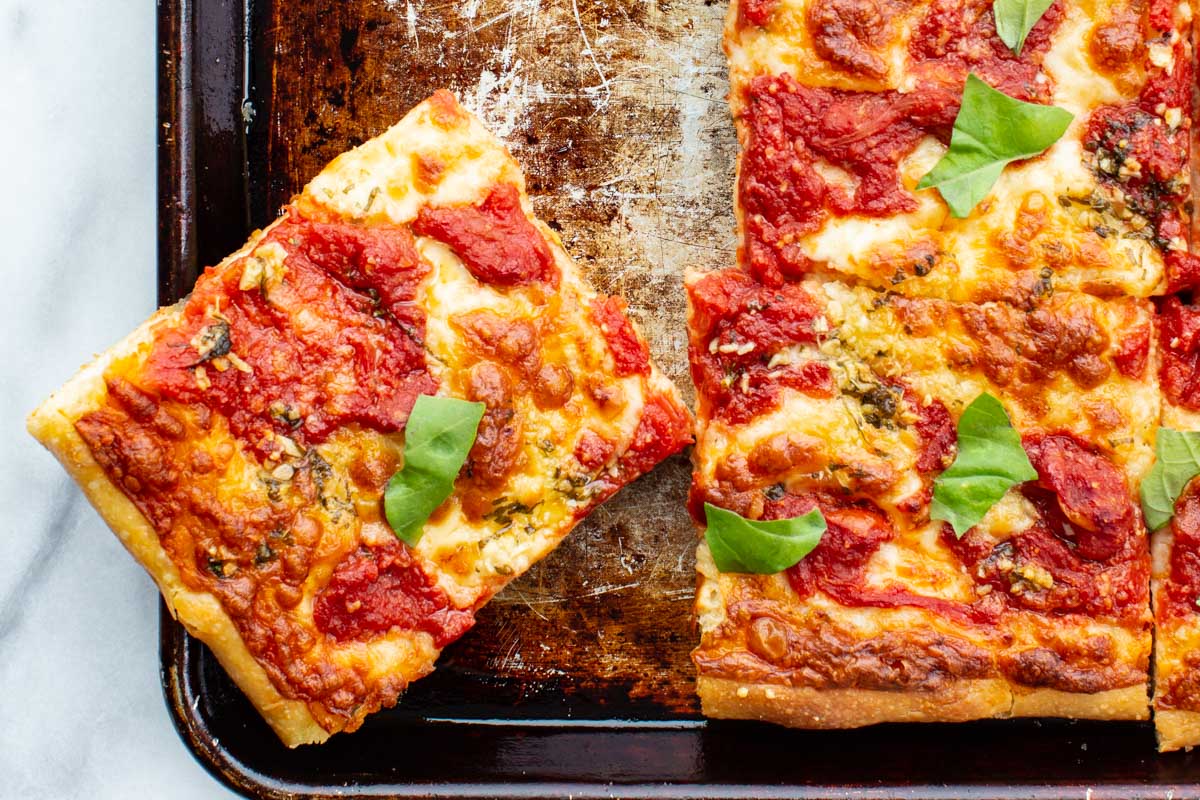
Grandma pizza is a rectangular-shaped pan pizza topped with a thick, chunky tomato sauce, garlic, and mozzarella cheese. It's similar to Sicilian pizza or sfincione, as it's known in Sicily, but it has a thinner crust, although not as thin as New York-style or Neapolitan pizza. It's said to have originated in Long Island and is popular around New York and New Jersey.
The Best Grandma Pizza
Like all good recipes, to make the best grandma pizza, you must use the best ingredients you can find.
The Sauce
This recipe uses a strained can of tomatoes, so you can add big chunks without weighing down the pizza and making it soggy.
Since a grandma pie should have big pockets of sauce with visible chunks of tomatoes, it will be thicker and less smooth than my classic pizza sauce recipe.
Even with great canned tomatoes, I find they still benefit from a teaspoon or two of sugar to liven them up and bring out their natural flavor.
The Cheese
As for the mozzarella, I go back and forth between using slices from the deli and tearing off pieces from a big hunk.
They both have their benefits: the slices cover more evenly and you can take them right to the edge so they get lacy and crisp on the crust, but the chunks create better cheesy pockets throughout.
You can't go wrong either way, it's just a matter of preference. However, don't use fresh mozzarella, as the excess moisture will make the crust soggy.
The Crust
This recipe is a labor of love and is best after letting the dough rest for a good 24-48 hours in the fridge. This allows it to slowly develop its gluten and ferment, which results in a perfectly light texture with a slight chew, big air bubbles and a really nice taste.
You can go as little as 12 hours, and while you will sacrifice some of those benefits, it will still be a pretty good pizza nonetheless.
I've found using weight measurements for this dough is the way to go. It ensures consistent results, rather than volume measurements, which can vary. I highly recommend using a kitchen scale if possible.
Grandma pizza needs a lot of olive oil to get that signature crisp crust. The dough basically fries, which makes it shatteringly crisp and almost buttery.
It's important to bake on the bottom rack of the oven so it actually gets nice and golden, otherwise the top will cook before the bottom has a chance to get thoroughly crisp. That said, all ovens work a little bit differently so you may need to mess around a few times before you get it just right.
Want more delicious pizza recipes? Try a classic Neapolitan pizza margherita, an authentic Neapolitan pizza marinara or a cheesy and elegant white pizza bianca.
Why This Recipe Works
- A clear, step-by-step method to make the best homestyle pizza!
- The dough is cold fermented for over 24 hours to create deep flavor and a light, chewy, and fluffy texture.
- A generous amount of olive oil and baking on the lower rack of the oven create a golden, crisp bottom.
- Straining the tomatoes and seasoning them with salt and sugar makes a thick, chunky, vibrant sauce.
- Weighing the ingredients on a scale guarantees the best results.
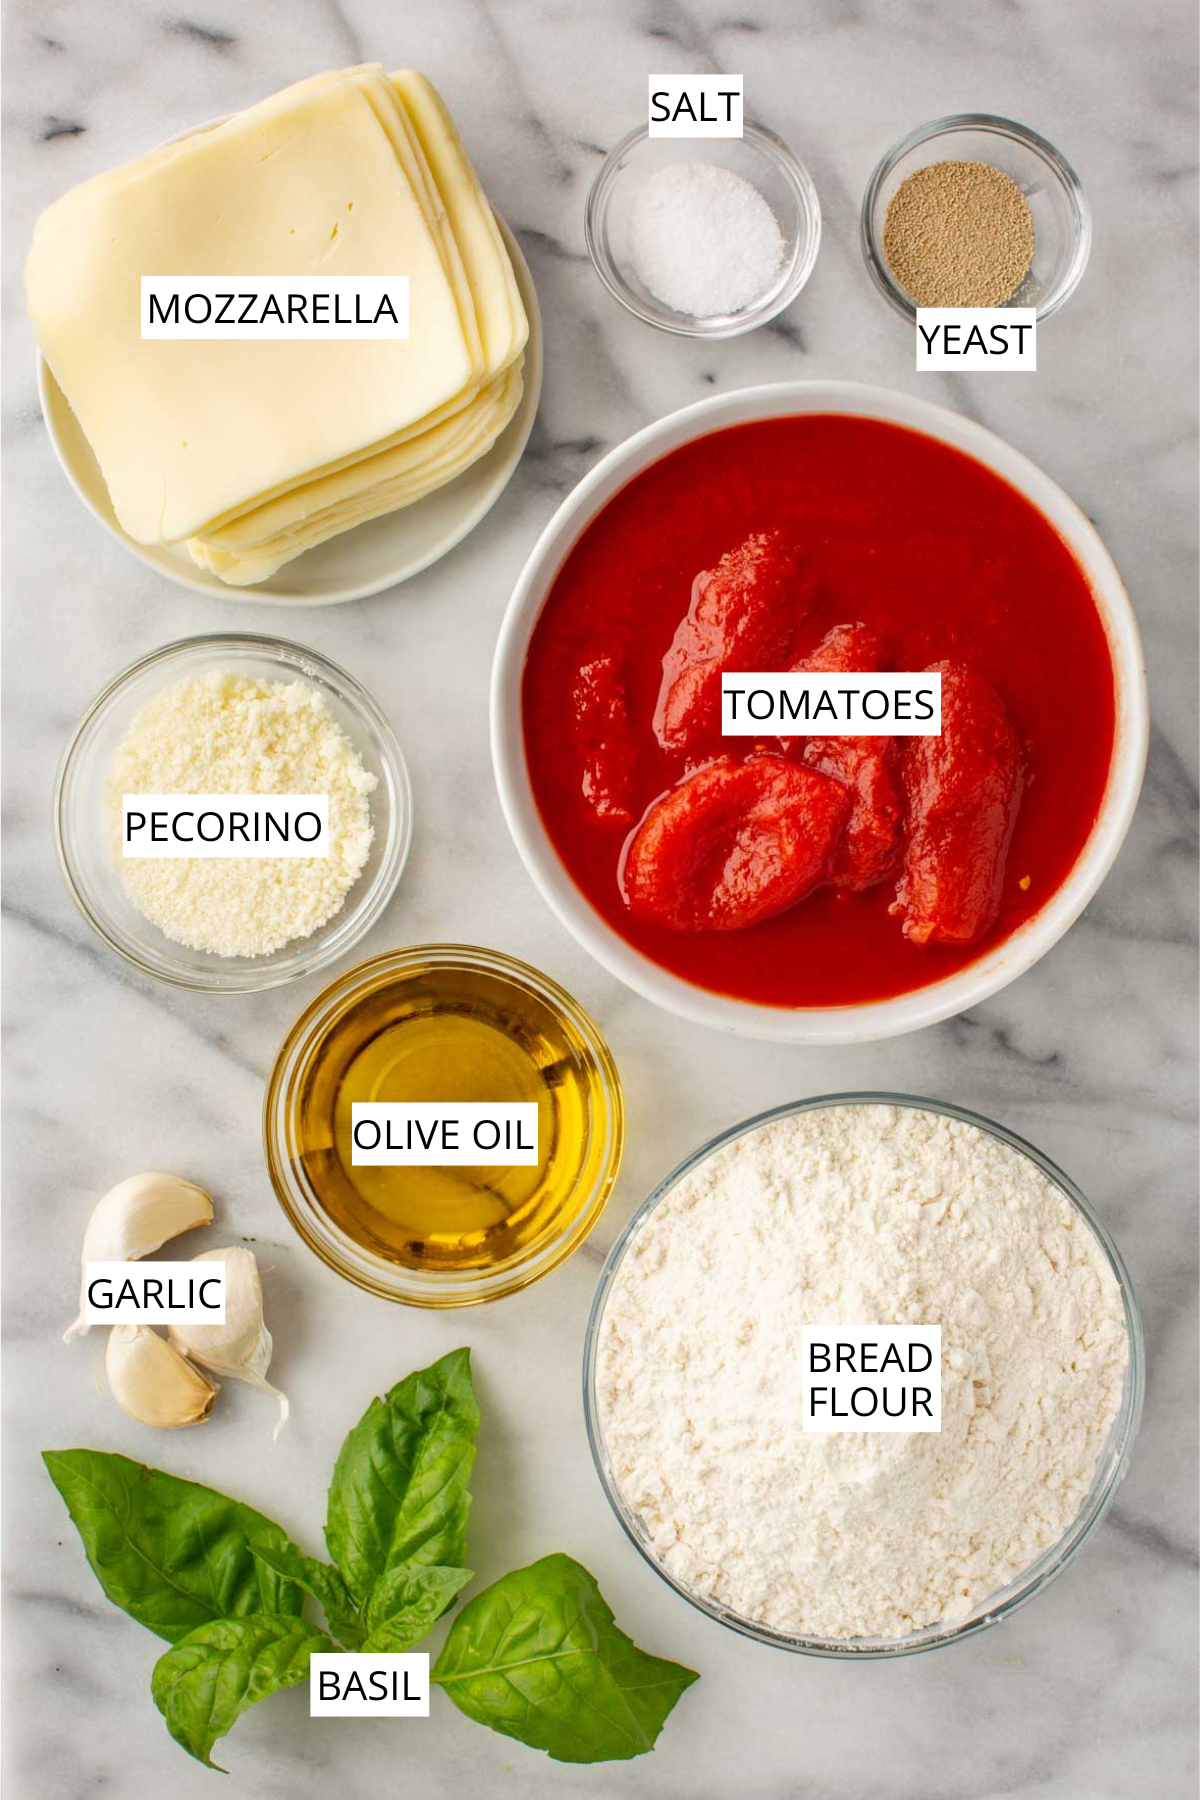
Grandma's Pizza Ingredient Notes
Bread flour - Bread flour has a higher protein and gluten content that helps create a more elastic, structured, chewy texture in the dough, which is achieved through slow fermentation in the fridge. You can replace it with all-purpose, but it won't have quite the same texture and chew.
Tomatoes - Use a can of the best whole peeled tomatoes you can find, such as San Marzano DOP or other good quality plum tomatoes, like Roma or Amish Paste. Crush them by hand and strain to remove excess liquid, then taste and adjust with a little bit of sugar if they're not sweet enough.
Mozzarella - Look for whole milk low-moisture mozzarella. You can either use slices from the deli or torn pieces from a big hunk. They create different textures, but both are great. Avoid using fresh mozzarella, which contains too much moisture and will make the crust soggy.
Basil - If you don't have fresh basil, you can use some good dried oregano, like Sicilian oregano, instead. It will have a different flavor but still be delicious. You can also use both!
Olive oil - Using a high-quality extra virgin olive oil will make your grandma pizza the best it can be. Learn how to choose the right one in my guide to Italian olive oils.
Salt - I always use Diamond brand Kosher salt in my recipes. If using iodized table salt, dial it back slightly.
Pecorino Romano - Always choose high-quality Pecorino Romano, such as Locatelli. Parmigiano is also a great alternative for a sweeter, nuttier bite. See my guide to Italian cheeses for more information.
*Find the full ingredient list in the recipe card below!
Helpful Equipment
- Large bowl
- Large sheet pan or grandma pizza pan
- Oven
- Small bowl
- Strainer
- Pizza baking steel or stone
How to Make Grandma Style Pizza
Make the Dough
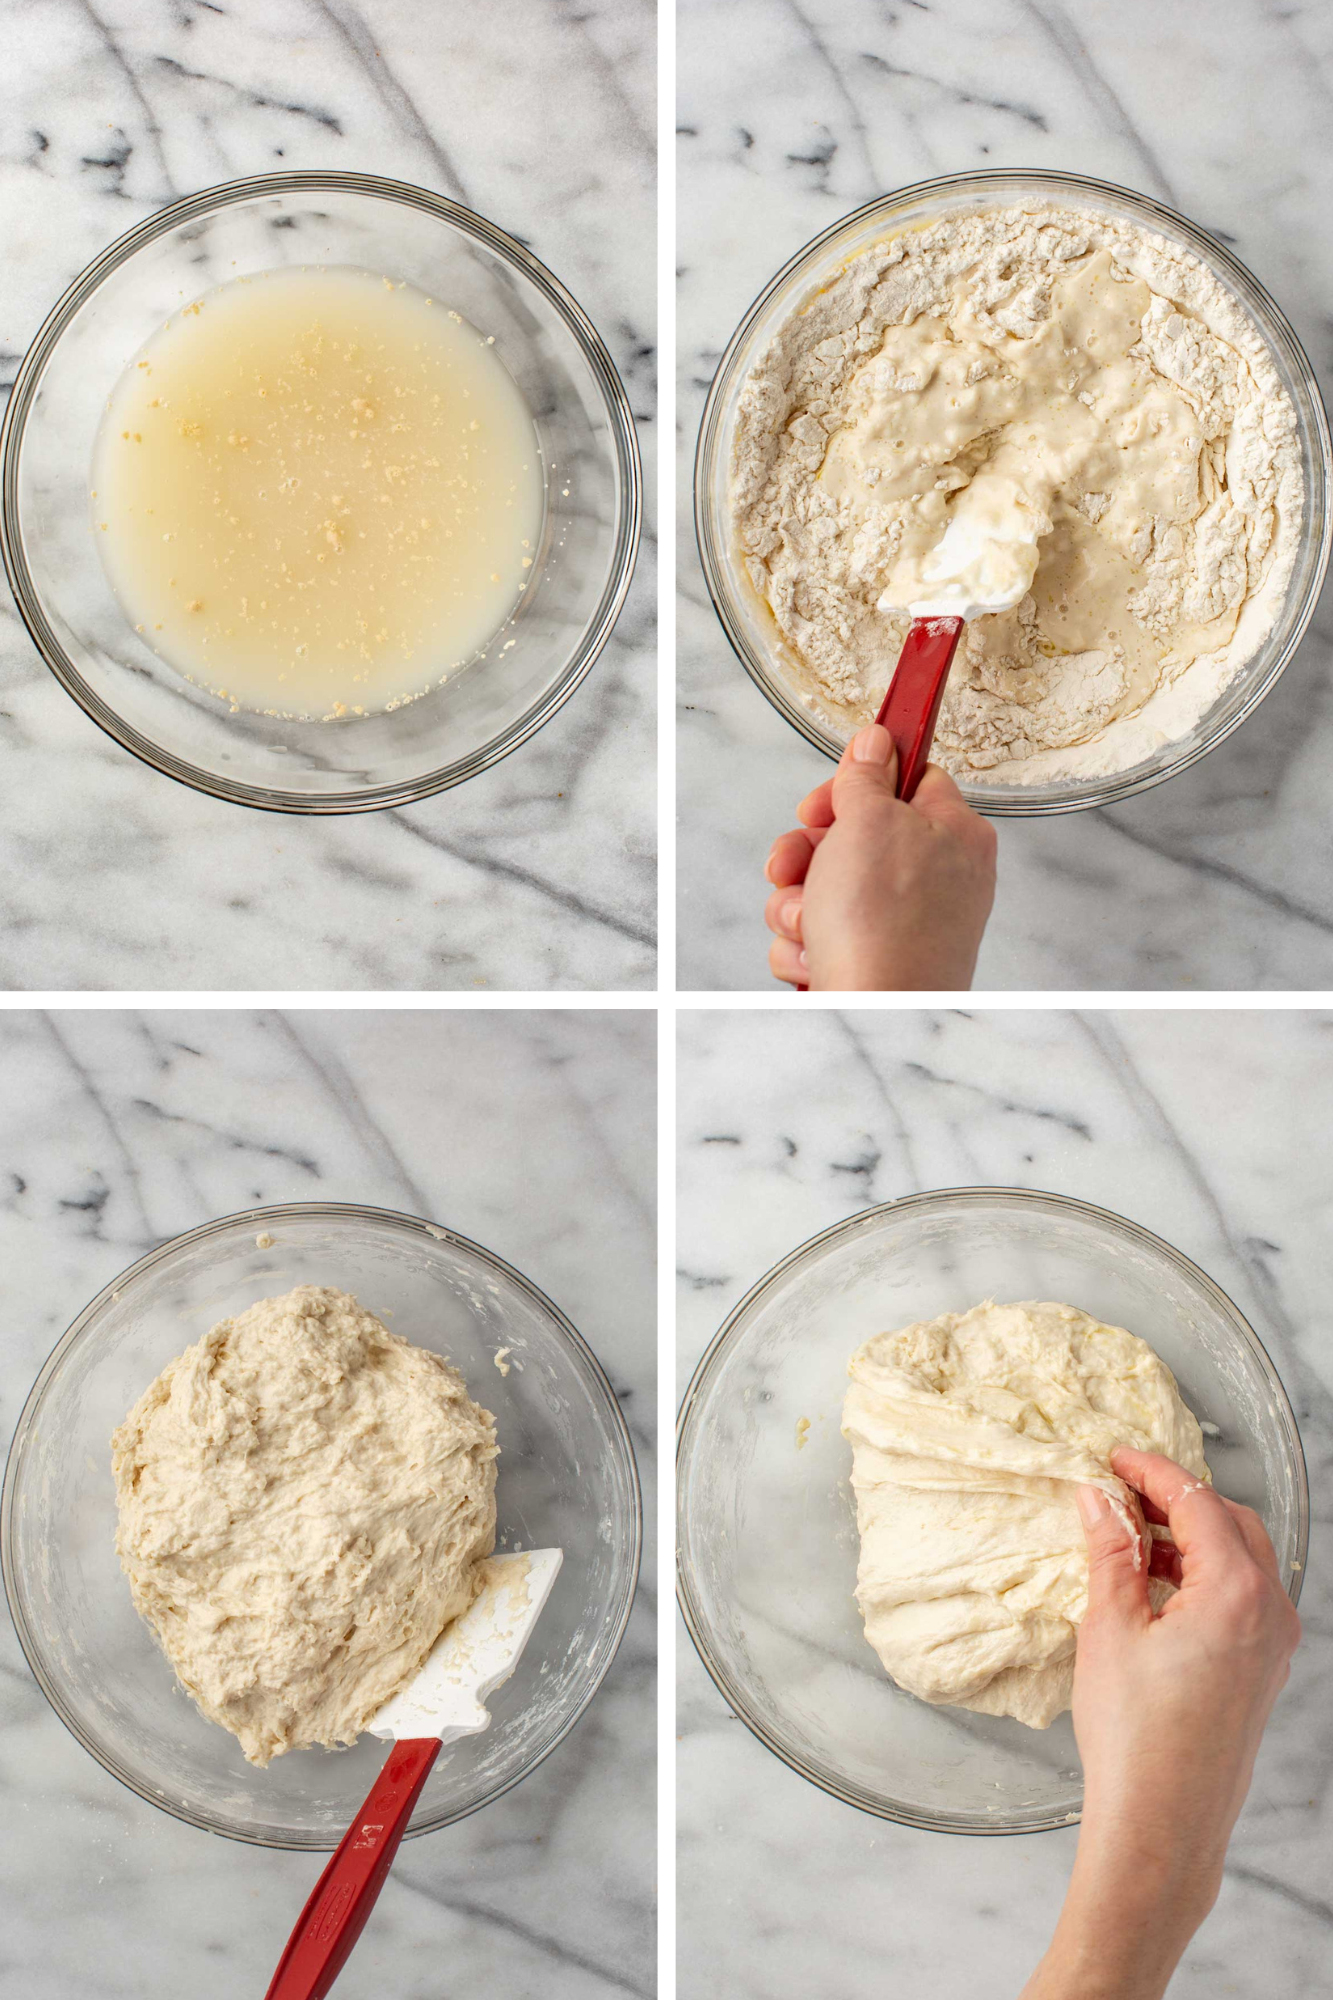
- In a large bowl, combine the water, yeast and sugar. Stir briefly and let sit for about 2 minutes to bloom the yeast.
- Add the flour, salt and olive oil, then mix until the dough looks cohesive and slightly elastic, about 1 minute. It should feel tacky but not sticky or dry.
- Cover and let it rest for 15-20 minutes to allow the flour to fully hydrate.
- With lightly oiled hands, perform a set of folds by pulling one side of the dough up and folding it over itself. Rotate the bowl and repeat on all four sides, then flip the dough seam-side-down. Let it rest for 15-20 minutes, then repeat this folding process two more times, resting 15-20 minutes between each set, for a total of three sets.
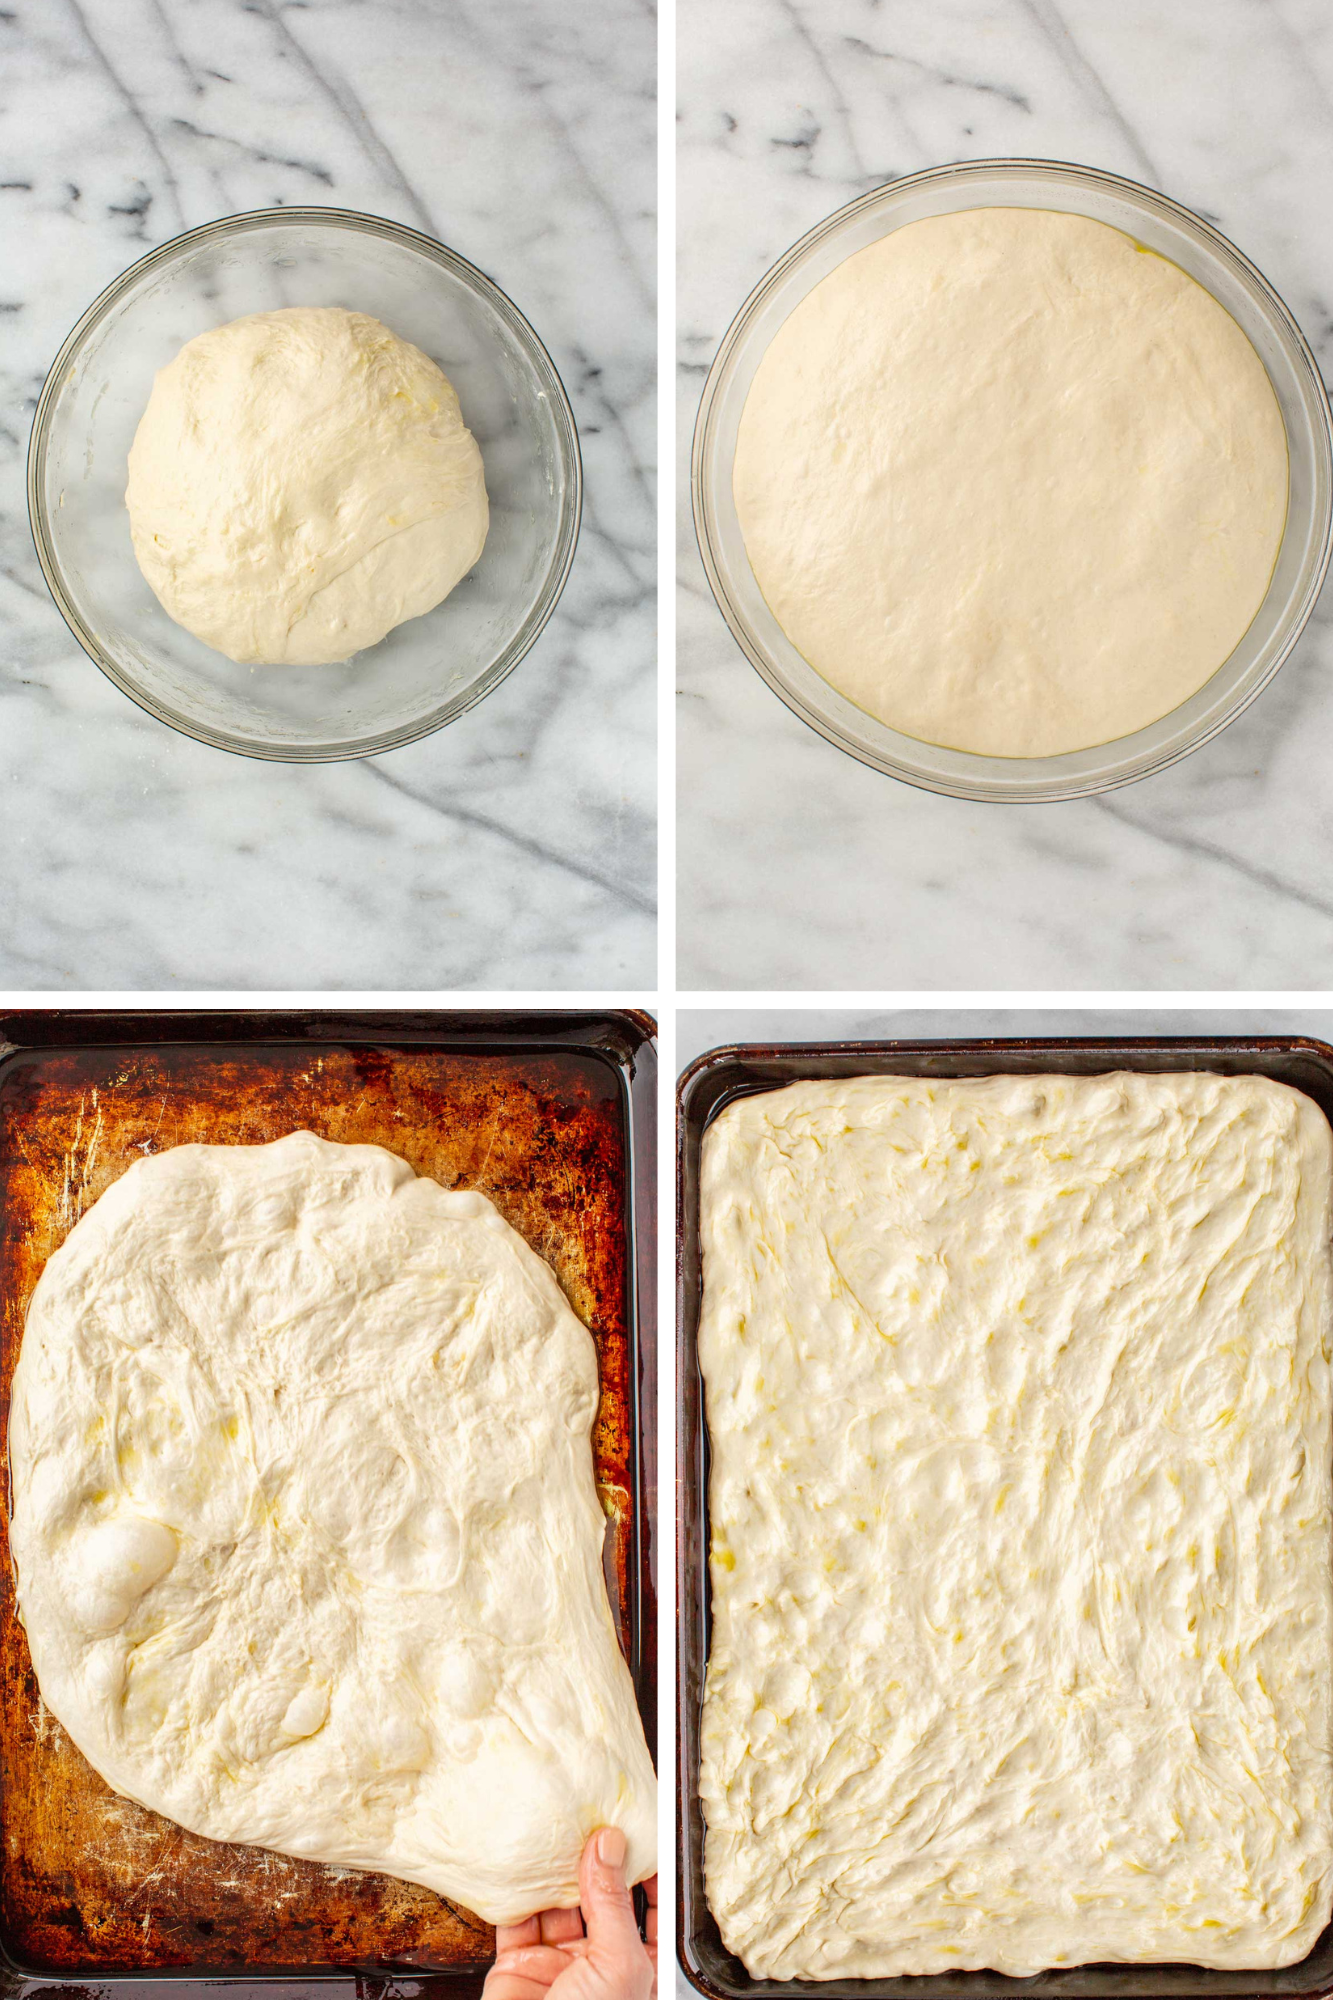
- After the final fold, cover the dough and let it sit at room temperature for about 25 minutes, just until it looks slightly puffy and alive, but not doubled.
- Transfer the dough to the refrigerator and let it cold ferment for at least 24 hours and up to 48 hours for deeper flavor.
Pro Tip: Cold fermenting the dough for 24 hours in the fridge will produce a nice, flavorful crust with great texture, but 48 hours will be even better!
Make the Pizza
- On baking day, remove the dough from the refrigerator and let it sit at room temperature for about 60 to 90 minutes, until it's no longer cold, looks relaxed and slightly puffy.
- Pour ¼ cup of olive oil into a dark metal sheet pan and tilt to coat evenly.
- Gently transfer the dough into the pan and flip once so both sides are lightly coated in oil. Using lightly oiled fingertips, press the dough into a loose rectangle. Do not force it to the edges. Cover and let it rest for 15 minutes.
- Press again, gently stretching the dough closer to the corners. If it resists, let it rest another 15 minutes and try again. Once it fills the pan or is very close, cover and let proof for 30-45 minutes, until the dough looks relaxed and lightly bubbly under the surface.
Pro Tip: If the dough doesn't reach all the way to the corners, don't sweat it. It will still turn out great!
- Preheat the oven to 500°F with racks set in both the lower and middle positions.
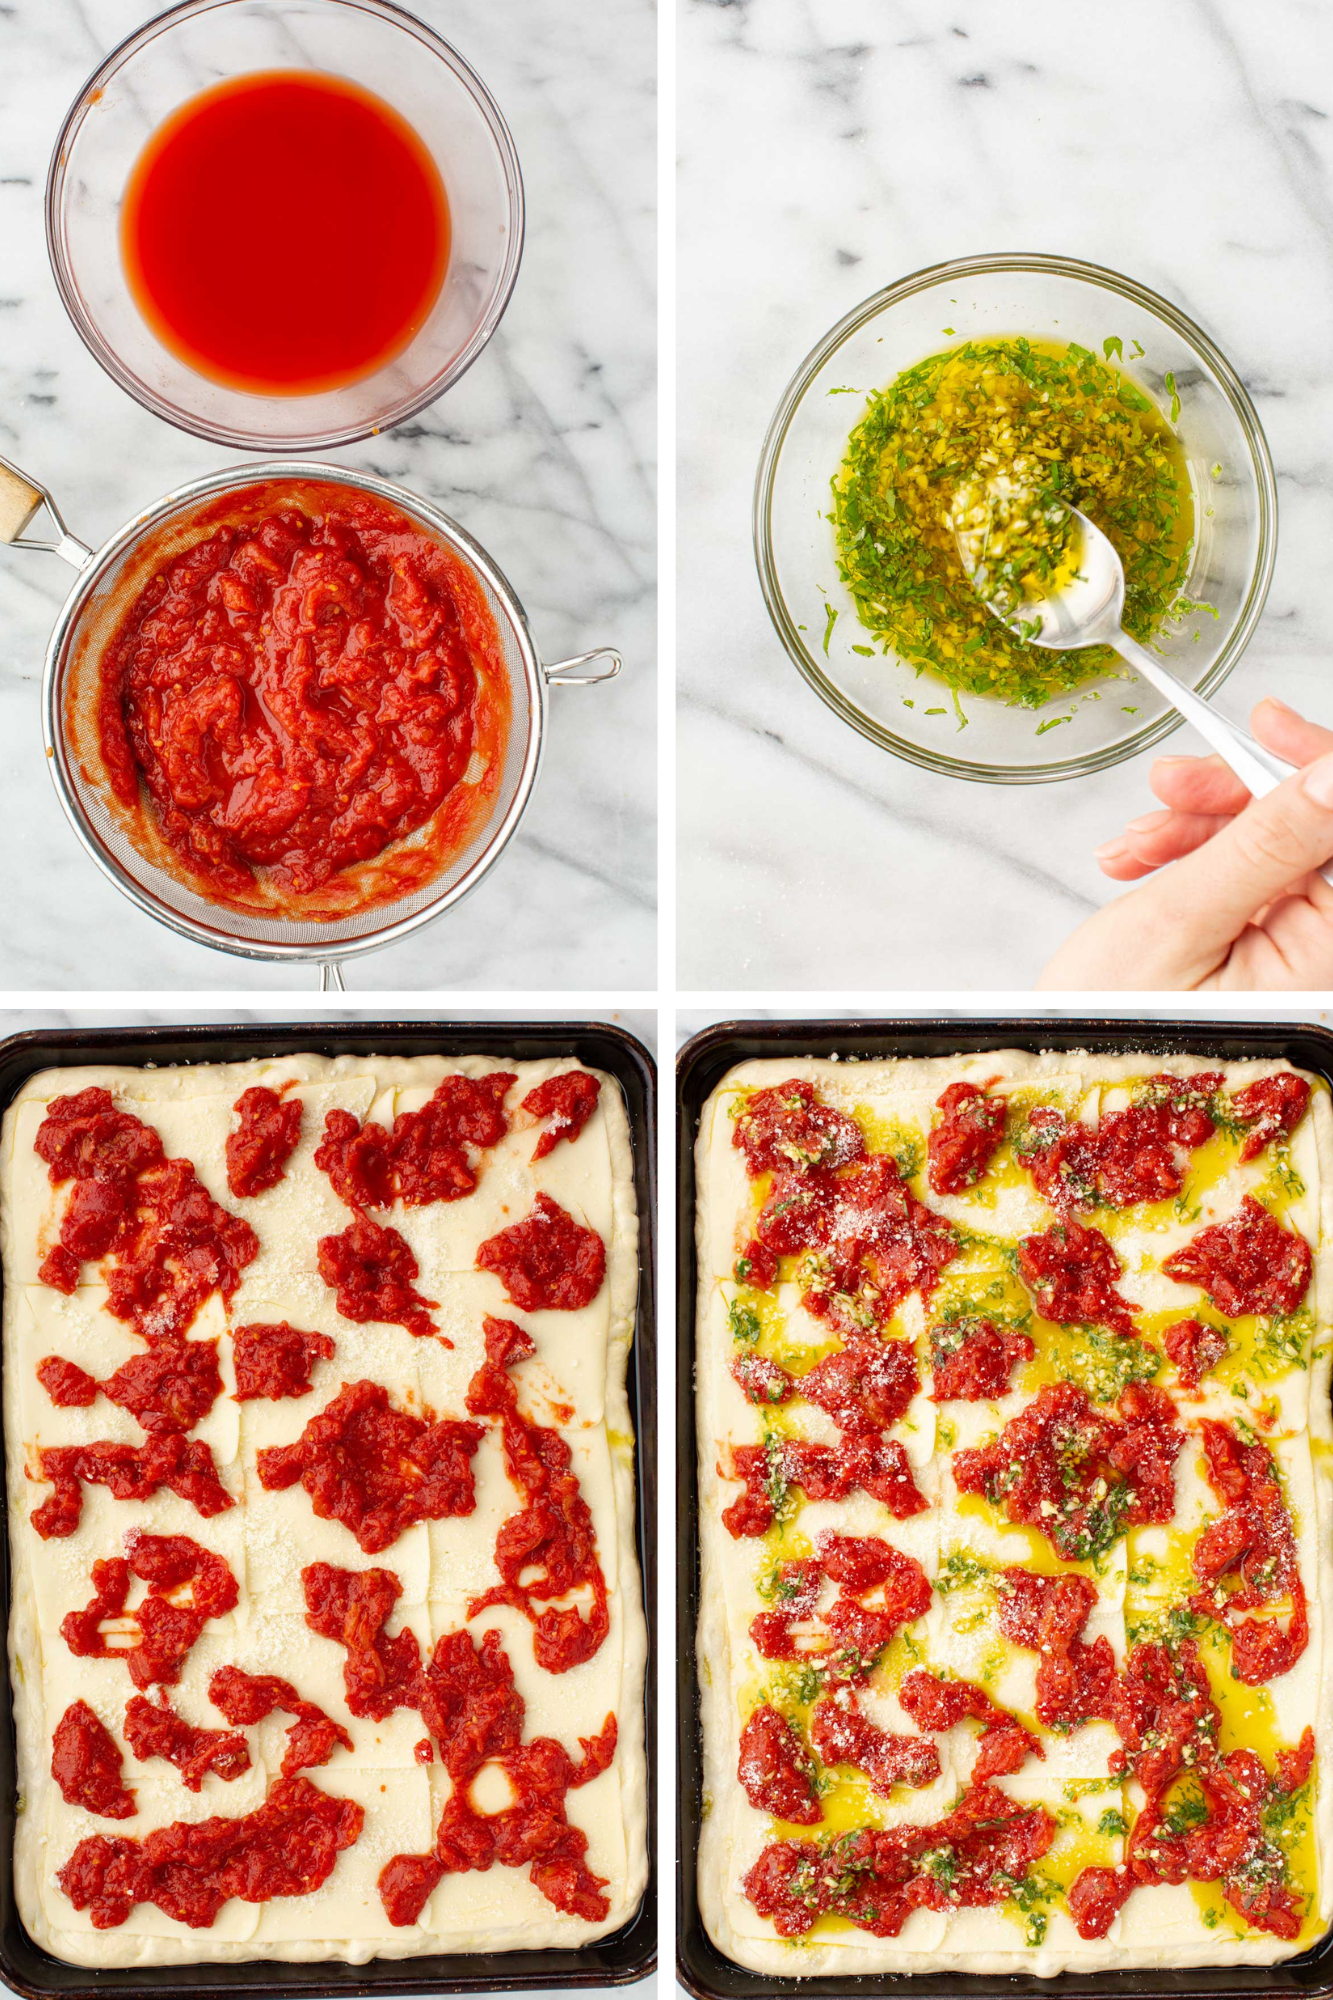
- Add the tomatoes to a strainer set over a bowl, then use your hands to crush them into pieces. Let drain for about 20 minutes, then mix with salt and sugar. Taste and adjust as needed.
Pro Tip: The tomatoes need to be well-drained or else they will make the dough soggy. Don't skip this step!
- In a small bowl, mix together the garlic, basil, the remaining ¼ cup of olive oil and a small pinch of salt.
- When the dough is ready, distribute the mozzarella over the dough, covering up as much of it as possible, but leaving a small outer edge for the crust.
- Spoon the tomatoes over the cheese in chunks. Don't spread it out evenly, leave some pieces of cheese exposed.
- Spoon the garlic basil oil over the top, then sprinkle all over with Pecorino Romano.
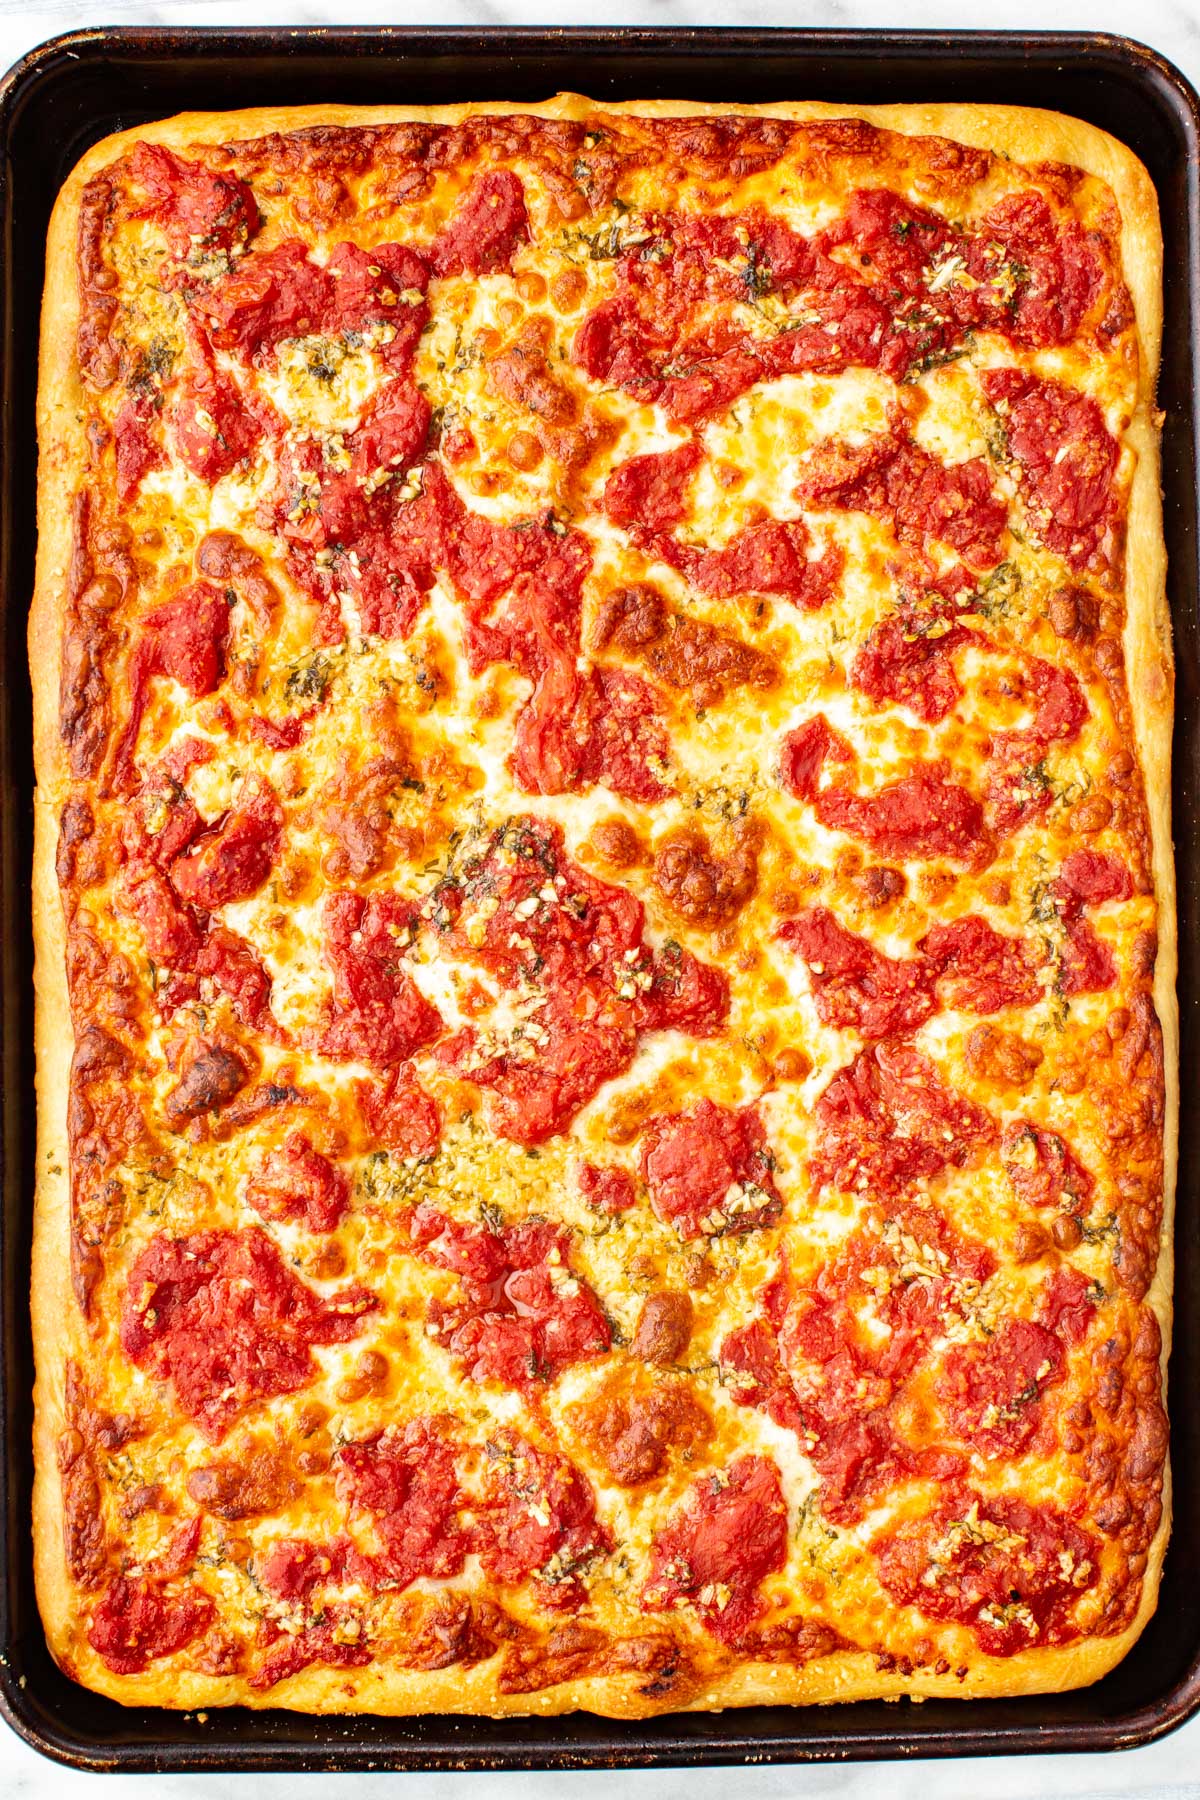
- Lower the oven to 475°F, then bake the pizza on the lower rack for about 18-20 minutes, rotating the pan once halfway through, until the bottom is deeply golden and the edges are crisp. If needed, bake an extra 2-3 minutes to ensure the center is fully set and crisp underneath.
Pro Tip: If the bottom is getting too dark before the top, move it up to the middle rack for the remainder of cooking.
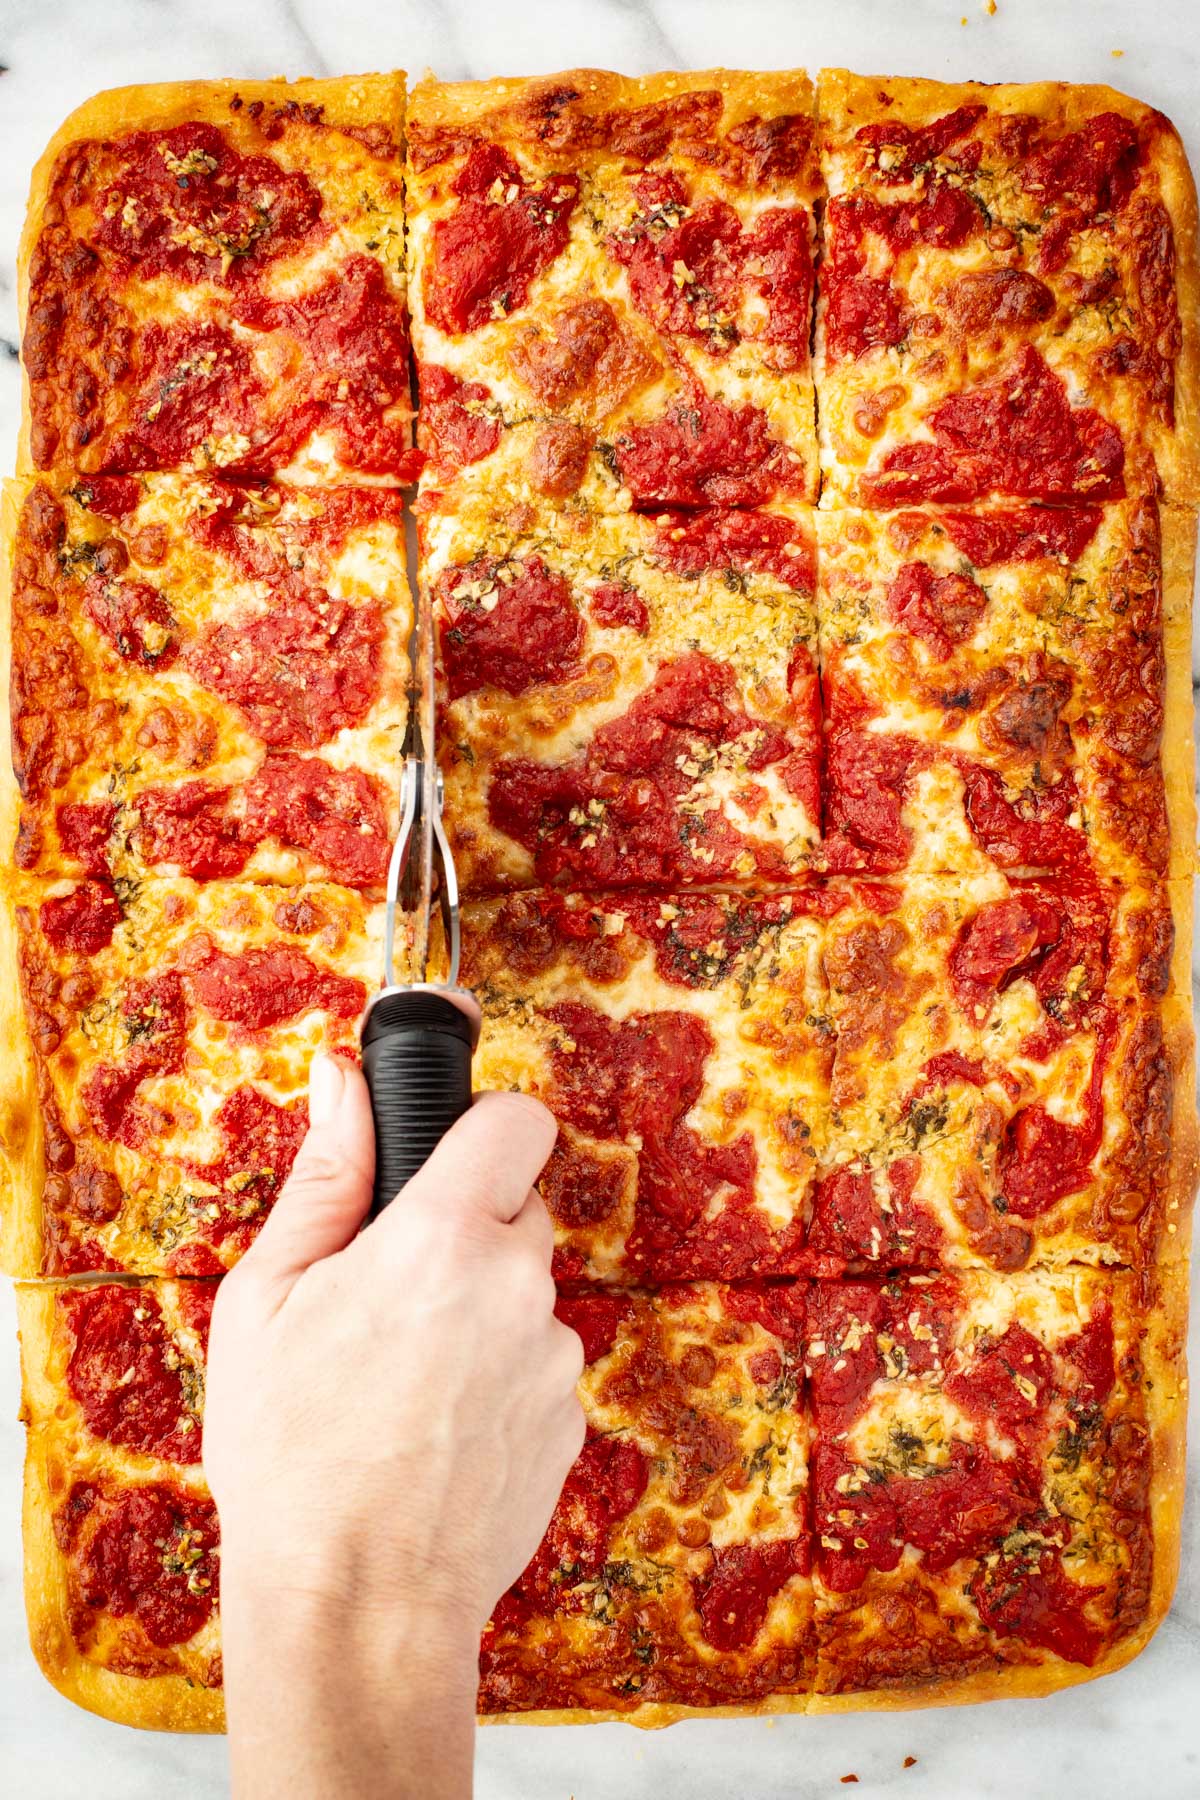
- Let rest for 3-4 minutes, then slice and serve.
Coley's Tips For Success
- Grandma pizza needs a lot of oil to create that signature, crisp crust. Don't use less!
- Don't force the dough when pressing it into the pan. If it snaps back or resists, give it 10 more minutes. Forcing it will lead to uneven thickness and tearing, which affects the texture.
- The quality and sweetness of your tomatoes matter here. Taste them, and if they are lacking, add a pinch or two more sugar as needed.
- Baking on the bottom rack of your oven gives the bottom of the pan direct heat, which is essential for browning the crust. Use a preheated pizza stone or baking steel for even better results.
Toppings for Grandma Style Pizza
- Add any of your favorite pizza toppings like pepperoni, Italian sausage, salami, peppers and onions, olives or anchovies on top before baking.
- Drizzle your grandma pizza with homemade basil oil. You can even replace the regular garlic olive oil and use this instead.
- Add some heat with these roasted Italian long hot peppers or a little sweetness with homemade roasted red peppers, this slow roasted tomato confit, or roasted garlic.
What to Serve with Grandma Pizza
This delicious grandma pizza is perfect on its own, but a nice side salad will make it a full meal!
Serve it with an easy arugula salad with pine nuts and parmesan, an authentic Caprese salad with fresh mozzarella if tomatoes are in season, or a traditional Caesar salad made tableside for a fun addition to pizza night!
How to Store and Reheat Homemade Pizza
Store leftovers wrapped tightly in plastic wrap, or in an airtight container in the fridge for 3-4 days or in the freezer for up to 2 months.
To reheat, place a skillet over medium heat. Add the pizza (thawed if previously frozen) and a splash of water on the side (not on top), and cover with a lid for 2-3 minutes. The bottom will crisp up and the water will create steam to melt the cheese. You can also reheat in a 400°F preheated oven for 5-10 minutes.
FAQs
Both are similar, rectangular pizzas with tomato sauce, but Sicilian pizza or sfincione has a thicker crust, while grandma pizza tends to be thinner, although not as thin as Neapolitan or New York-style pizza. Traditional Sicilian sfincione is usually topped with onions, anchovies, breadcrumbs and caciocavallo cheese, while American-style Sicilian pizza is usually topped more simply like a typical New York-style pie with just sauce and cheese. A grandma pizza, on the other hand, is known for having a thicker chunkier tomato sauce, and garlic oil along with mozzarella, basil and oregano.
Yes, grandma pizza is a good canvas for other kinds of toppings, like pepperoni, Italian sausage, peppers and onions, or anchovies. Use ingredients that complement the traditional thick tomato sauce layer, garlic oil and cheese.
Yes, grandma pizza is made to be baked in a home oven on a large sheet pan. No pizza oven, baking stone or steel required. It's one of the easiest pizza recipes to prepare at home.
Grandma pizza uses a yeasted dough more similar to focaccia than a New York style pizza crust. It's fluffy and chewy but still holds together and creates a crispy texture when baked in a pan with plenty of olive oil. The dough is slowly fermented for over a day in the fridge to develop gluten and flavor, as well as structure and lightness.


Did you LOVE this recipe? Please leave a star ⭐️ rating and comment and tag your creations @ColeyCooks on Instagram!
Want to Save This Recipe?
Enter your email & I'll send it to your inbox.
By submitting this form, you consent to receive emails from Coley Cooks.

Grandma Pizza Recipe
Ingredients
For the Dough
- 330 grams lukewarm water or 1 ⅓ cups plus 1 tablespoon
- 4 grams active dry yeast or 1 ¼ teaspoons
- 7 grams granulated sugar or 1 ½ teaspoons
- 12 grams kosher salt or 2 ¼ teaspoons *see note
- 500 grams bread flour or 4 cups
- 15 grams extra virgin olive oil or 1 tablespoon
For the Pizza
- 1 28-ounce can whole peeled tomatoes
- 1 teaspoon kosher salt or to taste
- 1 teaspoon sugar
- 3 cloves garlic minced
- ½ cup extra virgin olive oil divided
- 1 handful basil leaves fresh, torn or thinly sliced, plus more finishing
- 12 ounces mozzarella low-moisture whole milk, sliced, grated or torn into pieces
- ¼ cup Pecorino Romano grated
Instructions
Make the Dough
- In a large bowl, combine the water, yeast and sugar. Stir briefly and let sit for about 2 minutes to bloom the yeast.
- Add the flour, salt and olive oil, then mix until the dough looks cohesive and slightly elastic, about 1 minute. It should feel tacky but not sticky or dry.
- Cover and let it rest for 15-20 minutes to allow the flour to fully hydrate.
- With lightly oiled hands, perform a set of folds by pulling one side of the dough up and folding it over itself. Rotate the bowl and repeat on all four sides, then flip the dough seam-side-down. Let it rest for 15-20 minutes, then repeat this folding process two more times, resting 15-20 minutes between each set, for a total of three sets.
- After the final fold, cover the dough and let it sit at room temperature for about 25 minutes, just until it looks slightly puffy and alive, but not doubled.
- Transfer the dough to the refrigerator and let it cold ferment for at least 24 hours and up to 48 hours for deeper flavor.
Make the Pizza
- On baking day, remove the dough from the refrigerator and let it sit at room temperature for about 60 to 90 minutes, until it's no longer cold, looks relaxed and slightly puffy.
- Pour ¼ cup of olive oil into a dark metal sheet pan and tilt to coat evenly.
- Gently transfer the dough into the pan and flip once so both sides are lightly coated in oil. Using lightly oiled fingertips, press the dough into a loose rectangle. Do not force it to the edges. Cover and let it rest for 15 minutes.
- Press again, gently stretching the dough closer to the corners. If it resists, let it rest another 15 minutes and try again. Once it fills the pan or is very close, cover and let proof for 30-45 minutes, until the dough looks relaxed and lightly bubbly under the surface.
- Preheat the oven to 500°F with racks set in both the lower and middle positions.
- Add the tomatoes to a strainer set over a bowl, then use your hands to crush them into pieces. Let drain for about 20 minutes, then mix with salt and sugar. Taste and adjust as needed.
- In a small bowl, mix together the garlic, basil, the remaining ¼ cup of olive oil and a small pinch of salt.
- When the dough is ready, distribute the mozzarella over the dough, covering up as much of it as possible, but leaving a small outer edge for the crust.
- Spoon the tomatoes over the cheese in chunks. Don't spread it out evenly, leave some pieces of cheese exposed.
- Spoon the garlic basil oil over the top, then sprinkle all over with Pecorino Romano.
- Lower the oven to 475°F, then bake the pizza on the lower rack for about 18-20 minutes, rotating the pan once halfway through, until the bottom is deeply golden and the edges are crisp. If needed, bake an extra 2-3 minutes to ensure the center is fully set and crisp underneath. If the bottom is getting too dark before the top, move it up to the middle rack for the remainder of cooking.
- Let rest for 3-4 minutes, then slice and serve.
Notes
- Cold fermenting the dough for 24 hours in the fridge will produce a nice, flavorful crust with great texture, but 48 hours will be even better!
- If the dough doesn't reach all the way to the corners of the baking sheet, don't sweat it. It will still turn out great!
- Grandma pizza needs a lot of oil to create that signature, crisp crust. Don't use less!
- Don't force the dough when pressing it into the pan. If it snaps back or resists, give it 10 more minutes. Forcing it will lead to uneven thickness and tearing, which affects the texture.
- The tomatoes need to be well drained or else they will make the dough soggy. Don't skip this step!
- The quality and sweetness of your tomatoes matter here. Taste them, and if they are lacking, add a pinch or two more sugar as needed.
- Baking on the bottom rack of your oven gives the bottom of the pan direct heat, which is essential for browning the crust. Use a preheated pizza stone or baking steel for even better results.
- If the bottom of the pizza is getting too dark before the top, move it up to the middle rack for the remainder of cooking.